


Make a Chic Crochet Gourmet Beret — Chunky Beret Pattern & Finishing Tips

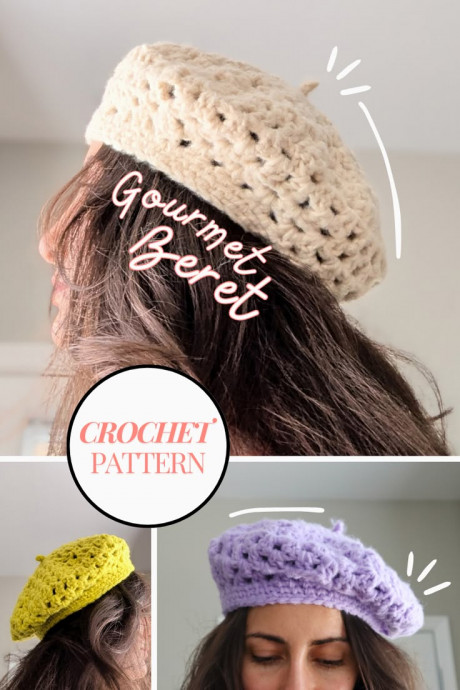
The Crochet Gourmet Beret is a stylish, cozy accessory worked from a hexagon motif out to a slouchy beret with a neat waistcoat-stitch brim and a classic nubbin on top. This pattern uses bulky yarn and a large hook for a soft, lofty fabric. It’s a great project for crocheters who are comfortable with basic stitches, reading rounds, and working simple decreases.
Materials
- Bulky weight yarn (I used Bernat Fluffee for its light and lofty texture)
- 7mm hook (US size K)
- Scissors
- A smaller hook for weaving in ends
Abbreviations
- ch = chain
- dc = double crochet
- sc = single crochet
- sl st = slip stitch
- ch sp = chain space
- dc3tog = double crochet 3 together (decrease)
Overview
The beret is made by starting with a hexagon motif (the top), increasing in a regular corner/side pattern to build the crown, then working shaped decrease rounds to form the slouch before adding a fitted waistcoat-stitch brim. A small nubbin is made separately and sewn on at the end.
Pattern
Top of the Beret (Hexagon Motif)
Round 1: Start with a slipknot, ch 4, sl st to first ch to form a ring. Ch 3 (counts as 1 dc), 1 dc in ring, *ch 1, 2 dc in ring; repeat from * 4 more times, ch 1, sl st to top of beginning ch-3. (6 sets of 2-dc clusters with ch-1 between)
Round 2: Ch 3, turn, 1 dc in the ch sp below, ch 1, 2 dc in the same ch sp, ch 1. *2 dc in next ch-1 sp, ch 1, 2 dc in same sp (corner made), ch 1*; repeat from * around, sl st to top of starting ch-3. (6 corners)
Rounds 3-6: Ch 3, turn. 1 dc in the ch sp below, ch 1. *work a corner (2 dc, ch 1, 2 dc) into the corner ch sp, ch 1. 2 dc, ch 1 into regular ch 1 spaces*; repeat from * around, ending with sl st to top of starting ch-3.
Shaping the Beret
Round 7 (No Increase Round): Ch 3, turn. 1 dc in the ch sp below, ch 1, *2 dc in next ch-1 sp, ch 1*; repeat from * around, sl st to top of starting ch-3.
Decrease Round 1: Ch 3, turn. 1 dc in the ch sp below. Counting that first 2 dc cluster, work a total of 5 clusters with ch 1s between them. *dc3tog decrease across the next two ch spaces (work the center dc of the decrease between the 2 dc of the previous row). Then, work 10 2 dc clusters*; repeat from * until you’ve worked 3 dc3tog decreases total, then work 5 more 2 dc clusters. Sl st to the top of your starting ch 3 to complete the round.
Decrease Round 2: Ch 3, turn. 1 dc in the ch sp below. Counting that first 2 dc cluster, work a total of 10 clusters with ch 1s between them. *skip the next ch sp, then work 10 2 dc clusters*; repeat from * until one ch sp remains, sl st to the top of your starting ch 3, skipping that last chain space.
Decrease Round 3: Ch 3, turn. 1 dc in the ch sp below. Counting that first 2 dc cluster, work a total of 5 clusters with ch 1s between them. *skip the next ch sp, then work 9 2 dc clusters*; repeat from * until you’ve completed 3 decreases (skipping ch spaces) and 4 ch spaces remain, work 4 2 dc clusters and sl st to the top of your starting ch 3 to complete the round.
Decrease Round 4: Before chaining or turning, slip stitch into the top of the next dc and slip stitch to the next ch sp. Then, ch 2 and turn. Begin completing a dc3tog across the next 2 ch spaces. *Ch 1 and work a total of 7 clusters with ch 1s between them. dc3tog decrease across the next two ch spaces; repeat from * until you’ve worked 3 dc3tog decreases total, then work 7 more 2 dc clusters. Sl st to your first dc3tog to complete the round.
Brim
Round 1: Ch 1 (no need to turn) sc in the same st, *sc in next ch-1 sp, sc between the next 2 dc; repeat from * around, sl st to first sc. (You may work 1 sc in the dc3togs from the previous row as well)
Rounds 2-3 (Waistcoat Stitch): Ch 1, sc in center of each sc post around, sl st to first sc.
Fasten off.
Finishing Touch: The Nubbin
- With a new yarn, make a slipknot with a tail about hand-length long.
- Wrap the tail over the front of the hook, crossing it over the working yarn.
- Yarn over with the working yarn, pull through 2 loops.
- Repeat steps 2-3 twice more.
- Cut working yarn and pull through.
- Attach the nubbin to the top center of the beret, weaving both ends in opposite directions under the first round of stitches and secure tightly to close up the ch 4 ring.
Tips & Finishing
- Keep your tension loose on the brim rounds to make the waistcoat stitch easier.
- To adjust fit: add or subtract repeat rounds in the crown (Rounds 3–6) before shaping to make the beret larger or smaller. Work evenly so the hexagon shape remains balanced.
- Weave in ends securely and block lightly if needed to even out stitches.
Enjoy your Crochet Gourmet Beret — a quick, cozy accessory that adds a touch of classic flair to your wardrobe.
- Funny Pictures
-
 Weekly Treat of Funniest Parenting Memes for Good Laugh out Loud Right Now
-
 Really Funny Pics to End These Weekend Perfectly
-
 Incredibly Relatable Pics for Your Amusement
- Recipes
-
 Baked Sweet Potato Parmesan Tater Tots
-
 Saffron Lemon Chicken With Persian Rice
-
 Croatian Plum Dumplings
- Lifehacks
-
 Silt Crochet Stitch Photo Tutorial
-
 Crochet Mesh Stitch in Corner to Corner! A Lacy C2C Stitch Photo Tutorial
-
 Woven Shell Crochet Stitch Photo Tutorial
- Crochet Ideas
-
 DIY Crochet Mushroom Keychain — Easy Step-by-Step Pattern with Photos
-
 Make a Leafy Texture: Easy Crochet Sprig Stitch (Free UK Pattern)
-
 Free Crochet Sleep Mask Pattern — Cute DK Cotton Eye Mask (UK Terms, Advanced Beginner)
- DIY
-
 Cozy Crochet: Free Up-and-Down Stripe Cotton Washcloth Pattern (Quick & Easy)
-
 How to Make Realistic Crepe Paper Daffodils — Easy Step-by-Step DIY
-
 Make Adorable Easter Egg Bird Feeders — Easy DIY Seed Ornaments for Your Backyard
- Knitting Ideas
-
 Knit the Fish Scale Stitch: Easy 4-Row Pattern for a Textured, Scaly Look
-
 Knitted Camisole Party Frock — Vintage Pattern with Step-by-Step Instructions
-
 DIY Knitted Cuddly Cat Toy — Free Pattern & Step-by-Step Instructions