Crochet Gourmet Beret: A Perfect Blend of Style and Comfort

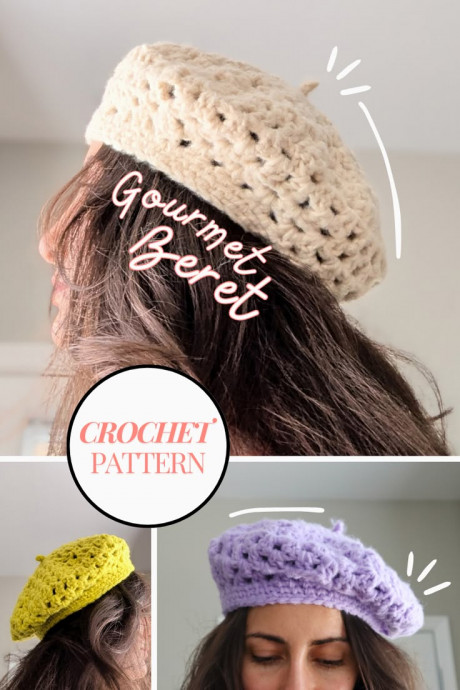
Oh, the Crochet Gourmet Beret is an absolute delight to wear!
With its stylish design and cozy feel, it adds a touch of elegance to any outfit. This charming beret is handmade with love and care, making it not only a fashion statement but also a unique piece of art. Whether you're strolling through the city streets or enjoying a leisurely brunch with friends, the Crochet Gourmet Beret is sure to turn heads and keep you looking fabulous! So go ahead, treat yourself to this lovely accessory and add a sprinkle of French flair to your wardrobe.
Materials
- Bulky weight yarn (I used Bernat Fluffee for its light and lofty texture)
- 7mm hook (US size K)
- Scissors
- A smaller hook for weaving in ends.
Abbreviations
- ch = chain
- dc = double crochet
- sc = single crochet
- sl st = slip stitch
- ch sp = chain space
- dc3tog = double crochet 3 together (decrease)
Pattern
Top of the Beret (Hexagon Motif)
Round 1: Start with a slipknot, ch 4, sl st to first ch to form a ring. Ch 3 (counts as 1 dc), 1 dc in ring, *ch 1, 2 dc in ring; repeat from * 4 more times, ch 1, sl st to top of beginning ch-3. (6 sets of 2-dc clusters with ch-1 between)
Round 2: Ch 3, turn, 1 dc in the ch sp below, ch 1, 2 dc in the same ch sp, ch 1. *2 dc in next ch-1 sp, ch 1, 2 dc in same sp (corner made), ch 1*; repeat from * around, sl st to top of starting ch-3. (6 corners)
Rounds 3-6: Ch 3, turn. 1 dc in the ch sp below, ch 1. *work a corner (2 dc, ch 1, 2 dc) into the corner ch sp, ch 1. 2 dc, ch 1 into regular ch 1 spaces*; repeat from * around, ending with sl st to top of starting ch-3.
Shaping the Beret
Round 7 (No Increase Round): Ch 3, turn. 1 dc in the ch sp below, ch 1, *2 dc in next ch-1 sp, ch 1*; repeat from * around, sl st to top of starting ch-3.
Decrease Round 1: Ch 3, turn. 1 dc in the ch sp below. Counting that first 2 dc cluster, work a total of 5 clusters with ch 1s between them. *dc3tog decrease across the next two ch spaces (work the center dc of the decrease between the 2 dc of the previous row). Then, work 10 2 dc clusters*; repeat from * until you’ve worked 3 dc3tog decreases total, then work 5 more 2 dc clusters. Sl st to the top of your starting ch 3 to complete the round.
Decrease Round 2: Ch 3, turn. 1 dc in the ch sp below. Counting that first 2 dc cluster, work a total of 10 clusters with ch 1s between them. *skip the next ch sp, then work 10 2 dc clusters*; repeat from * until one ch sp remains, sl st to the top of your starting ch 3, skipping that last chain space.
Decrease Round 3: Ch 3, turn. 1 dc in the ch sp below. Counting that first 2 dc cluster, work a total of 5 clusters with ch 1s between them. *skip the next ch sp, then work 9 2 dc clusters*; repeat from * until you’ve completed 3 decreases (skipping ch spaces) and 4 ch spaces remain, work 4 2 dc clusters and sl st to the top of your starting ch 3 to complete the round.
Decrease Round 4: Before chaining or turning, slip stitch into the top of the next dc and slip stitch to the next ch sp. Then, ch 2 and turn. Begin completing a dc3tog across the next 2 ch spaces. *Ch 1 and work a total of 7 clusters with ch 1s between them. dc3tog decrease across the next two ch spaces; repeat from * until you’ve worked 3 dc3tog decreases total, then work 7 more 2 dc clusters. Sl st to your first dc3tog to complete the round.
Brim
Round 1: Ch 1 (no need to turn) sc in the same st, *sc in next ch-1 sp, sc between the next 2 dc; repeat from * around, sl st to first sc. (You may work 1 sc in the dc3togs from the previous row as well)
Rounds 2-3 (Waistcoat Stitch): Ch 1, sc in center of each sc post around, sl st to first sc.
Fasten off.
Finishing Touch: The Nubbin
- With a new yarn, make a slipknot with a tail about hand-length long.
- Wrap the tail over the front of the hook, crossing it over the working yarn.
- Yarn over with the working yarn, pull through 2 loops.
- Repeat steps 2-3 twice more.
- Cut working yarn and pull through.
- Attach the nubbin to the top center of the beret, weaving both ends in opposite directions under the first round of stitches and secure tightly to close up the ch 4 ring.
Tips
- Keep your tension loose on the brim rounds to make the waistcoat stitch easier.
- Funny Pictures
-
 Pics to Get the Excitement Today
-
 Funny Christmas Meme Dump
-
 Funniest Relatable Felines in the Form of Memes
- Recipes
-
 Cappuccino Brownies
-
 Chicken Mushroom Tortellini Bake
-
 Spinach Pie
- Lifehacks
-
 8 Necessary Tips for Baking Bread
-
 Tips & Hacks for Clean Carpets
-
 10 Uses For Old TV Armoires
- Crochet Ideas
-
 Crochet Watermelon Amigurumi
-
 Crochet Shark Applique
-
 Crochet Pineapple Amigurumi
- DIY
-
 Yarn Wrapped Christmas Wreath Ornaments
-
 Egg Carton Snowman Ornament
-
 Stick Peppermint Candy Ornament
- Knitting Ideas
-
 Knitted Star Square Dishcloth
-
 Knitted Free 2025 Year Dishcloth
-
 Knitted Ribbed Adult Hat