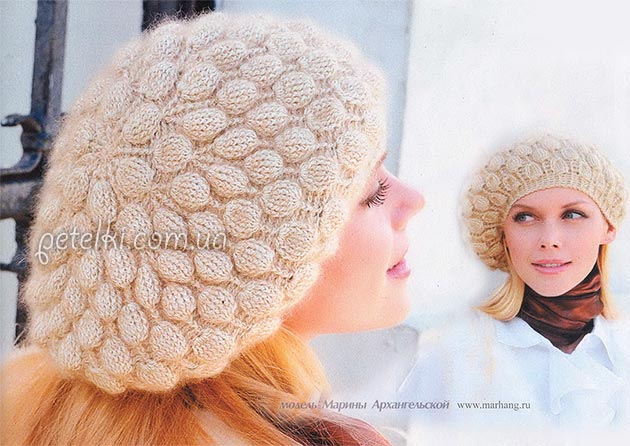
How to Crochet a Beautiful Beret with Cbiara Linn Grossn Yarn

Materials Needed
You'll need:
- 170g of Cbiara Linn Grossn yarn (70% viscose, 20% mohair, 10% polyamid; 190m/50g)
- Crochet hook 3
Size
56-57
Understanding Right and Wrong Side Relief Crochet
Sometimes you can find terms such as "wrong side" and "right side" relief crochet. By using these crochet techniques, you can create fabric similar to 1 x 1 rib knit using knitting needles.
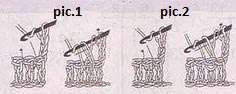
Right Side Relief Crochet Technique
When performing arched (right side) crochet, you should insert your crochet hook behind the crochet of the previous row, i.e., around the "stem" of the crochet, as shown by the arrow in the diagrams. The double crochet should be positioned above your crochet hook. Catch the working yarn, draw the stitches, and make the crochet as usual.
Wrong Side Relief Crochet Technique
For incurved (wrong side) crochet, insert your crochet hook in the stitch according to the direction shown in the diagrams, i.e., from the wrong side towards yourself, then take the crochet hook out towards the wrong side. Catch the working yarn, draw the stitch, and crochet as usual.
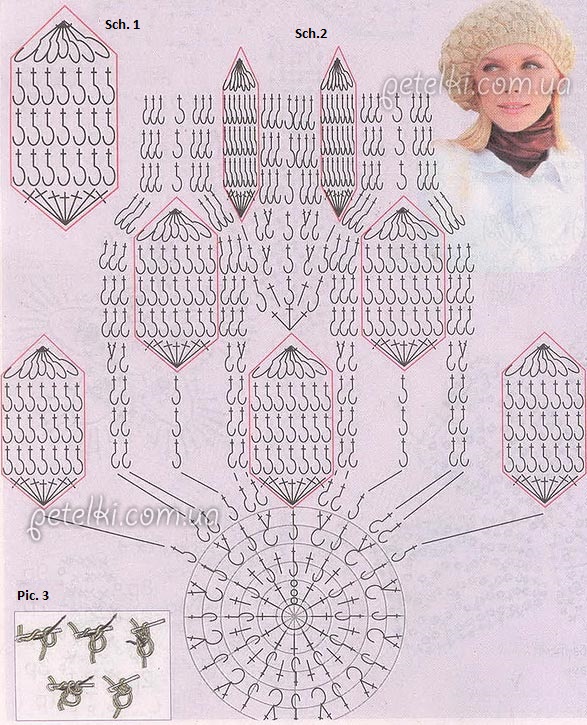
Starting Your Work
Begin your work with a slip stitch (see diagram 3). Make 3 stitches to increase, followed by 11 double crochets in the center of the ring. Tighten the stitch. Continue your work according to scheme 2, increasing stitches until you reach the desired beret diameter. Finish each row with a slip stitch and start with the necessary number of increasing stitches. In this case, the total number of "beads" should be 18. If you prefer a smaller diameter for your beret, you can opt for 12 "beads."
Shaping the Beret
After reaching the desired diameter, continue your work without increases to create the straight part of the beret. To circle the beret, you will need to decrease the number of stitches. For this, make 2 relief crochets together where you previously made increases. Proceed with 1 x 1 rib crochet for 5 to 7 rows before finishing your work.
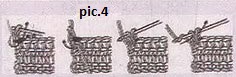
Finishing Touches
To complete the beret, make a row with a "shrimp stitch" (see diagram 4) along the edge of the cap band. Insert your crochet hook into the holes between the crochets of the last row of rib.
- Funny Pictures
-
 Cute Cat Memes That Will Make Your Day Brighter
-
 Spot-on and Funny Memes About Introverts Struggles
-
 Top Wonderful Cat Memes on Their Way to Better Your Day
- Recipes
-
 Creamy Old Fashioned Rice Pudding
-
 Russian Tea Cakes (Snowball Cookies)
-
 Rigatoni with Sausage, Tomatoes, and Zucchini
- Lifehacks
-
 How to Crochet a Harlequin Stitch
-
 Removing The Toughest Stains
-
 Crochet Basics: Crumpled Griddle Stitch
- DIY
-
 DIY Snowman Wreath
-
 Mini Santa Sleigh Ornament
-
 Crochet Gingerbread House Blanket
- Knitting Ideas
-
 Knitted Easter Bunny
-
 Knitted Mobile Phone/Glasses Case
-
 Knitted Cabled Wallet
- Crochet Ideas
-
 Crochet Christmas Tree
-
 Crochet Goblet of Fire
-
 Crochet Adorable Ammonite