


How to Crochet a Cute Cupcake Applique — Easy Pattern & Finishing Tips

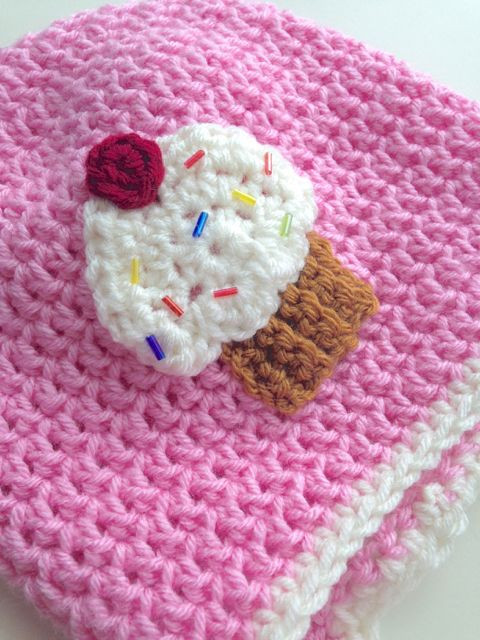
Crochet cupcake appliques are a quick, cheerful way to add a sweet, handmade accent to clothing, bags, hats and home décor. This easy pattern walks you through the three main pieces — frosting, base and cherry — plus simple finishing tips so you can attach and embellish your tiny treat. Suitable for crocheters who know basic stitches.
Crochet cupcake appliques are a cute and delightful way to add a touch of sweetness to your crafting projects. These tiny treats can be easily attached to anything you desire - from clothing to accessories - giving them a whimsical and charming flair. With their colorful yarn frosting and adorable sprinkles, crochet cupcake appliques bring a smile to anyone who sees them. Whether you're a seasoned crocheter or just starting out, incorporating these delightful little designs into your creations is sure to add a fun and playful element that everyone will love.
Materials
- Worsted Weight Yarn
- Crochet Hook Size I (I for “ice cream”)
- Darning Needle (for weaving in ends)
Abbreviations
- r = row
- ch = chain
- st = stitch
- sl st = slip stitch
- sc = single crochet
- hdc = half double crochet
- *instructions* = repeat around
Frosting
Please excuse my amateur’s attempt at showing how the frosting works in the picture below, but I hope it helps! Each round is labeled R1, R2, R3, the start of the row is marked with a circle, and the end of the row has an arrow in the direction the row moves.
RND 1: ch 3, sl st in 3rd ch from hook to form ring; ch 2, 8 hdc’s in ring, sl st to first hdc to join (8).
RND 2: ch 2, 2 hdc’s in the first 6 st’s, turn.
RND 3: ch 2, *1 hdc in first st, 2 hdc’s in second* repeat this pattern 6 times adding two more hdc’s in the last st (meaning 4 total hdc’s in the last st), rotate to the side from the first round and sl st in the next open spot, then repeat *5 hdc’s in next st, and sl st in next* across bottom to make four swoops for the bottom of the icing. Finish with a long tail to attach to your item.
Base of Cupcake
Note: You will be crocheting in the back loops only to create little ridges in your work (similar to the look of muffin paper cups when you bake)
RND 1: ch 6, turn, sc in back loops only across beginning in 2nd ch from hook (5)
RND 2 – RND 9: ch 1, turn, sc across in back loops only. Finish with long tail to attach to your item.
Cherry
RND 1: ch 2, make 8 sc’s in the 2nd ch from the hook, and sl st to the first sc to join into ring. Finish with long tail to attach your item.
Finishing Touches
First attach the base of the cupcake, then frosting on top (just overlapping so as to look like the frosting rests on the base), and then the cherry perched on top of the frosting. For added awesomeness, you can add tiny glass or plastic beads to look like sprinkles.
Tips: Use the long tails from each piece and a darning needle to sew the pieces together securely. Weave in ends neatly on the back so your applique sits flat. If attaching to clothing, sew around the edges with matching thread or add fabric glue for extra hold (test glue on scrap fabric first).
- Funny Pictures
-
 Weekly Treat of Funniest Parenting Memes for Good Laugh out Loud Right Now
-
 Really Funny Pics to End These Weekend Perfectly
-
 Incredibly Relatable Pics for Your Amusement
- Recipes
-
 Baked Sweet Potato Parmesan Tater Tots
-
 Saffron Lemon Chicken With Persian Rice
-
 Croatian Plum Dumplings
- Lifehacks
-
 Silt Crochet Stitch Photo Tutorial
-
 Crochet Mesh Stitch in Corner to Corner! A Lacy C2C Stitch Photo Tutorial
-
 Woven Shell Crochet Stitch Photo Tutorial
- Crochet Ideas
-
 DIY Crochet Mushroom Keychain — Easy Step-by-Step Pattern with Photos
-
 Make a Leafy Texture: Easy Crochet Sprig Stitch (Free UK Pattern)
-
 Free Crochet Sleep Mask Pattern — Cute DK Cotton Eye Mask (UK Terms, Advanced Beginner)
- DIY
-
 Cozy Crochet: Free Up-and-Down Stripe Cotton Washcloth Pattern (Quick & Easy)
-
 How to Make Realistic Crepe Paper Daffodils — Easy Step-by-Step DIY
-
 Make Adorable Easter Egg Bird Feeders — Easy DIY Seed Ornaments for Your Backyard
- Knitting Ideas
-
 Knit the Fish Scale Stitch: Easy 4-Row Pattern for a Textured, Scaly Look
-
 Knitted Camisole Party Frock — Vintage Pattern with Step-by-Step Instructions
-
 DIY Knitted Cuddly Cat Toy — Free Pattern & Step-by-Step Instructions