Crocheting a Beautiful Beret with Cable Stitch

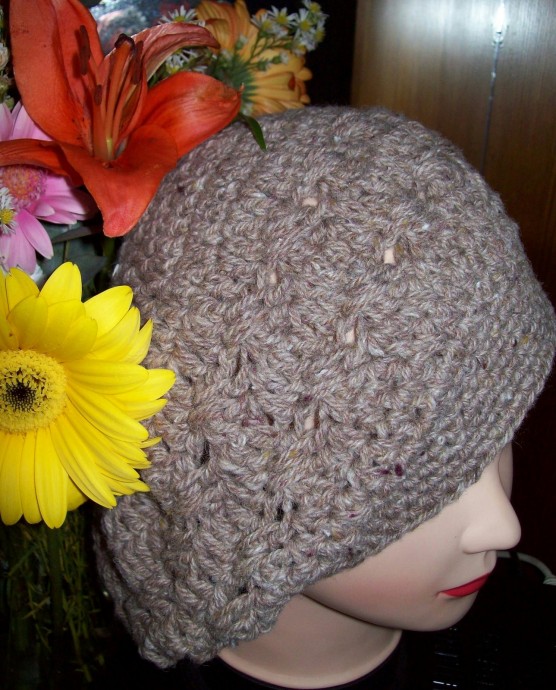
Crocheting a beret with a simple cable stitch is a delightful project for anyone looking to add a touch of handmade charm to their wardrobe. This technique allows you to create a cozy and stylish accessory that is both fashionable and fun to wear. With just a few basic crochet skills and some yarn, you can easily personalize your beret with different colors and sizes to suit your style. Whether you're a crochet enthusiast or someone looking to try a new hobby, crafting a crochet beret with a simple cable stitch is a perfect way to unleash your creativity and create a one-of-a-kind accessory that'll keep you warm and stylish all season long. So grab your crochet hook and get ready to stitch up a fabulous beret that will have you looking chic and feeling proud of your handmade creation!
Project Details
Size: Woman’s small, medium, and large
Experience Level: Intermediate
Time to Make: One evening
Materials:
- Size 5mm hook, H/8
- 100 gm’s of 12 ply yarn
Tension: I am a medium tension crocheter; if you crochet tightly use a larger hook, if you crochet loosely use a smaller hook.
Stitches Used: US terms. Sc, Hdc, and Dc.
Special Stitches: Cable stitch, worked over 4 dc; skip next 3 sts, dc into following 4th dc, dc into 3rd skipped dc, dc into 1st skipped dc, dc into 2nd skipped dc. Please note: at the beginning of the cable round you will not ch 3, you will dc into the 4th dc along as per the cable st instructions.
Hdc Decrease of Next 2 Stitches: Yo hook, insert hook into stitch and pull up a loop, insert hook into next st and pull up a loop, work all 4 loops off hook.
Beginning at Crown
Ch 4. Work 11 dc into 4th chain from hook, sl st into the top of the 4th chain to join (12 dc); my count will always include the first ch 3 as a dc.
Increasing Beret
Ch 3, work 1 dc into same space as ch 3, work 2 dc into each dc around, sl st into top of ch 3 to join (24 dc).
Ch 3, work 1 dc into same space as ch 3, work 1 dc into next dc, *work 2 dc into next dc, work 1 dc into next dc,* repeat from * to * to end, sl st into top of ch 3 to join (36 dc).
Ch 3, work 1 dc into same space as ch 3, work 1 dc into next 2 dc, *work 2 dc into next dc, work 1 dc into next 2 dc,* repeat from * to * to end, sl st into top of ch 3 to join (48 dc).
Ch 3, work 1 dc into same space as ch 3, work 1 dc into next 3 dc, *work 2 dc into next dc, work 1 dc into next 3 dc,* repeat from * to * to end, sl st into top of ch 3 to join (60 dc).
Ch 3, work 1 dc into same space as ch 3, work 1 dc into next 4 dc, *work 2 dc into next dc, work 1 dc into next 4 dc,* repeat from * to * to end, sl st into top of ch 3 to join (72 dc).
Ch 3, work 1 dc into same space as ch 3, work 1 dc into next 5 dc, *work 2 dc into next dc, work 1 dc into next 5 dc,* repeat from * to * to end, sl st into top of ch 3 to join (84 dc).
Ch 3, work 1 dc into same space as ch 3, work 1 dc into next 6 dc, *work 2 dc into next dc, work 1 dc into next 6 dc,* repeat from * to * to end, sl st into top of ch 3 to join (96 dc).
Cable Stitch Row
*Cable st over the next 4 dc,* repeat from * to * to end, sl st into top of first dc to join (the first dc is the dc into 1st skipped dc of the cable stitch) (96 dc).
Dc Row
Ch 3, work 1 dc in next dc and in each dc around, sl st to top of ch 3 to join (96 dc).
Cable Stitch Row
*Cable st over the next 4 dc,* repeat from * to * to end, sl st into top of ch 3 to join (the first dc is the dc into 1st skipped dc of the cable stitch, see special stitches) (96 dc).
Decrease Rows
Note: ch 2 is the first hdc st.
Ch 2, work 1 hdc into next 5 dc, hdc decrease over next 2 dc, *work 1 hdc into next 6 dc, hdc decrease over next 2 dc,* repeat from * to * to end, sl st to join in top of ch 2.
Ch 2, work 1 hdc into next 4 hdc, hdc decrease over next 2 hdc, *work 1 hdc into next 5 hdc, hdc decrease over next 2 hdc,* repeat from * to * to end, sl st to join in top of ch 2.
Ch 2, work 1 hdc into next 3 hdc, hdc decrease over next 2 hdc, *work 1 hdc into next 4 hdc, hdc decrease over next 2 hdc,* repeat from * to * to end, sl st to join in top of ch 2 (60 hdc).
Single Crochet Rounds, No Decreases
Please note the beginning ch 1 is not counted as the first sc.
Ch 1, work 1 sc into sl st space, work 1 sc into each hdc to end, sl st to join into first sc space (60 sc).
Ch 1, work 1 sc into first sc space, work 1 sc into each sc to end, sl st to join into first sc space.
Ch 1, work 1 sc into first sc space, work 1 sc into each sc to end, sl st to join into first sc space.
Ch 1, work 1 sc into first sc space, work 1 sc into each sc to end, sl st to join into first sc space.
Finish off here for large beret.
Ch 1, work 1 sc into first sc space, work 1 sc into each sc to end, sl st to join into first sc space.
Ch 1, work 1 sc into first sc space, work 1 sc into each sc to end, sl st to join into first sc space.
Ch 1, work 1 sc into first sc space, work 1 sc into each sc to end, sl st to join into first sc space.
Finish off here for medium beret.
Ch 1, work 1 sc into first sc space, work 1 sc into each sc to end, sl st to join into first sc space.
Ch 1, work 1 sc into first sc space, work 1 sc into each sc to end, sl st to join into first sc space.
Ch 1, work 1 sc into first sc space, work 1 sc into each sc to end, sl st to join into first sc space.
Finish off here for small beret.
- Funny Pictures
-
 Hilarious Memes for Those Bored to Tears
-
 Weekly Treat of Funniest Parenting Memes for Good Laugh out Loud Right Now
-
 Really Funny Pics to End These Weekend Perfectly
- Recipes
-
 Crispy Baked Avocado Fries
-
 Scrambled Chickpea and Spinach Pitas
-
 Cinnamon Pancakes
- Lifehacks
-
 Crochet Basics: Aligned Cobble Stitch
-
 Brick Stitch Crochet Tutorial
-
 Crochet Basics: Wattle Stitch
- Crochet Ideas
-
 Crochet Snorlax Plushie Doll
-
 Crochet Beautiful Penguin Toy
-
 Crochet Tiny Snowman
- DIY
-
 DIY Santa Craft For Kids
-
 Paper Plate Angel Craft
-
 Upcycled Mason Jar Chicken Vase
- Knitting Ideas
-
 Knitted Bridger Cowl
-
 Knitted Keepsake Bag
-
 Knitted Cutie Cupcake Dolls