Step-by-Step Guide to Crocheting Beautiful Cakes

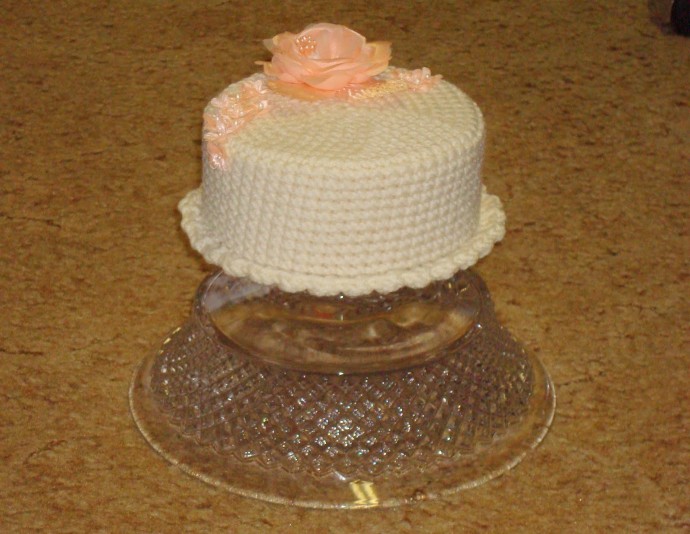
Unleash your creativity and embark on a delightful journey of crocheting beautiful cakes! With your nimble fingers and a hook in hand, you can transform yarn into mouthwatering treats that are calorie-free and everlasting. Whether you're a seasoned crocheter or just starting out, this craft offers endless possibilities to showcase your talent and create stunning masterpieces.
Imagine a cake adorned with intricate crochet patterns, delicate icing-like stitches, and vibrant colors that pop. From classic tiered cakes to whimsical cupcakes, the world of crocheted cakes is yours to explore. You can experiment with different stitches, textures, and yarn types to add depth and realism to your creations. Let your imagination run wild as you design luscious-looking strawberries, decadent chocolate drizzles, or even a slice of cake with a hidden surprise inside. The best part? These crocheted cakes will never go stale, ensuring that your hard work and artistry will be cherished for years to come.
Materials
- 1 1/2 oz. 4-ply ww acrylic
- J hook
- Styrofoam 5" round x 2" thick
- Flowers
- Glue
Size: approximately 6 1/2" (including ruffle) x 2 1/2"
Notes
- Do not join rounds; use a stitch marker.
- I had to make my own size of the styrofoam (gluing and trimming).
- I crochet tight, so you may want to adjust the size of your crochet hook.
Directions
For Top and Sides:
Rnd 1: Ch 2, 6 sc in 2nd ch from hook.
Rnd 2: 2 sc in each sc around.
Rnd 3: (2 sc in next sc, sc in next sc) around.
Rnd 4: (2 sc in next sc, sc in next 2 sc) around.
Rnd 5: (2 sc in next sc, sc in next 3 sc) around.
Rnd 6: (2 sc in next sc, sc in next 4 sc) around.
Rnd 7: (2 sc in next sc, sc in next 5 sc) around.
Rnd 8: (2 sc in next sc, sc in next 6 sc) around.
Rnd 9: (2 sc in next sc, sc in next 7 sc) around.
Rnd 10: (2 sc in next sc, sc in next 8 sc) around.
Rnds 11 - 21: Sc in each sc around. At end of Rnd 21, join with a sl st to 1st sc, end off.
For Bottom:
Repeat Rnds 1 - 10 of top. At the end of Rnd 10, join with a sl st to 1st sc, end off. Insert styrofoam into top piece.
Matching stitches and holding top and bottom pieces together, whipstitch through both loops of the bottom piece and front loops of the top piece together.
(I think that makes sense)
For Trim:
Join with a sc in any free back loop, 2 dc in next loop. *Sc in next loop, 2 dc in next loop. Repeat from * around. Join with a sl st to 1st sc, end off.
- Funny Pictures
-
 These are the Pics That Simply Describe Your Life
-
 Hilariously Accurate Parenting Memes That Show the Other Side of Parenthood
-
 Great Pics That Just Depict Our Lives
- Recipes
-
 Crispy Baked Avocado Fries
-
 Baked Beans and Hot Dogs with Biscuit Topping
-
 Roasted Rosemary Lemon Chicken Breasts
- Lifehacks
-
 Crochet Basics: Twisted Fringe
-
 7 Crochet Tips And Tricks
-
 How To Work Crochet Into Denim
- Crochet Ideas
-
 Crochet Snorlax Plushie Doll
-
 Crochet Cat in 1 Row
-
 Crochet Beautiful Penguin Toy
- DIY
-
 Popsicle Stick and Jingle Bell Christmas Tree Ornament
-
 DIY Santa Craft For Kids
-
 Paper Plate Angel Craft
- Knitting Ideas
-
 Knitted Bridger Cowl
-
 Knitted Keepsake Bag
-
 Knitted Cutie Cupcake Dolls