Crochet Red Velvet Bundt Cake Recipe

Crochet Red Velvet Bundt Cake is an absolute delight for any baking enthusiast! With its rich red color and scrumptious flavor, it's a showstopper at any gathering. The soft and moist texture of the cake, paired with a generous drizzle of cream cheese frosting, makes it a true indulgence for the taste buds. Whether you're celebrating a special occasion or simply craving a sweet treat, this delectable dessert is sure to bring smiles all around. So grab your apron, preheat the oven, and get ready to crochet a delicious masterpiece that will have everyone coming back for seconds!
What You Need
- Worsted weight acrylic yarn in cake color
- Size F (3.75 mm) hook
- Polyester fiber fill
- 3D fabric in glaze color
- Yarn needle
- Clip to keep place
- Scissors
- A scrap piece of paper
Cake Instructions
Work in continuous rounds. Be sure the "right" side of the work is facing inwards in the tube.
- Chain 12, sl st into the first st creating a ring
- Round 1: Sc around - 12 st
- Round 2-17: Sc in each sc around - 12 st
- Round 18: *2 sc in next st, sc in next st, rep from * around - 18 st
- Round 19: *2 sc in next st, sc in each of the next 2 sts, rep from * around - 24 st
- Round 20: *2 sc in next st, sc in each of the next 3 sts, rep from * around - 30 st
- Round 21: *2 sc in next st, sc in each of the next 4 sts, rep from * around - 36 st
- Round 22: *2 sc in next st, sc in each of the next 5 sts, rep from * around - 42 st
- Round 23: *2 sc in next st, sc in each of the next 6 sts, rep from * around - 48 st
- Round 24: *2 sc in next st, sc in each of the next 7 sts, rep from * around - 54 st
- Round 25: *2 sc in next st, sc in each of the next 8 sts, rep from * around - 60 st
- Round 26: *2 sc in next st, sc in each of the next 9 sts, rep from * around - 66 st
- Round 27-39: Sc in each sc around - 66 st
- Round 40: Sc in each sc around, back loops only - 66 st
- Round 41: *Sc2tog, sc in each of the next 9 sts, rep from * around - 60 st
- Round 42: *Sc2tog, sc in each of the next 8 sts, rep from * around - 54 st
- Round 43: *Sc2tog, sc in each of the next 7 sts, rep from * around - 48 st
- Round 44: *Sc2tog, sc in each of the next 6 sts, rep from * around - 42 st
- Round 45: *Sc2tog, sc in each of the next 5 sts, rep from * around - 36 st
- Stuff slightly firm (leave some wiggle room for when you stitch the curves)
- Round 46: *Sc2tog, sc in each of the next 4 sts, rep from * around - 30 st
- Round 47: *Sc2tog, sc in each of the next 3 sts, rep from * around - 24 st
- Round 48: *Sc2tog, sc in each of the next 2 sts, rep from * around - 18 st
- Round 49: *Sc2tog, sc in each of the next 1 sts, rep from * around - 12 st
- Leaving a tail to sew up, cut yarn. Sew end to the center post.
- Weave in the end.
Finishing Touches
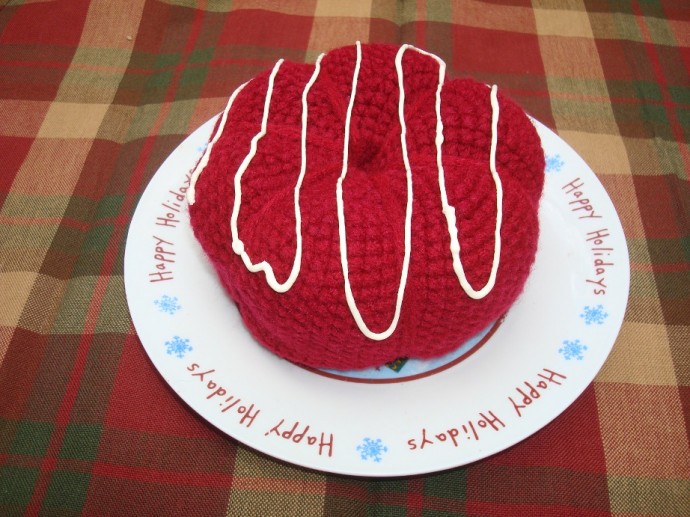
Cut a long piece of yarn. Tie a knot at one end and thread the needle onto the other. On the bottom of the cake, secure the end of the yarn with several stitches to make sure it is firm. Run the yarn to the top of the cake and thread down through the hole in the middle, pulling tight. Repeat so you have two threads pulling a curve down into your cake.
Repeat until you have all the indentations you want on your cake.
Place your cake on a scrap piece of paper before you "glaze" it. This way, if it drips, it won't mess up a plate or table. Using the 3D fabric paint, glaze your cake. You can use a very easy drizzle or any style glaze you prefer.
- Funny Pictures
-
 These are the Pics That Simply Describe Your Life
-
 Hilariously Accurate Parenting Memes That Show the Other Side of Parenthood
-
 Great Pics That Just Depict Our Lives
- Recipes
-
 Crispy Baked Avocado Fries
-
 Baked Beans and Hot Dogs with Biscuit Topping
-
 Roasted Rosemary Lemon Chicken Breasts
- Lifehacks
-
 Crochet Basics: Twisted Fringe
-
 7 Crochet Tips And Tricks
-
 How To Work Crochet Into Denim
- Crochet Ideas
-
 Crochet Snorlax Plushie Doll
-
 Crochet Cat in 1 Row
-
 Crochet Beautiful Penguin Toy
- DIY
-
 Popsicle Stick and Jingle Bell Christmas Tree Ornament
-
 DIY Santa Craft For Kids
-
 Paper Plate Angel Craft
- Knitting Ideas
-
 Knitted Bridger Cowl
-
 Knitted Keepsake Bag
-
 Knitted Cutie Cupcake Dolls