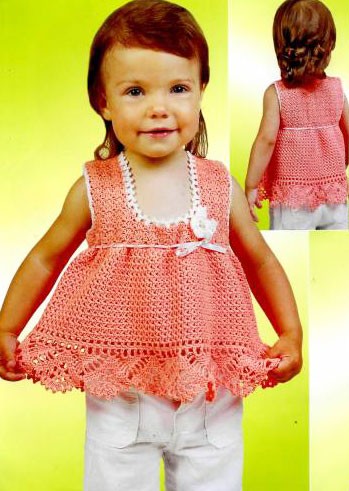
How to Crochet a Stylish One-Piece Outfit for Toddlers

You'll Need:
100g of peachy color yarn Yarn Art JEANS (55% cotton, 45% acryl; 160m/50g);
A little bit of 100% acryl white color yarn ALIZE ETAMIN;
Satin ribbon 1 cm wide – 70 cm;
Crochet hook size 2;
1 white button.
Size:
2-3 years.Note:
Make as one-piece cloth.Instructions
Bottom Part
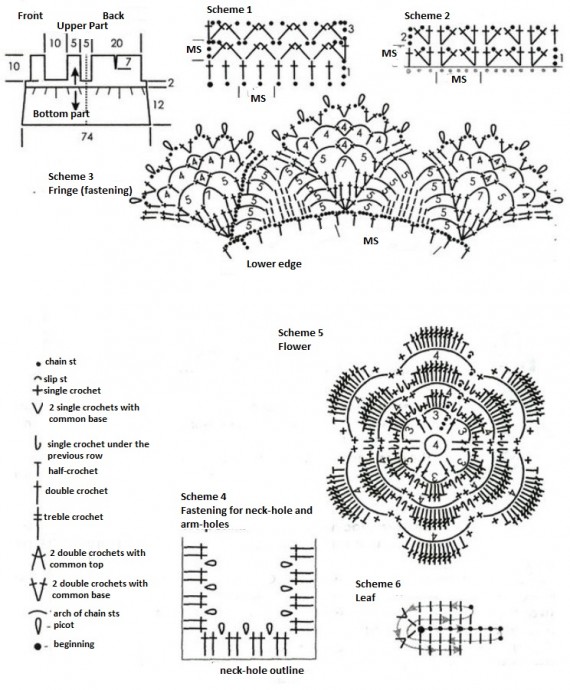
Work according to the scheme from up to down. Make 181 chain sts + 3 chain sts increase with Yarn Art and crochet straight according to the scheme 1 ( = 90 pattern repeats wide). Finish work after 12 cm.
Upper Part
Work from up to down.
Start crocheting from the set-up row of the bottom part and work according to the scheme 2 ( = 36 pattern repeats wide).
After 2 cm from the set-up row, divide your work into front and back with contrast color yarn and make them separately.
Back
You should make 18 pattern repeats.
Leave 2 pattern repeats from each side for arm-holes.
After 3 cm from the arm-hole, divide your work in 2 halves for the central cut (7 pattern repeats for each half) and crochet straight to 7 cm height.
Finish at 10 cm height from the arm-hole.
Front
You should make 18 pattern repeats.
Leave 2 pattern repeats from each side for arm-holes. Leave the central 6 pattern repeats for the rectangular shape outline and work straight for 7 cm height.
Finish your work after 10 cm from arm-hole and make shoulder chamfers (4 pattern repeats for each).
Assembly
Make seams along the right side and shoulders.
Fasten the bottom part of your work with the auxiliary yarn and neck-hole from the back side with 1 row of single crochets, from the front side – with pattern according to the scheme 4.
Make a flower according to the scheme 5 and a leaf according to the scheme 6 with the same yarn. Sew the decoration to the front part.
Insert the satin ribbon in the place of bottom and upper part connection. Sew the button on the back.
- Funny Pictures
-
 Hilarious Memes for Those Bored to Tears
-
 Weekly Treat of Funniest Parenting Memes for Good Laugh out Loud Right Now
-
 Really Funny Pics to End These Weekend Perfectly
- Recipes
-
 Crispy Baked Avocado Fries
-
 Scrambled Chickpea and Spinach Pitas
-
 Cinnamon Pancakes
- Lifehacks
-
 Crochet Basics: Aligned Cobble Stitch
-
 Brick Stitch Crochet Tutorial
-
 Crochet Basics: Wattle Stitch
- Crochet Ideas
-
 Crochet Snorlax Plushie Doll
-
 Crochet Beautiful Penguin Toy
-
 Crochet Tiny Snowman
- DIY
-
 DIY Santa Craft For Kids
-
 Paper Plate Angel Craft
-
 Upcycled Mason Jar Chicken Vase
- Knitting Ideas
-
 Knitted Bridger Cowl
-
 Knitted Keepsake Bag
-
 Knitted Cutie Cupcake Dolls