Crochet Totoro Bag Amigurumi

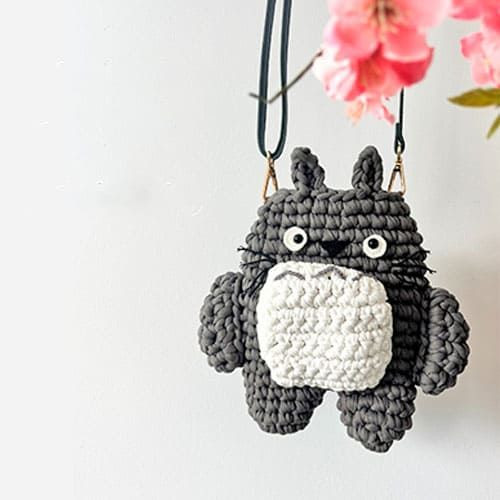
Looking for a cute and unique accessory? How about a Crochet Totoro Bag Amigurumi? This delightful creation combines the practicality of a bag with the charm of an amigurumi Totoro character. Imagine strolling around with this adorable bag slung over your shoulder, catching everyone's eye with its whimsical design. It's the perfect way to add a touch of fun to your outfit while also carrying your essentials in style. So, why not treat yourself to this cute and playful accessory that is sure to bring a smile to your face every time you use it?
What You Need to Crochet a Totoro Bag
- T-shirt yarn: grey, white.
- I used hoooked zpagetti T-shirt yarn.
- Cotton yarn: grey, white, black.
- I used rainbow cotton 8/4.
- Hook size 8.0 mm.
- Needle
Abbreviations
- ch: chain
- dec: decrease
- inc: increase
- hdc: half double crochet
- MR: magic ring
- sc: single crochet
- st: stitch
- slst: slip stitch
Legs
In grey T-shirt yarn:
- R1. MR 6 sc (6)
- R2. inc 6 (12)
- R3. sc 12 (12)
- R4. sc 12 (12)
Make another leg.
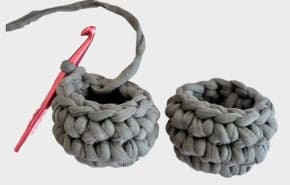
- R5. Connect the two legs:
Ch 1 and then insert sc 1 into the other leg.

Sc 11 around the left leg.
Sc into the ch, sc 12 in the right leg, then sc 1 into the ch (26)
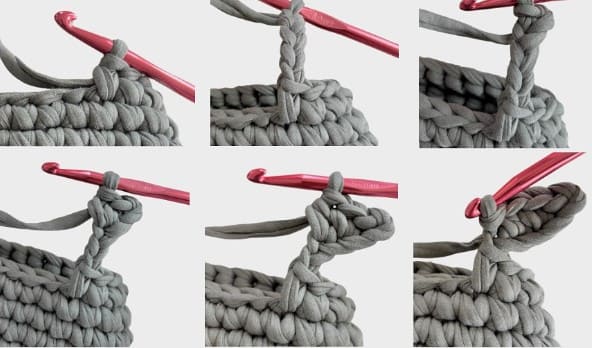
Body
- R6-14. sc 26 (26)
- R15. sc 6 (or until you reach the edge), dec, sc 11 to the other side, dec, sc 5 (24)
- R16. sc 5 until the edge, dec, sc 10 to the other side, dec, sc 5 (22)
- R17. sc 5 until the edge, dec, sc 9 to the other side, dec, sc 4 (20)
Ears
- R18. Insert your hook in the outermost stitch on the right. Sc 2, ch 5, slst into the 2nd ch from the hook. Sc 1, hdc 1, slst.
Now sc 1 into the head. Sc 3. Make another ear.
Sc 2 and slst.
Arms
In grey T-shirt yarn:
- Ch 5. start in 2nd ch from hook.
- R1-4. sc 4, turn, ch 1 (4)
- R5. skip 1st, sc3. turn, ch 1 (3)
- R6. skip 1st, sc2. turn, ch 1 (2)
- R7. skip 1st, sc 1 (1)
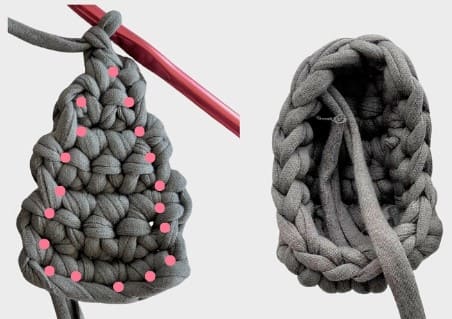
- R8. Sc 18 around the arm to form a cup. See pink dots to place the stitches. Close the round (18)
- Leave a long tail for sewing.
Make another arm.
Belly
In white T-shirt yarn:
- Ch 11. Start in 2nd ch from hook.
- R1-10. Sc 10, turn, ch 1 (10)
- R11. Sc 27 around the belly to form a cup. See pink dots to place the stitches. Close the round (27) Leave a long tail for sewing.
Grey Lines
Attach grey cotton yarn to the belly for his signature chest markings.
Attach Arms and Belly
- Arms: on the left and right side, attach the lowest part of the arm in R7 and the top of the arm in R13. Sew the arms to the body.
- Belly: sew the belly to the body but leave a little opening on the top so it’s a pouch. Attach the lowest part in R7, and the top in R15.

Eyes
In white cotton yarn:
- R1. MR sc 6 (6)
- R2. inc 6 (12)
- R3. (sc1,inc)*6 (18)
- Leave a long tail for sewing. Insert a 10mm safety eye, make sure it’s off center. Make another eye.
Nose
In black cotton yarn:
- Ch 3. Start in 2nd ch from hook.
- R1. sc 2, turn, ch 1 (2)
- R2. inc 2, turn, ch 1 (4)
- R3. inc, sc 2, inc (6)
- Leave a long tail for sewing.
Attach the Eyes and Nose
- Attach the eyes between R16 and R17, with 4 stitches apart.
- Attach the nose in between the two eyes, place it in between R16 and R17.
Whiskers
Attach black cotton yarn on each cheek and fasten it on the inside.
Finishing Touches
- Add a bag strap.
- Optional: add lining and/or a magnet.
- Funny Pictures
-
 Pics to Get the Excitement Today
-
 Funny Christmas Meme Dump
-
 Funniest Relatable Felines in the Form of Memes
- Recipes
-
 Cappuccino Brownies
-
 Chicken Mushroom Tortellini Bake
-
 Spinach Pie
- Lifehacks
-
 8 Necessary Tips for Baking Bread
-
 Tips & Hacks for Clean Carpets
-
 10 Uses For Old TV Armoires
- Crochet Ideas
-
 Crochet Watermelon Amigurumi
-
 Crochet Shark Applique
-
 Crochet Pineapple Amigurumi
- DIY
-
 Yarn Wrapped Christmas Wreath Ornaments
-
 Egg Carton Snowman Ornament
-
 Stick Peppermint Candy Ornament
- Knitting Ideas
-
 Knitted Star Square Dishcloth
-
 Knitted Free 2025 Year Dishcloth
-
 Knitted Belle Finger Puppet