Crochet Tote Bag: Seed & Bloom Pattern Guide

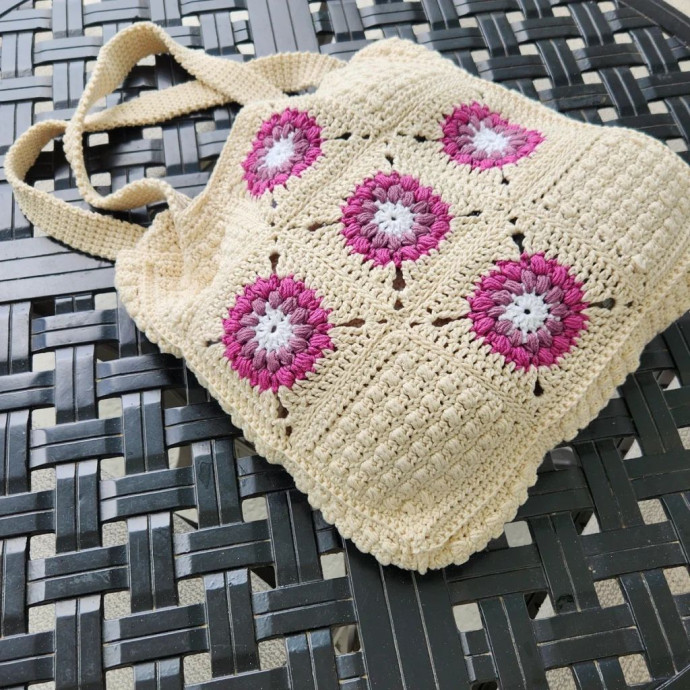
Crochet tote bags are not only fashionable but also versatile accessories that can add a touch of unique charm to your outfit. Whether you're heading to the beach, farmer's market, or simply running errands, a crochet tote bag can effortlessly elevate your style while being functional at the same time. The intricate crochet patterns and vibrant color options make these bags stand out in a crowd, showcasing your personality and creativity. Plus, their durable construction ensures that you can carry your essentials with ease while reducing your environmental impact by opting for a reusable bag. So, next time you need a stylish and eco-friendly way to carry your belongings, consider a crochet tote bag for a fun and practical accessory.
Supplies
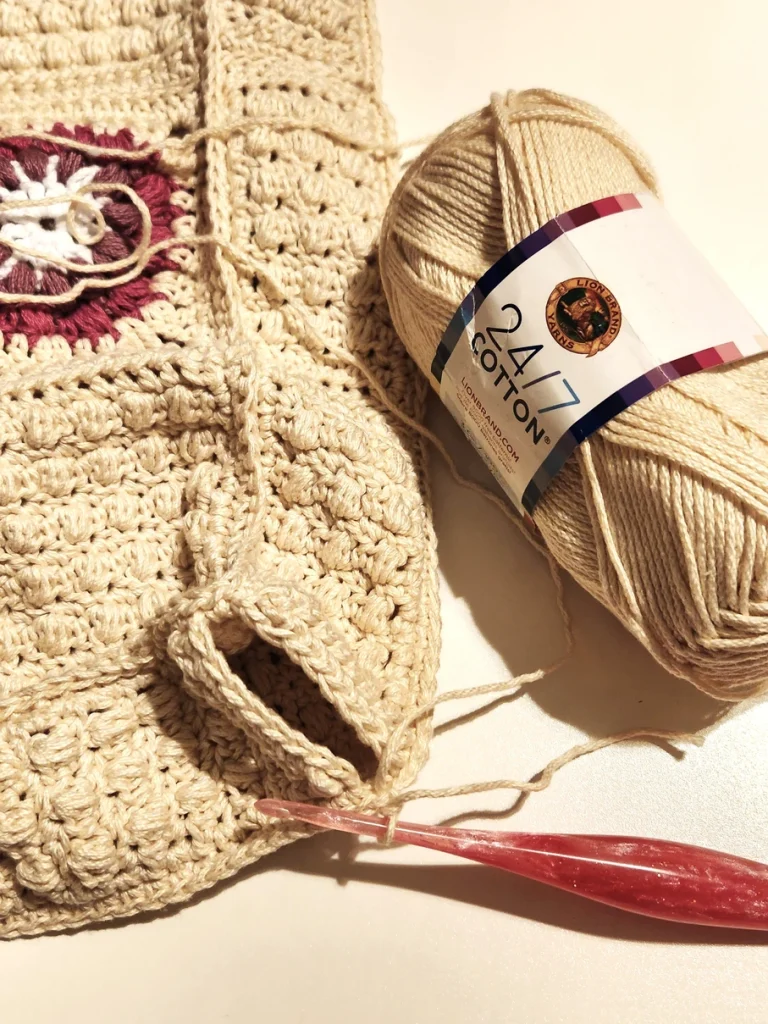
Yarn:
- Lion Brand 24/7 Cotton, worsted weight #4 yarn (100% mercerized cotton; 186 yds / 170 m per 100g skein)
- Ecru: 4 skeins (Main Color)
- White (Color A): 1 skein
- Mauve (Color B): 1 skein
- Coral (Color C): 1 skein
Hook:
4.0 mm G Furls Polaris Streamline Galaxy Hook (or hook size to obtain gauge)
Notions:
- Square Blocker or Blocking mat and pins
- Scissors
- Tapestry needle
Gauge
15 sts x 15 rows = 4” square in Seed Square
Difficulty
Intermediate
Size
Seed and Bloom Tote Bag Finished Measurements: 13.5” H x 13.5” W x 2” D
Stitch Abbreviations
- blo: back loop only
- ch: chain
- dc: double crochet
- Fhdc: Foundation half double crochet
- FO: Fasten Off
- PS: Puff Stitch
- RS: Right Side
- sl st: slip stitch
- st(s): stitch(es)
- sp(s): space(s)
- sk: skip
- tr: treble crochet (triple crochet)
- yo: yarn over
Special Stitches
Locking Mattress Stitch
Used to seam two pieces together, this stitch locks the pieces together by working back into the same stitch on each pass. Worked in the back loop of each stitch.
Instructions:
- Insert needle into the first stitch of square 1, then through the first stitch of square 2.
- Insert needle into the second stitch of square 2, then into the first stitch of square 1.
- Insert needle into the second stitch of square 1, then into the second stitch of square 2.
- Continue to work the entire length of the row working back into the previously worked stitches.
Mini Puff Stitch (Mini PS)
yo, insert hook into the st, yo and pull up a loop, repeat two times inserting hook into the same st each time (7 loops on the hook), yo pull through all 7 loops, ch 1 to close the stitch.
Puff Stitch (PS)
yo, insert hook into the st, yo and pull up a loop, repeat three times inserting hook into the same st each time (9 loops on your hook), yo pull through all 9 loops, ch 1 to close stitch.
Thermal Stitch
Worked into a blo row. Insert hook into the blo of the top row, and then into the unworked front loop of the row below, yo, pull through both rows to top, yo and pull through both loops on hook.
Notes
- When working the Mini PS and the PS, be sure to pull each loop up to the same level as the other loops on your hook to keep your square size consistent.
- Floral squares are worked in rounds. FO after each color and work the next round over the tail of the previous color. Keep starting tail to the right of your work and pull it up to the top of the first stitch before closing the round with a sl st.
- Puff stitch closes with a ch 1. When ch 1 is in the directions it is in addition to the puff stitch ch.
Free Crochet Bag Pattern: Seed & Bloom Tote
Seed Granny Square
Make 8 Using Main Color
- Row 1: Fhdc 15, turn. (15)
- Row 2: ch 1, sc across, turn. (15)
- Row 3: ch 1, hdc, Mini PS, across, hdc into last stitch, turn. (15)
- Rows 4 – 13: Repeat Rows 2 – 3
- Row 14: ch 1, sc across, turn. (15)
- Row 15: ch 1, hdc across, turn. (15)
- Border: ch 1, sc across, ch 2, turn to work down the side of the rows, sc 15 working 1 sc into the end of each row across to the bottom corner, ch 2, sc across foundation, ch 2, sc 15 across the ends of the rows, ch 2, sl st into the first sc of round, F/O. (60 sc, 4 ch 2 sps)
Side and Bottom Half Size Seed Square
Make 9
- Row 1: Fhdc 7, turn. (7)
- Row 2: ch 1, sc across, turn. (7)
- Row 3: ch 1, hdc, Mini PS, across, hdc into last stitch, turn. (7)
- Rows 4 – 13: Repeat Rows 2 – 3
- Row 14: ch 1, sc across, turn. (7)
- Row 15: ch 1, hdc across, turn. (7)
- Border: ch 1, sc across, ch 2, turn to work down the side of the rows, sc 15 working 1 sc into the end of each row across to the bottom corner, ch 2, sc across foundation, ch 2, sc 15 across the ends of the rows, ch 2, sl st into the first sc of round, F/O. (44 sc, 4 ch 2 sps)
Floral Bloom Granny Square
Make 10
- Round 1: With color A, working into a Magic Circle, ch 3 (counts as a dc), dc 11, close circle and sl st into the starting ch to join. FO leaving a tail to work over. (12)
- Round 2: With color B, attach yarn into the top of the last dc of round 1 with a sl st leaving a 3” tail, ch 1, beginning in the same st, PS, ch 1, repeat around, sl st into the first st of the round, FO leaving a tail to work over. (12 PS, 12 ch 1 sps)
- Round 3: With color C, attach yarn into the top of the last ch 1 of round 2 with a sl st leaving a 3” tail, ch 1, Beginning in the same ch sp, PS, ch 1, sc in top of next PS, ch 1 repeat around, sl st into the first st of the round, FO leaving a tail to work over. (24)
- Round 4: With Main Color, attach yarn in ch 1 sp before last sc of round 3 with a sl st. ch 4 (counts as a tr), tr in same sp, ch 2, sk the sc, 2 tr in next ch 1 sp, [dc in PS, dc in ch 1 sp, sk the sc, dc in ch 1 sp] 2X, dc in PS, 2 tr in ch 1 sp, ch 2, sk the sc, 2 tr in ch 1 sp Repeat to 2 more times, [dc in PS, dc in ch 1 sp, sk the sc, dc in ch 1 sp] 2X, DC in PS, sl st in top of starting ch, sl st in tr , sl st in ch 2 sp. (16 tr, 28 dc, 4 ch 2 sps)
- Round 5: ch 2, (counts as a dc) (dc, ch 2, 2 dc) all in same ch 2 sp, dc 11, (2 dc, ch 2, 2 dc) in ch 2 sp, 3 times, dc 11, sl st in top of starting ch, sl st in next st, FO. (60 dc, 4 ch 2 sps)
Assembly
Block all squares to 4.5” x 4.5” square before assembling.
Squares will be seamed using the locking mattress stitch.
Using a 12” piece of yarn and a tapestry needle, seam squares in rows of 3 as follows:
Front and Back Panels
Make 2 of each row
- Row 1: Seed, Bloom, Seed
- Row 2: Bloom, Bloom, Bloom
- Row 3: Seed, Bloom, Seed
You will be seaming 17 stitches down the side of each square: 1 ch, 15 sc, 1 ch.
Pull tail on either end tight to secure.
Using the locking mattress stitch, and a 36” piece of yarn, seam rows 1 & 2 and rows 2 & 3 together down the length of the rows. Pull tight to secure.
For Sides and Bottom Panels
Make 3
With an 8” piece of yarn and a tapestry needle, seam 3 half size seed squares with short ends together using the locking mattress stitch. Pull ends tight to secure.
Building the Bag
With RS facing out, sc the front panel to one side panel beginning in the ch 1, and working across to the end ch 1. (51) Do not cut yarn.
sc in corner, pick up bottom piece sc in ch 1, and across to end ch 1, sc in corner (53)
Pick up second side piece, sc in ch 1, and across to end ch 1, FO.
Repeat instructions to attach back panel.
Attach yarn into one of the sc in the bottom corner where side and bottom panels meet with a sl st, sc in ch 1, and across, sc in ch 1, sl st in the sc in the corner. FO (9 sc, 2 sl st)
On the seed squares work the sc in the ch 1 sp of the Mini PS and not into the top of the Mini PS.
Attach yarn into the ch 1 at the top right corner of the front panel. Ch 1, sc in the same sp and around, sl st in first st, FO and weave in ends. (120)
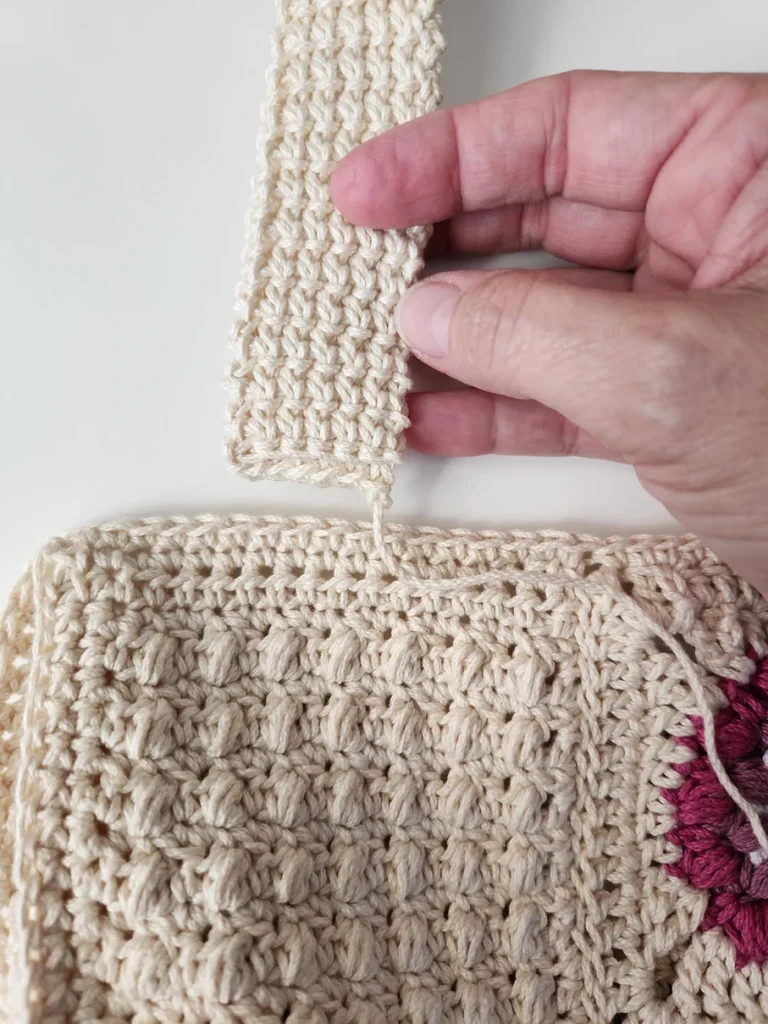
Straps
- Row 1: Attach yarn into the 6th SC from the top right corner of the front panel with a SL ST, CH 1, SC in same ST and next 5 STS, turn. (6)
- Row 2: CH 1, SCBLO across, turn.
- Row 3: CH 1, Thermal stitch across, turn.
- Rows 4 – 138: Repeat Row 3. F/O leaving a long tail. Sew onto the bag 6 to 11 stitches from the opposite top edge of front panel. You will have a small lip on the end of your strap. Sew that to the inside of your bag so the ridge lines up with the top edge.
Repeat instructions for second strap on the back panel.
- Funny Pictures
-
 True and Simple Pics That Describe All of Us
-
 Fresh Animal Memes to Mix in Your Morning Coffee
-
 The Funniest Tweets of the Day
- Recipes
-
 Creamy Old Fashioned Rice Pudding
-
 Cream of Mushroom Soup
-
 Homemade Breakfast Sausage
- Lifehacks
-
 Crochet Basics: Crumpled Griddle Stitch
-
 Crochet Basics: Sedge Stitch
-
 Surprising Ways to Use Dryer Sheets
- Crochet Ideas
-
 Crochet Amigurumi Mushroom Plant
-
 Crochet Sweet Baby Bonnet
-
 Crochet Festive Marshmallow
- DIY
-
 DIY Snowman Wreath
-
 Mini Santa Sleigh Ornament
-
 Crochet Adorable Baked Cake
- Knitting Ideas
-
 Knitted Easter Bunny
-
 Knitted Mobile Phone/Glasses Case
-
 Knitted Mini Summer Purse