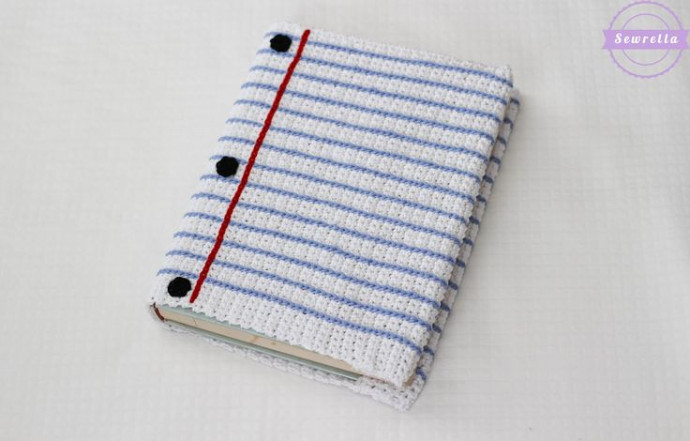
How to Make a Crochet Textbook Cover

If you're looking to jazz up your textbooks and protect them at the same time, a crochet textbook cover is a fantastic DIY project to tackle! Not only will it add a personal touch to your books, but it can also prevent them from getting scuffed or damaged in your bag. You can choose your favorite colors and patterns to make it uniquely yours. Plus, it's a great way to show off your crochet skills while staying organized for the school year. Get ready to impress your classmates with your stylish and functional textbook covers!
Materials:
- Lion Brand 24/7 Cotton in white (2 skeins), sky (1 skein), red & black (small amounts)
- Size F 3.75mm crochet hook
- Tapestry needle
- Textbook
Instructions:
With white, Ch 49, Sc in 2nd Ch from hook, Sc across, Ch 1, turn.
Rows 2-104: Sc in each st across, Ch 1, turn. Finish off, weave ends.
Creating the Horizontal Design:
Hold your work so that the rectangle is oriented horizontally (your stitch rows look vertical). With sky, surface stitch straight lines horizontally skipping 3 rows of stitches in between each row of sky stitches. After each row finish off and weave ends.
Marking the Red Lines:
Using stitch markers (or bobbi pins!) mark where you want your red lines to lie. To do this, I found the center of my work and counted out in each direction 5 rows of stitches. Place your stitch markers.
Adding Red Lines:
With red, surface stitch straight lines vertically from top to bottom of your work where your markers lie. Finish off after each row and weave ends.
Making the Black Hole Punches:
With black, make a magic ring, Ch 1, 6 Sc inside ring, sl st to join, finish off. Make 6 black “hole punches.”
Sewing the Hole Punches:
Sew each hole punch just inside each of your red lines, one at the top, one in the middle, and one at the bottom on each side.
Final Touches:
Now we need to whip stitch the edges to make the cover fit onto our book – almost done! Flip over your work (looking at the wrong side).
Fold in each end by 12 rows of stitches (about 2 in. long).
Cut a piece of white yarn and thread your tapestry needle. Sew up the overlapping edges at the top and bottom. Repeat on the other side. Weave in all ends.
- Funny Pictures
-
 Cute Cat Memes That Will Make Your Day Brighter
-
 Spot-on and Funny Memes About Introverts Struggles
-
 Top Wonderful Cat Memes on Their Way to Better Your Day
- Recipes
-
 Creamy Old Fashioned Rice Pudding
-
 Russian Tea Cakes (Snowball Cookies)
-
 Rigatoni with Sausage, Tomatoes, and Zucchini
- Lifehacks
-
 How to Crochet a Harlequin Stitch
-
 Removing The Toughest Stains
-
 Crochet Basics: Crumpled Griddle Stitch
- Crochet Ideas
-
 Crochet Christmas Tree
-
 Crochet Goblet of Fire
-
 Crochet Adorable Ammonite
- DIY
-
 DIY Snowman Wreath
-
 Mini Santa Sleigh Ornament
-
 Crochet Gingerbread House Blanket
- Knitting Ideas
-
 Knitted Easter Bunny
-
 Knitted Mobile Phone/Glasses Case
-
 Knitted Cabled Wallet