Crochet Food Covers: Pattern and Instructions

A Creative Touch to Your Meals
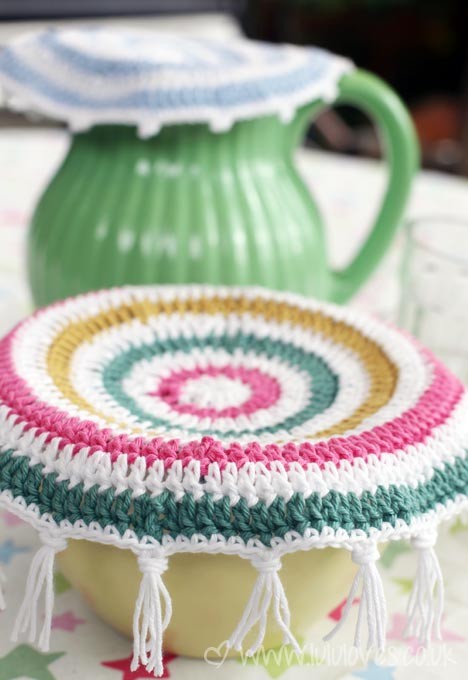
A crochet food cover is a creative way to add a personal touch to your meals. You can make covers for various types of food, such as sandwiches, salads, and even snacks like popcorn or chips. Using cotton or acrylic yarn, you can crochet a simple design or get creative with intricate patterns and embellishments. Not only do these covers add a pop of color and texture, but they also help keep your food fresh and protected. Plus, they make great conversation starters at parties or gatherings!
Crochet Food Covers/Placemat Pattern
Pattern written in UK terms.
Hook: 4mm
Yarn: Rowan Handknit Cotton
Stitches Used
- Ch = Chain
- SS = Slip Stitch
- Tr = Treble crochet (US dc)
- Dc = Double crochet (US sc)
- Picot = Double crochet (dc), chain 3, Slip Stitch back into dc.
When finished, this should create a food cover/placemat approximately 25cm in diameter (excluding tassels). If you are using these as food covers, you will want them to be at least 3cm bigger than the bowl you want to cover so they don’t slip into your food! I have left notes at the end of the pattern on how to make a bigger cover. If you want to create stripey ones, as I have done here, simply attach a new colour each round. The edging row is worked by double crocheting around and creating a picot every 6th stitch.
Pattern Instructions
Foundation
Chain 6 and join with SS or create a magic circle.
Rounds
Rnd 1: Ch 3, 11 tr into circle, join with SS to top of ch 3. (12)
Rnd 2: Ch 3, 1 tr into same stitch, 2 tr into each stitch around, join with a SS into top of ch 3. (24)
Rnd 3: Ch 3, 1 tr into same stitch, 1 tr into next stitch, *2 tr into next, 1 tr into next* repeat from *to* around, join with a SS into top of ch 3. (36)
Rnd 4: Ch 3, 1 tr into same stitch, 1 tr into next 2 stitches, *2 tr into next stitch, 1 tr into next 2 stitches* repeat from * to * around, join with a SS into top of chain 3. (48)
Rnd 5: Ch 3, 1 tr into same stitch, 1 tr into next 3 stitches, *2 tr into next stitch, 1 tr into next 3 stitches* repeat from * to * around, join with a SS into top of chain 3. (60)
Rnd 6: Ch 3, 1 tr into same stitch, 1 tr into next 4 stitches, *2 tr into next stitch, 1 tr into next 4 stitches* repeat from * to * around, join with a SS into top of chain 3. (72)
Rnd 7: Ch 3, 1 tr into same stitch, 1 tr into next 5 stitches, *2 tr into next stitch, 1 tr into next 5 stitches* repeat from * to * around, join with a SS into top of chain 3. (84)
Rnd 8: Ch 3, 1 tr into same stitch, 1 tr into next 6 stitches, *2 tr into next stitch, 1 tr into next 6 stitches* repeat from * to * around, join with a SS into top of chain 3. (96)
Rnd 9: Ch 3, 1 tr into same stitch, 1 tr into next 7 stitches, *2 tr into next stitch, 1 tr into next 7 stitches* repeat from * to * around, join with a SS into top of chain 3. (108)
Rnd 10: Ch 3, 1 tr into same stitch, 1 tr into next 8 stitches, *2 tr into next stitch, 1 tr into next 8 stitches* repeat from * to * around, join with a SS into top of chain 3. (120)
Edging Round
Ch 1, dc into same stitch, dc into next 4 stitches, (dc, ch 3, ss) into next stitch to create a picot, see description above, *dc into next 5 stitches, picot (dc, ch 3, ss) into next stitch* repeat from * to * around. You should end with a picot and then 1 dc into the final stitch, ss into Ch 1 and finish off.
Adding Tassels
If you would like to add the tassels as I did, simply cut 3 lengths of yarn double the length you want your tassels to be. Push your hook up into the picot stitch from the underneath (in creating your picot with a ch 3 you will have created a small loop), wrap all three pieces around your hook and pull them back through the picot, then pull the ends through the loop you’ve created. Do this for every picot. Then give them a trim with the scissors!
Making a Bigger Cover
If you need to make your cover bigger, just keep increasing as before (in 12s), so for Row 11, you would increase by working 2 tr into every 10th stitch (2 tr, 1 tr into next 9 stitches), Row 12 every 11th stitch (2 tr, 1 tr into next 10 stitches), and so on until you have your desired size.
- Funny Pictures
-
 Cute Cat Memes That Will Make Your Day Brighter
-
 Spot-on and Funny Memes About Introverts Struggles
-
 Top Wonderful Cat Memes on Their Way to Better Your Day
- Recipes
-
 Creamy Old Fashioned Rice Pudding
-
 Russian Tea Cakes (Snowball Cookies)
-
 Rigatoni with Sausage, Tomatoes, and Zucchini
- Lifehacks
-
 How to Crochet a Harlequin Stitch
-
 Removing The Toughest Stains
-
 Crochet Basics: Crumpled Griddle Stitch
- Crochet Ideas
-
 Crochet Christmas Tree
-
 Crochet Goblet of Fire
-
 Crochet Adorable Ammonite
- DIY
-
 DIY Snowman Wreath
-
 Mini Santa Sleigh Ornament
-
 Crochet Gingerbread House Blanket
- Knitting Ideas
-
 Knitted Easter Bunny
-
 Knitted Mobile Phone/Glasses Case
-
 Knitted Cabled Wallet