How to Crochet a Japanese Bag Inspired by Mount Fuji

The Crochet Japanese Bag is a delightful accessory that combines the intricate craft of crochet with the elegance of Japanese design. With its unique patterns and charming aesthetic, this bag is sure to turn heads and add a touch of whimsy to any outfit. Whether you're heading to the market or meeting friends for coffee, this bag is not only practical but also a fun conversation starter. So why not treat yourself to a piece of Japanese-inspired crochet art that exudes both style and creativity?
Materials
- 1 skein Red Heart white yarn (partial)
- 1 skein Red Heart country blue yarn
- 1 skein Red Heart coffee yarn (partial)
- 1 skein Red Heart light raspberry yarn (partial)
- 1 skein Red Heart berry red yarn (partial)
- 5mm crochet hook
- Tapestry needle
Abbreviations (US Terms)
- mr = Magic ring
- sl st = Slip Stitch
- ch = Chain
- sc = Single crochet
- hdc = Half Double Crochet
- tr = Triple Crochet
- inc = Increase
Notes
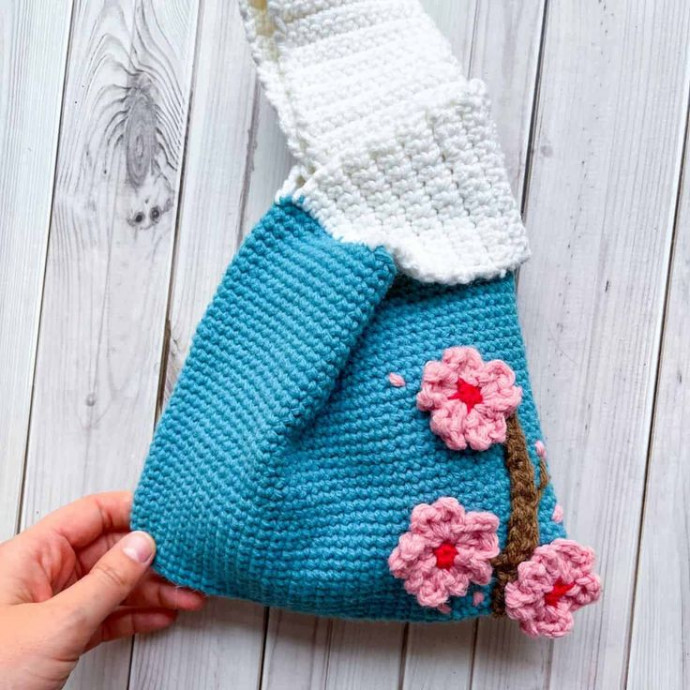
This crocheted Japanese knot bag resembles Mount Fuji.
Made with single crochet; size approximately 8x9 inches (excluding straps).
Adjust size by modifying the starting chain.
Versatile design: change colors, add cherry blossoms, or alter stitches.
For beginners, this is a forgiving design for easy crocheting.
Instructions
This bag pattern is worked in the round. Then the handles are made in rows.
Base of the Bag
Round 1: Ch x31 (If you want the bag wider or skinnier, add/subtract chains, but ensure there is an odd amount).
Round 2: In the second chain from the hook, make an inc. Then sc in each of the next 28 chains. When you get to the last stitch in the corner, make 3 sc. The 3 sc will help you go to the other side of the chain. Sc x29 for this side of the chain as well. The last stitch will be in the stitch that had the first increase. (Total: 62)
Round 3: Inc, inc, sc x28, then in the corner of the other side, inc, inc, inc, sc x28, inc. (Total: 68)
Round 4: Sc, sc, inc, sc x30, inc, sc x3, inc, sc x30, inc, sc. (Total: 74)
Round 5-40: Sc in every stitch. (Total: 74)
Fasten off the blue yarn. Now, the base of your crochet knot bag is done.
Handles
This part of the pattern is made in rows.
Short Handle
Row 1: Join the white yarn to the corner of the bag and sc x12 towards the center of the bag. (12).
Ch x1 and turn.
Row 2-30: Sc x12 (12). Then ch x1 and turn. When all the rows are completed, fasten off and leave a long tail for sewing. Sew the strap to the other side of the bag. Weave in any ends.
Longer Handle
Row 1: Join the white yarn to the corner of the bag and sc x12 towards the center of the bag. (12).
Ch x1 and turn.
Row 2-50: Sc x12 (12). Then ch x1 and turn. When all the rows are completed, fasten off and leave a long tail for sewing. Sew the strap to the other side of the bag. Weave in any ends.
Sakura Blossoms
The crochet cherry blossoms are made in the round.
Round 1: With the berry red yarn, make a mr and sc x5 in it. Fasten off the red and join the light raspberry yarn where you left off.
Round 2: With the newly joined pink yarn, ch x3, then tr, sc, tr, ch x3 and sl st into the same stitch you made the first 3 chains from. You just completed your first crochet cherry blossom petal.
For the other 4 petals, you will do the following: ch x3, and then in the next stitch: tr, sc, tr, ch x3 and sl st into the same stitch from the round below.
When all 5 petals have been made, sl st back to the base of the first petal.
Fasten off but leave a tail for sewing. I made 3 crochet sakura blossoms, but feel free to make more.
Cherry Blossom Tree Pattern
This pattern is made in only 2 rows.
Row 1: With the coffee brown yarn, ch x20.
Row 2: In the second ch from the hook, make a sl st. For the next 9 chains, make a sl st in each one. Sc in each of the next 4 chains, then hdc in the last 5 chains. Fasten off and leave a long tail for sewing.
Sewing
Sew the little tree trunk onto the tree, making little embroidered branches along the way.
Then sew the crochet cherry blossoms onto the branches. I also added little embroidered petals around a few of the blossoms for added texture. (The petals are just small embroidered lines).
Once all the sewing is done, and the tails are weaved in, your crochet Japanese knot bag that looks like Mount Fuji with cherry blossom trees is done!
I hope you enjoyed my Japanese knot bag crochet pattern!
- Funny Pictures
-
 Relatable and Funny Memes to Distract You From the Routine
-
 Hilarious Cat Snapchats That Will Leave You With the Biggest Smile
-
 Today’s Top Funny Tweets to Scroll Before Bed
- Recipes
-
 Cappuccino Brownies
-
 Chicken Mushroom Tortellini Bake
-
 Spinach Pie
- Lifehacks
-
 8 Necessary Tips for Baking Bread
-
 Tips & Hacks for Clean Carpets
-
 10 Uses For Old TV Armoires
- Crochet Ideas
-
 Crochet Watermelon Amigurumi
-
 Crochet Shark Applique
-
 Crochet Pineapple Amigurumi
- DIY
-
 Yarn Wrapped Christmas Wreath Ornaments
-
 Egg Carton Snowman Ornament
-
 Stick Peppermint Candy Ornament
- Knitting Ideas
-
 Knitted Star Square Dishcloth
-
 Knitted Free 2025 Year Dishcloth
-
 Knitted Ribbed Adult Hat