How to Create a Charming Crocheted Brooch

Create your own charming brooch using the art of crocheting. Craft a delightful accessory that will add a touch of whimsy to any outfit. By crocheting a brooch, you can customize it to your liking by choosing your favorite colors and patterns. This handmade accessory will be a unique addition to your wardrobe or a thoughtful gift for a friend. Crocheting a brooch is a fun and creative way to showcase your skills and express your personal style. Crocheting an adorable brooch allows you to experiment with different stitches and techniques, making each piece one-of-a-kind. Whether you're a seasoned crocheter or just starting out, crafting a brooch is a rewarding project that will bring joy to both the maker and the wearer. So grab your crochet hook and yarn, and get ready to create a charming brooch that will be a conversation starter wherever you go.
Finished Size
2×3 inches
Materials
- Yarn
- Size 7/1.65mm steel crochet hook or size needed to obtain gauge
- Beading needle
- Size 8 glass beads by Mill Hill: 30 #18010 ice
- 1-inch pin back
- Craft glue
Ribbon: 4 sts = 1/2 inch; 8 rows = 2 inches
Backing: Rnds 1-3 = 1 3/8 inches in diameter
Pattern Notes
Chain -3 : at beginning of row or round counts as first double crochet unless otherwise stated.
Join with slip stitch as indicated unless otherwise stated.
Instructions
Ribbon
Row 1: With pink, ch 6, dc in 4th ch from hook (first 3 chs count as first dc), hdc in next ch. sc in last ch, turn.
Row 2: Ch 1, sc in first st, hdc in next st. dc in each of last 2 sts turn.
Rows 3-26: Ch 3 (see Pattern Notes), dc in each st across, turn.
Row 27: Ch 3, dc in next st. hdc in next st. sc in last st. turn.
Row 28: Ch 1, sc in first st. hdc in next st. dc in each of last 2 sts. Fasten off.
Backing
Rnd 1: With white, ch 4, sl st in first ch to form ring, ch 1, 8 sc in ring, join (see Pattern Notes) in beg sc. (8 sc)
Rnd 2: Ch 4 (count as first dc and ch-1), dc in same st, (dc. ch 1, dc) in each st around, join in 3rd ch of beg ch-4.
Rnd 3: Sl st in first ch sp, ch 5 (counts as first dc and ch-2), dc in same ch sp. ch 1, [(dc, ch 2, dc) in next ch sp. ch 1] around, join in 3rd ch of beg ch-5. (16 ch sps)
Rnd 4: Sl st in first ch sp. ch 1, sc in same ch sp. [ch 3, sc in next ch sp] around, ch 1, join with hdc in beg sc, forming last ch sp.
Rnd 5: Ch 1, sc in this ch sp. *(dc, {ch 1, dc} 3 times) in next ch sp**, sc in next ch sp. rep from * around, ending last rep at **, join in beg sc. Fasten off.
Beads
Sew 1 bead in each ch-1 sp between dc on rnd 5 of Backing.
Finishing
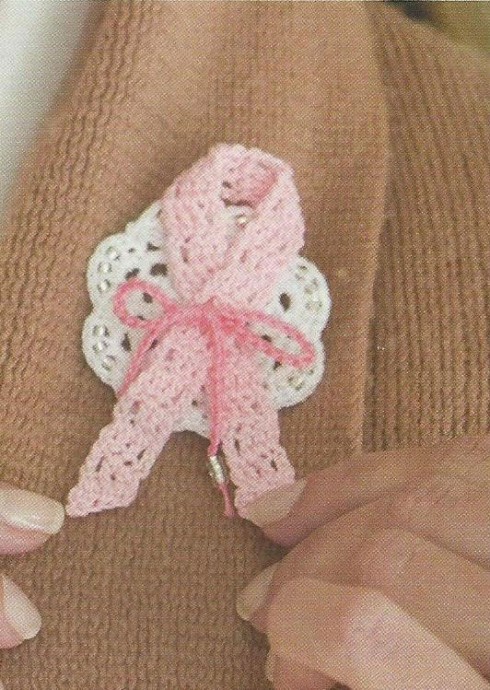
Fold the Ribbon as shown in the photo. Place the Ribbon on the Backing with the center of the overlapped Ribbon in the center of the Backing.
The Bow
Insert rose thread through the center of the Ribbon and Backing from front to back and from back to front. Tie the center of the thread into a knot on the front.
Make a slip knot next to the tied knot and ch 30 on each end of the thread.
Tie chs in a bow. Shorten 1 ch if necessary. String 3 beads onto the end of each ch. Tie the end in a knot to secure the bead. Trim ends. Sew or glue the pin back to the back of the Backing just above the center.
- Funny Pictures
-
 These are the Pics That Simply Describe Your Life
-
 Hilariously Accurate Parenting Memes That Show the Other Side of Parenthood
-
 Great Pics That Just Depict Our Lives
- Recipes
-
 Crispy Baked Avocado Fries
-
 Baked Beans and Hot Dogs with Biscuit Topping
-
 Roasted Rosemary Lemon Chicken Breasts
- Lifehacks
-
 Crochet Basics: Twisted Fringe
-
 7 Crochet Tips And Tricks
-
 How To Work Crochet Into Denim
- Crochet Ideas
-
 Crochet Snorlax Plushie Doll
-
 Crochet Cat in 1 Row
-
 Crochet Beautiful Penguin Toy
- DIY
-
 Popsicle Stick and Jingle Bell Christmas Tree Ornament
-
 Upcycled Mason Jar Chicken Vase
-
 Crochet Namaste Stephanie Doll
- Knitting Ideas
-
 Knitted Keepsake Bag
-
 Knitted Textured Heart Dishcloth
-
 Knitted Snowfall Dishcloth