How to Crochet Your Own Dishcloth

Penelope
May 26, 2024 07:52 AM
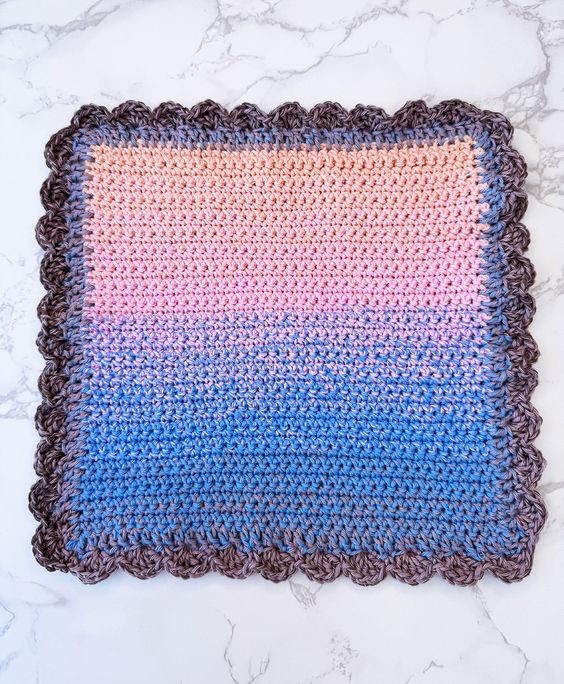
Unleash your creativity and embark on a delightful crochet journey as you craft your very own charming dishcloth. With just a few simple tools and some colorful yarn, you can transform a mundane household item into a work of art. Crocheting allows you to add a personal touch to your kitchen by creating a dishcloth that is not only functional but also visually appealing. Whether you choose to crochet a dishcloth in the shape of a cute animal or opt for a vibrant pattern, the possibilities are endless. Let your imagination run wild and crochet your way to a delightful and practical addition to your kitchen.
Skill Level
Basic/Beginner
Size Information
- Length = 9.5 inches/25 cm
- Width = 9.5 inches/25 cm
Gauge – 20 sts / 26 rows in 10×10 cm/4×4 inches in single crochet.
The Supplies You Need
Yarn
- Yarn 1 x Ricorumi Spin Spin DK Cotton (50g/115m)
- This yarn is DK yarn/light worsted/8-Ply.
Hook Size
4 mm (US G-6) hook.
Notions
- Darning needle/yarn needle
- Scissors
- Tape measure
Crochet Abbreviations
- CH – Chain
- Cont – Continue
- DC – Double Crochet
- Patt – Pattern
- Rep – Repeat
- RS – Right Side
- SC – Single Crochet
- Sl-St – Slip Stitch
- St(s) – Stitch(es)
- WS – Wrong Side
Beginner Dishcloth Crochet Pattern
- Make a slipknot and CH 40, turn.
- Row 1: (RS) CH 1, 1 SC in the 2nd CH from the hook, *1 sc in each CH, rep from * to end, turn.
- Rep row 1 until the work measures 8 inches/20 cm.
Double Crochet Border
- Next, chain 3, and make a double crochet into the same stitch (should be the corner).
- Then, continue to make 1 double crochet in each stitch across the row.
- Once you have reached a corner, make 3 double crochets in the same stitch.
- Make a double crochet in each stitch on the next side of your project.
- Make sure you’re putting just one stitch per row when working on the sides of your crochet project.
- Now, continue to repeat this sequence all the way around your crochet project.
- Once you have finished your border, slip stitch to the first stitch (Make sure you have worked one more double crochet into the final corner – which is the first corner, making a slip stitch into that first ch 3).
The Scalloped/Shell Crochet Border
- Ch 1, work 1 SC into the next st, skip 1 st, work 5 DC’s into the next st, skip 1 st, work 1 SC into the next st, skip 1 st, work 5 DC’s into the next st.
- Rep the sequence of working 1 SC, skip 1 st, work 5 DC’s into the next st, skip 1 st, work 1 SC into the next st.
- Repeat until you return to where you started at the beginning of the shell border, Sl-St into the last st.
- Cut the yarn and fasten it off securely.
- Weave in any loose ends.
No comments
Write a comment
- Funny Pictures
-
 Hilarious Memes for Those Bored to Tears
-
 Weekly Treat of Funniest Parenting Memes for Good Laugh out Loud Right Now
-
 Really Funny Pics to End These Weekend Perfectly
- Recipes
-
 Crispy Baked Avocado Fries
-
 Scrambled Chickpea and Spinach Pitas
-
 Cinnamon Pancakes
- Lifehacks
-
 Crochet Basics: Aligned Cobble Stitch
-
 Brick Stitch Crochet Tutorial
-
 Crochet Basics: Wattle Stitch
- Crochet Ideas
-
 Crochet Snorlax Plushie Doll
-
 Crochet Beautiful Penguin Toy
-
 Crochet Tiny Snowman
- DIY
-
 DIY Santa Craft For Kids
-
 Paper Plate Angel Craft
-
 Upcycled Mason Jar Chicken Vase
- Knitting Ideas
-
 Knitted Bridger Cowl
-
 Knitted Keepsake Bag
-
 Knitted Cutie Cupcake Dolls