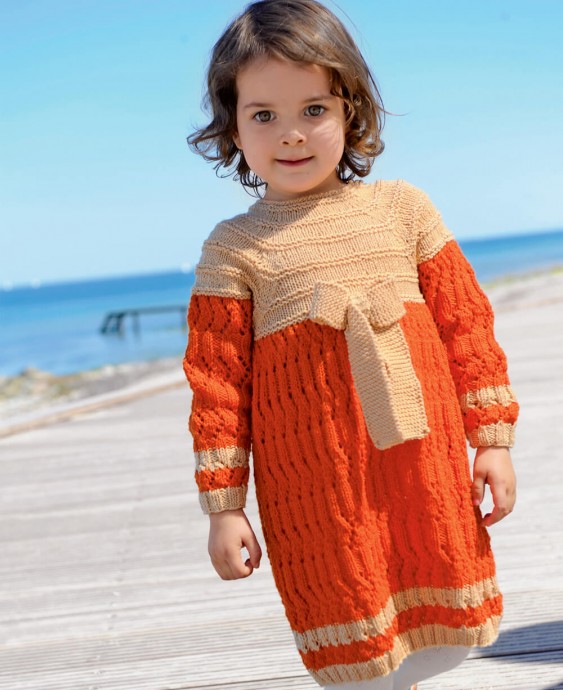
Crafting a Beautiful Knitted Garment


You'll Need:
150; 200; 250g of mercerized cotton yarn of carroty color (125m/50g);
100; 150; 200g of the same yarn, but beige color;
Straight knitting needles 3.5;
Circle knitting needles 3.5;
Crochet hook 3;
Markers (M);
Button with Ø 24 mm.
Size:
86/92; 98/104; 110/116.Used Patterns:
- Stockinette stitch: right-side rows - all knit sts, wrong-side rows - all purls, circle rows - all knit sts;
- Garter stitch: right-side and wrong-side rows - all knit sts, circle rows - 1 row of knit sts, 1 row of purls by turn;
- Stripes: 4 rows of garter stitch, 6 rows of stockinette stitch by turn;
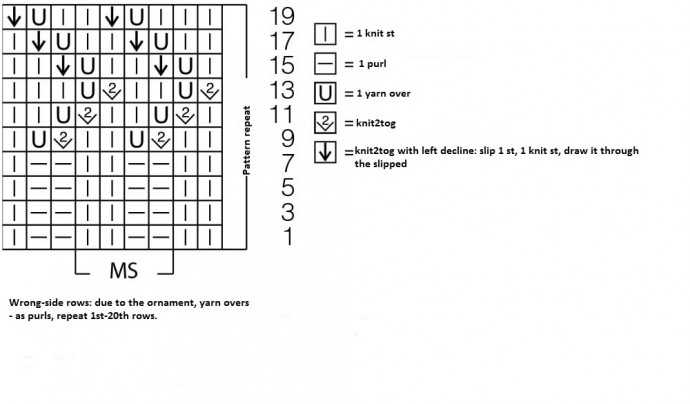
- Relief pattern: made on 4 sts due to the scheme, working wrong-side rows according to the ornament, yarn overs as purls. Start row with sts before pattern repeat, repeat the pattern the needed times, finishing with sts after pattern repeat. Repeat 1st-20th rows in height. Ensure the quantity of yarn overs matches the quantity of sts knit together;
- "Shrimp stitch": single crochets from left to right with the crochet hook.
Marked Decreases:
Use 2 sts from both sides of the marker. These sts are called raglan sts. For decrease, knit 1st raglan st together with the 2nd st as knit st, then, 2 sts of stockinette stitch, knit 3rd raglan st together with the 4th st as 1 knit st with left decline (slip 1 st as knit st, 1 knit st, draw it through the slipped).
Stitches Control:
- Relief pattern: 20 sts x 30 rows = 10 cm x 10 cm;
- Stripes: 22 sts x 32 rows = 10 cm x 10 cm.
Instructions:
Back:
Cast on 87; 95; 103 sts with beige yarn and make 8 rows with relief pattern between the selvedge sts. Then, switch to carroty yarn, make 8 rows with the same pattern, then switch back to beige yarn.
Make 8 rows with this yarn, then change to carroty yarn once again and knit this detail only with this yarn.
After 36; 40; 44 cm of total height, decrease 23 sts in equal distances, leaving 64; 72; 80 sts for some time.
Front:
Make in the same way as back.
Sleeves:
Cast on 31; 35; 35 sts with beige yarn for each sleeve and make 8 rows with relief pattern between the selvedge sts. Then, switch to carroty yarn and make 8 rows with the same pattern, and then switch to beige color again. Make 8 rows with this yarn, then change to carroty color one more time and continue making this detail only with this yarn.
Simultaneously, make increases in every 6th row from both sides of 1 st for sleeve widening, 5; 9; 10 times. Then increase 1 st due to the ornament 8; 4; 5 times from both sides.
After 22; 25; 28 cm of total height of sleeve, leave the sts.
Yoke:
Transfer the sts of back, one sleeve, front and the second sleeve to the knitting needles, using beige yarn. Place markers between the details. Total, there are 242; 266; 290 sts in work.
Make stripes pattern on all the sts. Make marked decreases on the raglan lines near each marker in all the even rows. Total, decrease 20; 22; 24 rows by 2 sts.
At the same time, after 9; 10; 11 cm of yoke height, divide the circle cloth for the cut along the middle line of back and continue with straight and reversed rows. At 14; 15; 16 cm height, bind off the remaining 82; 90; 98 sts.
Bow:
Cast on 10 sts with beige yarn and knit with garter stitch between the selvedge sts. After 50 cm, bind off the sts.
Make the connecting strap on 6 sts. Make this detail with garter stitch between the selvedge sts. After 5 cm, bind off the sts.
Assembly:
Fasten the edge of the neck-hole and cut with beige yarn, making 1 row of single crochets and 1 row of the "shrimp stitch" with the help of a crochet hook. Make a loop buttonhole in the upper part of the cut. For this, 2 single crochets, 2 chain sts.
Make side and sleeve seams. Create a bow from satin ribbon, attach it with the connecting strap, and sew both details to the front. Finally, sew on buttons.
- Funny Pictures
-
 These are the Pics That Simply Describe Your Life
-
 Hilariously Accurate Parenting Memes That Show the Other Side of Parenthood
-
 Great Pics That Just Depict Our Lives
- Recipes
-
 Crispy Baked Avocado Fries
-
 Baked Beans and Hot Dogs with Biscuit Topping
-
 Roasted Rosemary Lemon Chicken Breasts
- Lifehacks
-
 Crochet Basics: Twisted Fringe
-
 7 Crochet Tips And Tricks
-
 How To Work Crochet Into Denim
- Crochet Ideas
-
 Crochet Snorlax Plushie Doll
-
 Crochet Cat in 1 Row
-
 Crochet Beautiful Penguin Toy
- DIY
-
 Popsicle Stick and Jingle Bell Christmas Tree Ornament
-
 DIY Santa Craft For Kids
-
 Paper Plate Angel Craft
- Knitting Ideas
-
 Knitted Bridger Cowl
-
 Knitted Keepsake Bag
-
 Knitted Cutie Cupcake Dolls