Detailed Knitting Instructions for a Stylish Garment


You'll Need:
500g of 100% acryl yarn (225m/100g);
Knitting needles 3.5 and 4.
Stitches Control:
19 sts x 26 rows = 10 x 10 cm.
Size:
S
Instructions
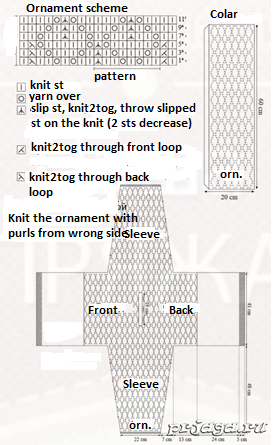
Both sleeves and upper part (yoke) are knitted across, starting from the first sleeve to the second one. Cast on 51 sts and knit 4 rows with garter stitch. Then turn to making the relief ornament due to the scheme. Add 1 st 9 times in every 15th row from sides in the process of knitting.
Knit to 48 cm and cast off 27 sts from both sides. As a result, you should get 123 sts on the knitting needles. Continue knitting with ornament to 59 cm, then bind off for the neck-hole 5 sts from the centre of work. Then, make both parts (front and back) separately to 73 cm height. After that, cast on 5 sts and connect two halves into one detail, continuing to work with the relief ornament. When the length of your work is 89 cm, bind off 27 sts from each side.
After that, make decreases in the same order as you made increases in the beginning, i.e., 1 st in every 15th row 9 times. Knit to 136 cm long and knit 4 rows with garter stitch, after that bind off the sts of the last row.
Lower Part of Back and Front
Make the lower part of back and front separately. Knit them as whole cloth also in a transversal direction. Cast on 58 sts with knitting needles 3.5 and knit each row with 7 purls and 51 sts of stockinette stitch. Knit to 82 cm height and bind off the last row of sts. Now we need to make the collar.
Collar Instructions
It's also made transversal, separately from other details. Cast on 42 sts of the 1st row with knitting needles 4. Knit 38 sts with a relief ornament and 4 sts of garter stitch. The length of the cloth is 60 cm. Knit to this height and bind off the sts of the last row.
Sew the yoke seams and also sleeve seams. Then, sew upper and lower details and all side seams. After that, you need to sew the ready-made collar to the neck-hole.
- Funny Pictures
-
 Cute Cat Memes That Will Make Your Day Brighter
-
 Spot-on and Funny Memes About Introverts Struggles
-
 Top Wonderful Cat Memes on Their Way to Better Your Day
- Recipes
-
 Creamy Old Fashioned Rice Pudding
-
 Russian Tea Cakes (Snowball Cookies)
-
 Rigatoni with Sausage, Tomatoes, and Zucchini
- Lifehacks
-
 How to Crochet a Harlequin Stitch
-
 Removing The Toughest Stains
-
 Crochet Basics: Crumpled Griddle Stitch
- Crochet Ideas
-
 Crochet Christmas Tree
-
 Crochet Goblet of Fire
-
 Crochet Adorable Ammonite
- DIY
-
 DIY Snowman Wreath
-
 Mini Santa Sleigh Ornament
-
 Crochet Gingerbread House Blanket
- Knitting Ideas
-
 Knitted Easter Bunny
-
 Knitted Mobile Phone/Glasses Case
-
 Knitted Cabled Wallet