Crochet Angel Ornament: A Step-by-Step Guide


Create a stunning and unique crochet angel ornament that will add a touch of elegance to your holiday decorations. This beautiful handmade piece will surely become a cherished heirloom for years to come. With just a few simple crochet stitches and some basic materials, you can bring this heavenly creation to life. Whether you're an experienced crocheter or just starting out, this crochet angel ornament is a wonderful project to showcase your skills and creativity. It also makes for a thoughtful and heartfelt gift for loved ones during the holiday season. So, gather your materials, find a cozy spot, and let your imagination soar as you create this enchanting crochet angel ornament.
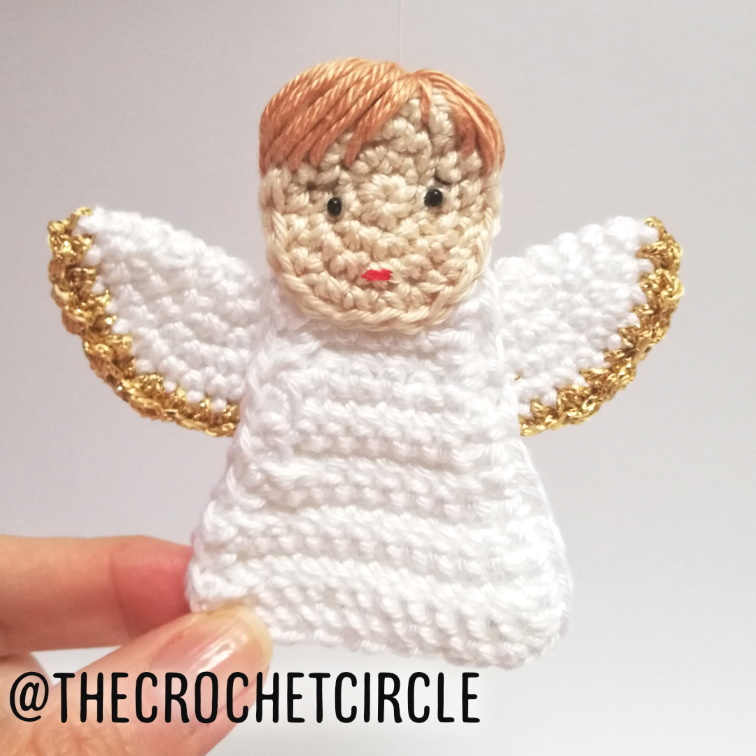
A simple crochet angel ornament made from basic geometric shapes (circle and a cut-off triangle) and using only basic crochet stitches. This is a beginner-friendly crochet Christmas decoration project.
Note!
A great benefit of this pattern is the adjustment of the size that you want. With my 3mm crochet hook and cotton DK yarn the angel is about 8cm tall and the wingspan is also 8cm.
If you want a smaller or a bigger angel you have two options:
- Take thicker or thinner yarn/wool and a bigger or smaller crochet hook.
- Make the base of the body longer (do more chains and continue with decreases in every 3rd row - after R7) or shorter (do fewer chains). For the head and the wings, you can do more or fewer rows of increasing the base of 6 stitches.
For the crochet angel ornament I made, I took a base of 13 chains for the body. The body is worked bottom to top.
You have to make 2 parts for the body (front and back), 2 parts for the head (front and back), and two parts for the wing (each folded in half you get a left and a right wing).
The Stitches Used in This Pattern for the Angel Ornament Are:
- Magic ring
- Sl st - slip stitch
- Ch - chain stitch
- Sc - single crochet stitch
- Dec - sc decrease stitch (join 2sc in 1 - back loops only)
- Inc - sc increase stitch (make 2sc in 1)
The Patterns for the Parts:
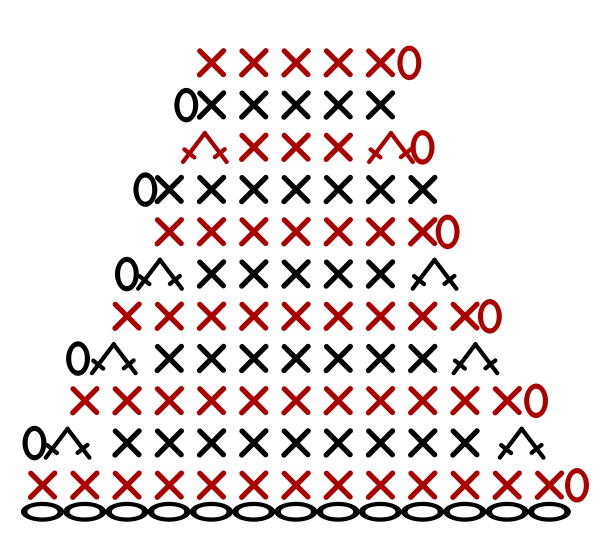
Pattern for the Body of the Crochet Ornament
Note! You will need to make 2.
- Ch 13
- Ch1, 13sc
- Ch1, dec, 9sc, dec
- Ch1, 11sc
- Ch1, dec, 7sc, dec
- Ch1, 9sc
- Ch1, dec, 5sc, dec
- Ch1, 7sc
- Ch1, 7sc
- Ch1, dec, 3sc, dec
- Ch1, 5sc
- Ch1, 5sc
To make a nice edge of the body part crochet single crochet stitches in each last stitch of the row all the way around the body of the angel. In the corner, make 3 single crochet stitches in one - just to turn it. You only have to do this on the side and bottom edges.
The Pattern as a Diagram for the Body of the Crochet Angel:
Pattern for the Angel Head:
- Magic ring
- R1: 6sc - 6st
- R2: 6inc - 12st
- R3: {sc, inc} x6 - 18st
- R4: {sc, inc, sc} x6 - 24st
Pattern for the Crochet Angel Wings:
Wings: make 2 (each wing is a folded in half circle).
Note - Last row of the crochet wings is done in a different color. I used some golden yarn to give it the angelic look. You can skip the changing of the color of the yarn.
- Magic ring
- R1: 6sc - 6st
- R2: 6inc - 12st
- R3: {sc, inc} x6 - 18st
- R4: {sc, inc, sc} x6 - 24st
- R5: {3sc, inc} x6 - 30st
Change color
- R6: {2sc, inc, 2sc} x6 - 36st
How to Assemble the Crochet Angel with All the Parts:
Here is a list to follow with all the steps:
- Fold each wing in half and sew the round edges together - you will get two half circles.
- Attach the wings on the back side of the body - sew the crochet wings to the body.
- Join the body front and body back together - sew the parts together on the edge.
- Embroider the head - eyes, mouth.
- Sew the top part of the head together.
- Insert the body of the angel ornament into the head and continue sewing around the edge of the head.
- Use hair color of your choice and sew some lines to make the hair.
- And your simple crochet angel ornament is done.
Happy Crafting!
- Funny Pictures
-
 Hilarious Memes for Those Bored to Tears
-
 Weekly Treat of Funniest Parenting Memes for Good Laugh out Loud Right Now
-
 Really Funny Pics to End These Weekend Perfectly
- Recipes
-
 Crispy Baked Avocado Fries
-
 Scrambled Chickpea and Spinach Pitas
-
 Cinnamon Pancakes
- Lifehacks
-
 Crochet Basics: Aligned Cobble Stitch
-
 Brick Stitch Crochet Tutorial
-
 Crochet Basics: Wattle Stitch
- Crochet Ideas
-
 Crochet Snorlax Plushie Doll
-
 Crochet Beautiful Penguin Toy
-
 Crochet Tiny Snowman
- DIY
-
 DIY Santa Craft For Kids
-
 Paper Plate Angel Craft
-
 Upcycled Mason Jar Chicken Vase
- Knitting Ideas
-
 Knitted Bridger Cowl
-
 Knitted Keepsake Bag
-
 Knitted Cutie Cupcake Dolls