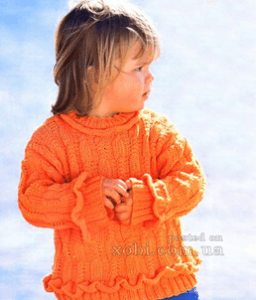
How to Knit a Beautiful Sweater with Frills and Braids

You'll Need:
350g of orange yarn (50% cotton, 50% polyamid; 125m/50g);
Knitting needles 3 and 3.5;
Circle knitting needles 3;
Crochet hook 3.
Size:
80 - 98 cmInstructions
Neck-Hole Placket
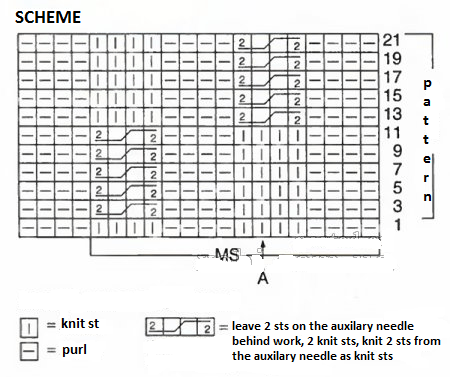
Cast on the stitches on the outer zone of edging and knit 4 cm with 2 x 2 rib. It's necessary to put frill in the upper part. To make the frill, knit 2 cm with stockinette stitch. Then, put the frill on the placket and knit them together to the 1st stitch of the frill and the 1st stitch of the placket. Concerning the ornament with braids, it's made according to the schema of 16 stitches. There are only right side rows on the scheme; wrong side rows are made due to the ornament. You should repeat the pattern from the 3rd to the 22nd rows in height.
Back
Start making the sweater with the back. Cast on 94 stitches, knit 4 cm with 2 x 2 rib, after that leave this part of work. Then cast on 140 stitches for the frills and knit 2 cm with stockinette stitch. In the last row, it's necessary to decrease the stitches to 46 stitches. Then, knit the stitches of the frill and placket together, as it was stated above. After that, knit your cloth between the slevedge stitches of the braid ornament according to the schema. After knitting 28 cm from the rib, divide your work in the center to form a vent. Then finish both parts separately. After making 4 cm, bind off 8 stitches in the neck-hole zone, then in a row 2 times on 6 stitches. When you knit 34 cm after the rib, bind off the remaining stitches of shoulders.
Front
The front is made practically in the same way as the back. The only difference is that the neck-hole should be deeper than on the back. To make it, knit 28 cm after the rib, and then bind off 14 central stitches and knit each part of the front separately. In the process of making one part of the front, bind off along the hole 1 x 4 stitches, 1 x 3 stitches, and 3 x 2 stitches in a row. When the length of the front in the shoulder zone is 34 cm from the rib, bind off the last stitches from the shoulder.
Sleeves
Cast on 50 stitches for one sleeve, then make 4 cm with 2 x 2 rib. Then, leave this part. Make a frill, cast on 75 stitches and knit 2 cm with stockinette stitch. In the final row of the frill, decrease 25 stitches and continue working as described above. Then, knit with the ornament with braids according to the schema in the zone from point A.
Sleeves Chamfers and Assembly
Forming of sleeve chamfers is made only if you made increases in every 5th row 14 times of 1 stitch from both sides. Knit 23 cm from the rib, then bind off the stitches of the final row. Assembly starts with making shoulder seams. Then, cast on 66 stitches along the neck hole and make a placket according to the description above. Fasten the vent with a crochet hook, making 1 row of single crochets and 1 row of "shrimp stitch." Forming of straps is also made with the crochet hook. Make a chain of chain stitches. At the end of the work, sew the sleeves into the armholes, connecting the center with the shoulder seam. Make shoulder, side, and sleeve seams.
- Funny Pictures
-
 Hilarious Memes for Those Bored to Tears
-
 Weekly Treat of Funniest Parenting Memes for Good Laugh out Loud Right Now
-
 Really Funny Pics to End These Weekend Perfectly
- Recipes
-
 Crispy Baked Avocado Fries
-
 Scrambled Chickpea and Spinach Pitas
-
 Cinnamon Pancakes
- Lifehacks
-
 Crochet Basics: Aligned Cobble Stitch
-
 Brick Stitch Crochet Tutorial
-
 Crochet Basics: Wattle Stitch
- Crochet Ideas
-
 Crochet Snorlax Plushie Doll
-
 Crochet Beautiful Penguin Toy
-
 Crochet Tiny Snowman
- DIY
-
 DIY Santa Craft For Kids
-
 Paper Plate Angel Craft
-
 Upcycled Mason Jar Chicken Vase
- Knitting Ideas
-
 Knitted Bridger Cowl
-
 Knitted Keepsake Bag
-
 Knitted Cutie Cupcake Dolls