


Adorable Crochet Amigurumi Sweet Bunny — Free 12 cm Pattern & Step-by-Step Guide

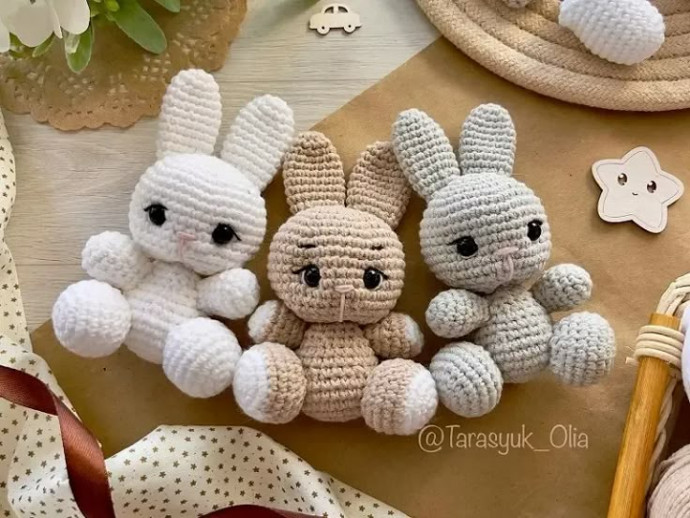
Create a cuddly little friend with this free Crochet Amigurumi Sweet Bunny pattern. Finished height is approximately 12 cm (4.7″). The pattern uses YarnArt Jeans (cotton/acrylic blend) and a 2.0 mm hook to produce a firm, tidy fabric—perfect for a small toy, gift or decoration. Below you’ll find the full materials list, stitch abbreviations, round-by-round instructions for head, body, arms, legs and ears, plus simple assembly and finishing tips.
Difficulty: Easy–Intermediate. Suitable for crocheters who know basic amigurumi techniques: working in the round, increases/decreases, changing colors, and simple embroidery.
Materials Needed
You will need:
- YarnArt Jeans yarn (55% cotton, 45% acrylic, 50 g/160 m): white #01, black #53, beige (main color) #87
- 2.0 mm crochet hook
- 7 mm safety eyes
- Tapestry needle
- Scissors
- Fiberfill
Height: 12 cm (4.7″)
Free Crochet Bunny Pattern
Abbreviations
R – row
ch – chain
sc – single crochet
inc – increase (2 sc in one stitch)
dec – decrease (2 sc together)
[…] – number of stitches you should have at the end of the row
(…) – repeat whatever is between the brackets the given number of times
Head
With main color yarn:
R 1: 6 sc in magic ring [6]
R 2: (inc) repeat 6 times [12]
R 3: (1 sc, inc) repeat 6 times [18]
R 4: (2 sc, inc) repeat 6 times [24]
R 5: (3 sc, inc) repeat 6 times [30]
R 6: (4 sc, inc) repeat 6 times [36]
R 7: (5 sc, inc) repeat 6 times [42]
R 8-13: 42 sc (6 rows)
R 14: (5 sc, dec) repeat 6 times [36]
Insert safety eyes between R 11 and R 12.
R 15: (4 sc, dec) repeat 6 times [30]
R 16: (3 sc, dec) repeat 6 times [24]
R 17: (2 sc, dec) repeat 6 times [18]
R 18: (4 sc, dec) repeat 3 times [15]
Stuff the head.
Fasten off and leave a long tail for sewing.
Body
With main color yarn:
R 1: 6 sc in magic ring [6]
R 2: (inc) repeat 6 times [12]
R 3: (1 sc, inc) repeat 6 times [18]
R 4: (2 sc, inc) repeat 6 times [24]
R 5: (3 sc, inc) repeat 6 times [30]
R 6-7: 30 sc (2 rows)
R 8: (3 sc, dec) repeat 6 times [24]
R 9-10: 24 sc (2 rows)
R 11: (2 sc, dec) repeat 6 times [18]
R 12: (4 sc, dec) repeat 3 times [15]
R 13: 15 sc
Stuff the body.
Fasten off.
Arms
(make 2)
Start with white color yarn:
R 1: 6 sc in magic ring [6]
R 2: (inc) repeat 6 times [12]
R 3: (3 sc, inc) repeat 3 times [15]
Change to main color yarn:
R 4-5: 15 sc (2 rows)
R 6: (1 sc, dec) repeat 5 times [10]
R 7-8: 10 sc (2 rows)
Stuff the arm.
Fasten off and leave a long tail for sewing.
Legs
(make 2)
Start with white color yarn:
R 1: 6 sc in magic ring [6]
R 2: (inc) repeat 6 times [12]
R 3: (1 sc, inc) repeat 6 times [18]
R 4: (2 sc, inc) repeat 6 times [24]
Change to main color yarn:
R 5-7: 24 sc (3 rows)
R 8: (2 sc, dec) repeat 6 times [18]
R 9: (1 sc, dec) repeat 6 times [12]
Stuff the leg.
Fasten off and leave a long tail for sewing.
Ears
(make 2)
With main color yarn:
R 1: 6 sc in magic ring [6]
R 2: (inc) repeat 6 times [12]
R 3: 12 sc
R 4: (3 sc, inc) repeat 3 times [15]
R 5-10: 15 sc (6 rows)
R 11: (3 sc, dec) repeat 3 times [12]
R 12: 12 sc
R 13: (4 sc, dec) repeat 2 times [10]
Do not stuff.
Fasten off and leave a long tail for sewing.
Assembly
Sew the head to the body.
Sew the arms and legs to the body.
Finishing Touches
Make eye tightening.
Embroider eye whites using a white yarn, eyebrows and lashes using a black one.
Embroider a nose using a pink yarn.
Sew the ears to the head between R 7 and R 8 with slightly leaning forward.
Quick Tips
- Use a 2.0 mm hook and slightly tighter than usual tension for a firm fabric so stuffing doesn’t show through.
- Place safety eyes before closing the head and secure them tightly; consider using washers for extra safety if the toy is for a child.
- When stuffing, add fiberfill gradually and shape as you go to avoid lumps.
- Sew parts on securely with matching yarn and weave in ends neatly.
- Funny Pictures
-
 Weekly Treat of Funniest Parenting Memes for Good Laugh out Loud Right Now
-
 Really Funny Pics to End These Weekend Perfectly
-
 Incredibly Relatable Pics for Your Amusement
- Recipes
-
 Chewy Oatmeal Cookies
-
 Tomato Tuna Melt
-
 Instant Pot Broccoli Cheddar and Zucchini Soup
- Lifehacks
-
 Wide Half Double Crochet Stitch Photo Tutorial
-
 How to Crochet a Sunflower Stitch Photo Tutorial
-
 Lemon Peel Crochet Stitch Photo Tutorial
- Crochet Ideas
-
 DIY Crochet Mushroom Keychain — Easy Step-by-Step Pattern with Photos
-
 Make a Leafy Texture: Easy Crochet Sprig Stitch (Free UK Pattern)
-
 Free Crochet Sleep Mask Pattern — Cute DK Cotton Eye Mask (UK Terms, Advanced Beginner)
- DIY
-
 Cozy Crochet: Free Up-and-Down Stripe Cotton Washcloth Pattern (Quick & Easy)
-
 How to Make Realistic Crepe Paper Daffodils — Easy Step-by-Step DIY
-
 Make Adorable Easter Egg Bird Feeders — Easy DIY Seed Ornaments for Your Backyard
- Knitting Ideas
-
 Knit the Fish Scale Stitch: Easy 4-Row Pattern for a Textured, Scaly Look
-
 Knitted Camisole Party Frock — Vintage Pattern with Step-by-Step Instructions
-
 DIY Knitted Cuddly Cat Toy — Free Pattern & Step-by-Step Instructions