


Make a Sweet Crochet Bear Didi Amigurumi — Step‑by‑Step Pattern

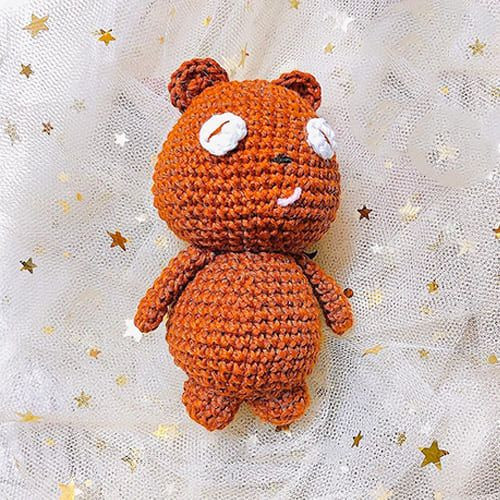
Create your own cuddly Crochet Bear Didi with this clear amigurumi pattern. Perfect for gift‑making or a comforting hobby project, Didi is an approachable make for crocheters familiar with basic amigurumi techniques. Below is the full stitch pattern, abbreviations, materials, and helpful finishing tips to assemble your bear.
Meet the Adorable Crochet Bear Didi Amigurumi
This charming little bear is the perfect cuddly companion for both children and adults alike. With its soft yarn and cute design, Didi is sure to bring a smile to anyone's face. Whether you're looking for a unique gift or a fun project to work on, Crochet Bear Didi is a delightful choice. So grab your crochet hook and get ready to create your own fluffy friend with this lovable amigurumi pattern!
Abbreviations
MR: Magic ring
Sc: Single crochet
Dec: Decrease
Inc: Increase
Slst: Slip stitch
Ch: Chain
Materials
Hook size: 1 mm - Cotton yarn
Depends on the size of yarn you’re using
Stitch marker
Fiberfill
Scissors
Head
Rnd 1. 6 sc in MR (6)
Rnd 2. 6 inc (12)
Rnd 3. (sc, inc) * 6 (18)
Rnd 4. (2sc, inc) * 6 (24)
Rnd 5. (3sc, inc) * 6 (30)
Rnd 6. 30 sc (30)
Rnd 7. 2 sc, inc, (4sc, inc) * 5, 2 sc (36)
Rnd 8-9. 36 sc (36)
Rnd 10. (5sc, inc) * 6 (42)
Rnd 11-13. 42 sc (42)
Rnd 14. (6sc, inc) * 6 (48)
Rnd 15. 48 sc (48)
Rnd 16. 3sc, dec, (6sc, dec) * 5, 3sc (42)
Rnd 17. (5sc, dec) * 6 (36)
Rnd 18. 2 sc, dec, (4sc, dec) * 5, 2 sc (30)
Rnd 19. (3sc, dec) * 6 (24)
Rnd 20. sc, dec, (2sc, dec) * 5, sc (18)
Ears (Make 2)
Rnd 1. MR, 5sc, 1 ch, turn (5)
Rnd 2. 5 inc (10)
Eyes (Make 2)
Rnd 1. MR, 8 sc (8)
Rnd 2. 8 inc (16)
Arms (Make 2)
Rnd 1. 6 sc in MR (6)
Rnd 2-9. 6 sc (6)
Legs (Make 2)
Rnd 1. 6 sc in MR (6)
Rnd 2. 6 inc (12)
Rnd 3-4. 12 sc (12)
Body
Rnd 1. 6 sc in MR (6)
Rnd 2. 6 inc (12)
Rnd 3. (sc, inc) * 6 (18)
Rnd 4. (2sc, inc) * 6 (24)
Rnd 5. (3sc, inc) * 6 (30)
Rnd 6. 2 sc, inc, (4sc, inc) * 5, 2 sc (36)
Rnd 7-11. 36 sc (36)
Rnd 12. 2sc, dec, (4sc, dec) * 5, 2sc (30)
Rnd 13. 30 sc (30)
Rnd 14. (3sc, dec) * 6 (24)
Rnd 15. (2sc, inc) * 6 (18)
Sewing the body and head.
Finishing and Assembly
1. Position and sew the eyes onto the head before stuffing fully so you can place them evenly.
2. Stuff the head, body, arms, and legs firmly with fiberfill; avoid overstuffing to keep stitches even.
3. Sew the head to the body securely using a yarn needle and matching yarn, weaving the tail through several stitches to anchor it.
4. Attach ears, arms, and legs symmetrically—use pins to test placement before stitching.
5. Embroider the nose and mouth with yarn or embroidery thread, or add safety nose/buttons if desired (ensure they are secured properly for toys for young children).
Tips
- Use a stitch marker to keep track of rounds.
- Adjust hook size to change finished size; smaller hooks create tighter stitches for less stuffing gap.
- Customize Didi with different yarn colors, a tiny scarf, or embroidered details for personality.
- Funny Pictures
-
 Weekly Treat of Funniest Parenting Memes for Good Laugh out Loud Right Now
-
 Really Funny Pics to End These Weekend Perfectly
-
 Incredibly Relatable Pics for Your Amusement
- Recipes
-
 Chewy Oatmeal Cookies
-
 Tomato Tuna Melt
-
 Instant Pot Broccoli Cheddar and Zucchini Soup
- Lifehacks
-
 Wide Half Double Crochet Stitch Photo Tutorial
-
 How to Crochet a Sunflower Stitch Photo Tutorial
-
 Lemon Peel Crochet Stitch Photo Tutorial
- Crochet Ideas
-
 DIY Crochet Mushroom Keychain — Easy Step-by-Step Pattern with Photos
-
 Make a Leafy Texture: Easy Crochet Sprig Stitch (Free UK Pattern)
-
 Free Crochet Sleep Mask Pattern — Cute DK Cotton Eye Mask (UK Terms, Advanced Beginner)
- DIY
-
 Cozy Crochet: Free Up-and-Down Stripe Cotton Washcloth Pattern (Quick & Easy)
-
 How to Make Realistic Crepe Paper Daffodils — Easy Step-by-Step DIY
-
 Make Adorable Easter Egg Bird Feeders — Easy DIY Seed Ornaments for Your Backyard
- Knitting Ideas
-
 Knit the Fish Scale Stitch: Easy 4-Row Pattern for a Textured, Scaly Look
-
 Knitted Camisole Party Frock — Vintage Pattern with Step-by-Step Instructions
-
 DIY Knitted Cuddly Cat Toy — Free Pattern & Step-by-Step Instructions