


Adorable Kawaii Cat Amigurumi Crochet Pattern — Step-by-Step Guide

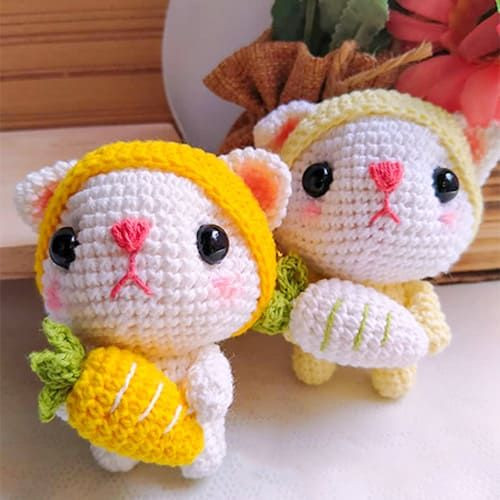
Create a cute, cuddly Kawaii Cat Amigurumi with this complete crochet pattern. Below you’ll find the materials, abbreviations and full round-by-round instructions for the head, ears, tail, arms, legs, body, hood and a tiny carrot accessory. Follow the assembly and finishing tips to complete your charming handmade toy.
Crochet Kawaii Cat Amigurumi
Crochet Kawaii Cat Amigurumi is a delightful craft project that brings cuteness to life through colorful yarn and intricate stitches. These adorable handmade creations are perfect for adding a touch of charm to any space, whether as a cute decor piece or a lovable gift for a fellow cat lover. With their sweet faces and tiny details, crafting a Kawaii Cat Amigurumi can be a heartwarming experience that sparks joy and creativity. So grab your crochet hook, a ball of soft yarn, and let's embark on a crafting adventure filled with endless smiles and purr-fect moments!
Materials
- 100% natural cotton thread
- 1.5mm crochet hook
- Sewing needle and scissors
- 9mm safety eyes
- Fiberfill for stuffing
Abbreviations
MR: Magic ring
Sc: Single crochet
St: Stitch
Ch: Chain
Dc: Double crochet
Inc: Increase
Dec: Decrease
Head
With white.
RND 1: 7 sc in MR (7)
RND 2: 7 inc (14)
RND 3: (sc, inc)*7 (21)
RND 4: (sc, inc, sc)*7 (28)
RND 5: (3sc, inc)*7 (35)
RND 6: (2sc, inc, 2sc)*7 (42)
RND 7-10: 42 sc
RND 11: 6 sc, (inc, sc)*3, 18 sc, (sc, inc)*3, 6 sc (48)
RND 12-15: 48 sc
RND 16: (dec, 6 sc)*6 (42)
RND 17: (dec, 5 sc)*6 (36)
RND 18: (dec, 4 sc)*6 (30)
RND 19: (dec, 3 sc)*6 (24)
RND 20: (dec, 2 sc)*6 (18)
Note: Attach eyes between row 10 (16th and 27th) or your choice.
Ears (Make 2)
With white.
RND 1: 6 sc in MR (6)
RND 2: (sc, inc)*3 (9)
RND 3: (2sc, inc)*3 (12)
RND 4: (3sc, inc)*3 (15)
RND 5: 15 sc
Tail
With white.
RND 1: 6 sc in MR (6)
RND 2: 6 inc (12)
RND 3-5: 12 sc
Fasten off, leaving a long tail for sewing.
Arms (Make 2)
With white.
RND 1: 8 sc in MR (8)
RND 2-5: 8 sc
RND 6: dec, 6 sc (7)
RND 7: dec, 5 sc (6)
Legs and Body
Legs
With white.
RND 1: 6 sc in MR (6)
RND 2: (sc, inc)*3 (9)
RND 3-4: 9 sc
Break the yarn and work the second leg the same way.
RND 5: Ch 3, 9 sc, ch 3, 9 sc (24)
Body
RND 6-9: 24 sc
RND 10: (dec, 6 sc)*3 (21)
RND 11: 21 sc
RND 12: (dec, 5 sc)*3 (18)
Baby Carrot
RND 1: 6 sc in MR (6)
RND 2: (sc, inc)*3 (9)
RND 3: (sc, inc, sc)*3 (12)
RND 4: 12 sc
RND 5: (3sc, inc)*3 (15)
RND 6: 15 sc
RND 7: (2sc, inc, 2sc)*3 (18)
RND 8-11: 18 sc
RND 12: (dec, sc)*6 (12)
RND 13: 12 sc
Fasten off, leaving a long tail for sewing.
Hood
With yellow.
RND 1: 8 sc in MR (8)
RND 2: 8 inc (16)
RND 3: (sc, inc)*8 (24)
RND 4: (sc, inc, sc)*8 (32)
RND 5: (3sc, inc)*8 (40)
RND 6: 40 sc
RND 7: (2sc, inc, 2sc)*8 (48)
RND 8: (5sc, inc)*8 (56)
RND 9-12: 56 sc
RND 13: (dec, 5sc)*8 (48)
RND 14: 48 sc
Assembly
1. Stuffing: Lightly stuff each piece as you go. Use fiberfill to achieve a smooth, even shape—avoid overstuffing to keep seams easy to sew.
2. Face and eyes: Secure safety eyes in the head at the suggested placement (between row 10, around stitches 16 and 27) or adjust to preference. Add an embroidered nose and mouth with yarn or embroidery thread.
3. Sew ears: Position ears on top of the head and sew them in place with a yarn needle, using small, even stitches so they sit symmetrically.
4. Attach limbs and tail: Sew the arms to the sides of the body and the tail to the back. Sew the legs to the bottom of the body where rounds 5–6 join.
5. Hood and carrot: Place the hood over the head and stitch it in place at the back or sides to keep it secure. Sew the tiny carrot accessory to the arms or body as desired.
Finishing Tips & Customization
- Weave in all loose ends neatly on the inside of the toy.
- Use a tapestry needle and ladder stitch or whipstitch for nearly invisible seams.
- Customize colors for the main body, hood or carrot to make different characters.
- Add small embroidered blush with pastel or yarn for extra kawaii effect.
- For safety: if making for small children, ensure eyes and small parts are securely attached or consider embroidering facial features instead of using safety eyes.
Enjoy making your Kawaii Cat Amigurumi—adjust color, size and details to make a unique, adorable handmade gift or decor piece.
- Funny Pictures
-
 Weekly Treat of Funniest Parenting Memes for Good Laugh out Loud Right Now
-
 Really Funny Pics to End These Weekend Perfectly
-
 Incredibly Relatable Pics for Your Amusement
- Recipes
-
 Chewy Oatmeal Cookies
-
 Tomato Tuna Melt
-
 Instant Pot Broccoli Cheddar and Zucchini Soup
- Lifehacks
-
 Wide Half Double Crochet Stitch Photo Tutorial
-
 How to Crochet a Sunflower Stitch Photo Tutorial
-
 Lemon Peel Crochet Stitch Photo Tutorial
- Crochet Ideas
-
 DIY Crochet Mushroom Keychain — Easy Step-by-Step Pattern with Photos
-
 Make a Leafy Texture: Easy Crochet Sprig Stitch (Free UK Pattern)
-
 Free Crochet Sleep Mask Pattern — Cute DK Cotton Eye Mask (UK Terms, Advanced Beginner)
- DIY
-
 Cozy Crochet: Free Up-and-Down Stripe Cotton Washcloth Pattern (Quick & Easy)
-
 How to Make Realistic Crepe Paper Daffodils — Easy Step-by-Step DIY
-
 Make Adorable Easter Egg Bird Feeders — Easy DIY Seed Ornaments for Your Backyard
- Knitting Ideas
-
 Knit the Fish Scale Stitch: Easy 4-Row Pattern for a Textured, Scaly Look
-
 Knitted Camisole Party Frock — Vintage Pattern with Step-by-Step Instructions
-
 DIY Knitted Cuddly Cat Toy — Free Pattern & Step-by-Step Instructions