


Adorable Crochet Rubber Duck Amigurumi — Free Pattern & Step-by-Step Guide

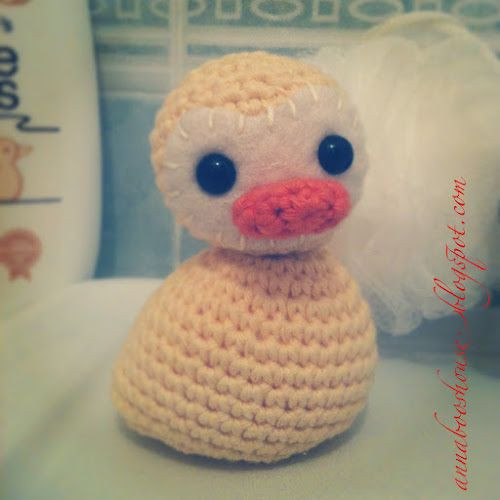
Add a touch of charm to your crochet collection with this Crochet Rubber Duck Amigurumi pattern. This pattern outlines the head, body and bill construction, plus assembly notes and the materials used. It uses basic amigurumi techniques (magic ring, single crochet, increases and decreases) and the supplied step-by-step rounds make it easy to follow along. Gather your yarn and hook and enjoy making a squishy, smile-inducing duck!
Quick overview: make the head and body separately, join the neck, add the bill and felt face (or embroider) and finish by stuffing firmly. The pattern below uses RICO Creative Cotton and a 4 mm hook but you can substitute similar yarn and hook sizes to achieve the texture you prefer.
You Will Need
Your materials for this project include:
- Yarn of your choice and a hook to match (the example uses RICO Creative Cotton, main colour 63 [light yellow] and bill colour 74 [orange] and a 4mm hook)
- Stitch marker
- Toy stuffing
- Embroidery thread (to coordinate with face and bill colours) and needle
- Tapestry (blunt) needle
- Felt (for face, optional)
- 2x 9mm black safety eyes
- 1x 12mm safety eye if you want a moving head (optional)
Stitches and Abbreviations
I use US terms, so single crochet (sc) is equivalent to UK double crochet here:
- Chain (ch)
- Single crochet (sc)
- Stitches (sts)
- Single Crochet 2 Together (sc2tog)
To Single Crochet 2 Together
Follow these steps:
- Insert hook into next stitch.
- Yarn over, pull up a loop. (2 loops on hook)
- Insert hook into next stitch.
- Yarn over, pull up a loop (3 loops on hook)
- Yarn over and pull through all 3 loops.
Pattern
Head (Beginning with Neck and Working Up)
- 5sc in magic ring OR ch2, 5sc in 2nd chain from hook.
- 2sc in each sc (10)
- 2sc in each sc (20)
- Sc 20
- (3sc, 2sc in next sc) repeat around (25)
- Sc 25
- (4sc, 2sc in next sc) repeat around (30)
- 8-9. Sc 30
- (4sc, sc2tog) repeat around (25)
- (3sc, sc2tog) repeat around (20)
- Sc 20
Measure 2 arm lengths of yarn and cut. You'll finish the head in a bit...
Body (Neck Down)
- 5sc in magic ring OR ch2, 5sc in 2nd chain from hook.
- 2sc in each sc (10)
- 2sc in each sc (20)
- Sc 20
- (1sc, 2sc in next sc) repeat around (30)
- Sc 30
- (5sc, 2sc in next sc) repeat around (35)
- 8-11. Sc 35
- Sc 10, 2sc in each of next 5 stitches, sc10, sc2tog over next 10 stitches (35 sts)
- Sc 35
- (3sc, sc2tog) repeat around (28)
- Sc2tog around (14)
Attach the body to the head (if using safety eye): push the eye shank into the bottom of the head and into the neck of the body and attach the collar tightly. Stuff firmly.
- Sc2tog around (7)
- Sew closed.
Bill
- 6sc
- (2sc in each of next 2 sts, sc, 2sc in each of next 2 scs, sc) (10sts)
- Sc 10
- Sc 10
Fasten off.
Finish Head
Follow these steps:
- Make small slits in the felt 'face' and push safety eyes through. Push eye shanks into crochet face and attach collars behind.
- Sew on felt face
- Attach beak
- Stuff firmly
- Sc2tog around (10)
- Sc2tog around (5)
- Sew closed.
Finishing Tips
- Work with a slightly smaller hook than recommended for your yarn to get tight stitches that prevent stuffing from showing.
- Use a stitch marker to mark the beginning of each round; continuous rounds keep the amigurumi smooth.
- Stuff firmly and evenly to keep the duck's shape; add stuffing as you close to avoid lumps.
- If you prefer embroidered features instead of felt, use embroidery thread and a needle to stitch a simple beak and eyes before final stuffing.
And that should be it! Enjoy making your lovable Crochet Rubber Duck Amigurumi — a sweet handmade gift or cheerful decor piece.
- Funny Pictures
-
 Weekly Treat of Funniest Parenting Memes for Good Laugh out Loud Right Now
-
 Really Funny Pics to End These Weekend Perfectly
-
 Incredibly Relatable Pics for Your Amusement
- Recipes
-
 Chewy Oatmeal Cookies
-
 Tomato Tuna Melt
-
 Instant Pot Broccoli Cheddar and Zucchini Soup
- Lifehacks
-
 Wide Half Double Crochet Stitch Photo Tutorial
-
 How to Crochet a Sunflower Stitch Photo Tutorial
-
 Lemon Peel Crochet Stitch Photo Tutorial
- Crochet Ideas
-
 DIY Crochet Mushroom Keychain — Easy Step-by-Step Pattern with Photos
-
 Make a Leafy Texture: Easy Crochet Sprig Stitch (Free UK Pattern)
-
 Free Crochet Sleep Mask Pattern — Cute DK Cotton Eye Mask (UK Terms, Advanced Beginner)
- DIY
-
 Cozy Crochet: Free Up-and-Down Stripe Cotton Washcloth Pattern (Quick & Easy)
-
 How to Make Realistic Crepe Paper Daffodils — Easy Step-by-Step DIY
-
 Make Adorable Easter Egg Bird Feeders — Easy DIY Seed Ornaments for Your Backyard
- Knitting Ideas
-
 Knit the Fish Scale Stitch: Easy 4-Row Pattern for a Textured, Scaly Look
-
 Knitted Camisole Party Frock — Vintage Pattern with Step-by-Step Instructions
-
 DIY Knitted Cuddly Cat Toy — Free Pattern & Step-by-Step Instructions