


Adorable Crochet Mini Snowman Ornament — Free Pattern & Step-by-Step Guide

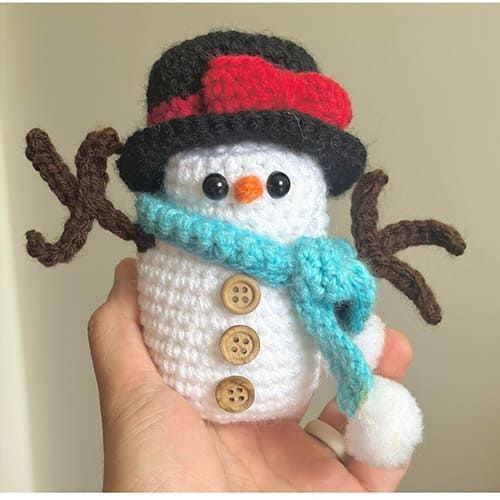
Make a charming Crochet Mini Snowman Ornament to brighten your holiday decor or give as a handmade gift. This compact amigurumi-style snowman features a slanted hat, tiny bow, scarf, twig arms and three buttons. The pattern suits an advanced beginner and finishes about 5" tall when using the recommended yarn and hook. Read through the materials, stitch abbreviations and step-by-step rounds below, then assemble and embellish to create a festive ornament.
Materials and Tools
Yarn:
• Patons Classic Wool in red
• Red Heart Super Saver in white and blue
• Caron Jumbo in brown
or any worsted/medium 4 yarn brand of your choice.
Yellow embroidery thread for the light embroidery.
3.75mm crochet hook
Tools and Notions:
• Stitch marker
• 8 mm or smaller safety eyes (Amazon)
• 3 pcs of 6-8mm buttons
• Polyfil stuffing (I used Fairfield)
• Alternative: cotton balls/scrap yarn
• Scissors
• Tapestry needle
• Small soft pom poms (half of an inch size and they come in packs)
• Glue gun and sticks if sewing is not preferred (optional).
Project Overview
Difficulty Level: Advanced beginner.
Finished Item Size: From the tip of the hat, 5" tall x the widest part of the body 4.00" (If recommended yarn size and hooks are followed).
Abbreviations
ch - chain
st - stitch
slst - slip stitch
sc - single crochet
hdc - half double crochet
dc - double crochet
inc - increase
dec - decrease
FO - fasten off
Note: The body and head of the pattern are worked as one piece. It is worked in chains at the beginning and will turn into continuous rounds.
Body (worked in white yarn)
R1. Chain 7, sc around the chains starting in the 2nd ch from the hook. (12)
R2. inc in each st around (24)
R3-4 sc around (24)
In this round, your work is supposed to be in an oblong shape.
R5. 3sc, inc x (30)
R6-13. sc around (30)
R14. 3sc, dec x 6 (24)
R15-18. sc around (24)
Note: Lay your work flat before inserting the safety eyes for the pattern is like a ‘sack’. It is kind of a flat oblong shape. The safety eyes are located between R16 and 17, 1 st apart.
Note: For the safety eyes, I prefer to attach them with the wider part of the backing facing out. Use a strong glue before inserting them. In that way, they will be more secure.
R19. 2sc, dec x 6 (18)
R20. 1sc, dec x 6 (12)
R21. dec x 6 (6)
Stuff, sl st in the beginning sc of the round, FO, and closing the opening is not necessary.
Hat (worked in black then red)
In black yarn.
R1. 6 sc in a magic ring (6)
R2. inc in each st around (12)
R3. 1sc, inc x 6 (18)
R4. 2sc, inc x 6 (24)
R5. 3sc, inc x 6 (30)
R6. Back loops only, sc around (30)
R7-9. Regular sc around (30)
Switch to red yarn or any color of your choice.
R10. sc around (30)
R11. 8sc, dec x 3 (27)
Cut the red yarn.
Switch to black yarn.
R12. Front loops only, sc around (27)
R13. Regular sc, 2sc, inc x 9 (36)
R14. 3sc, inc x 9 (45)
R15. sc around, FO and weave ends.
Mini Bow (in red)
R1. ch 20 and join
R2-3. sc around (20)
To make this into a bow, sew this on the red stripe of the hat.
Sew on the center with vertical sts. Do this multiple times. Weave ends.
Scarf (in blue)
R1. ch 51, sc in each st across starting in the 2nd ch from the hook, ch 1 and turn (50)
R2-3. sc across.
FO and weave ends.
Optional: attach pom poms at both ends of the scarf or fringe.
Twigs (Make 2) (in brown)
R1. ch 11, 6 slst across starting in the 2nd ch from the hook (5)
To work with the extra twigs on the side.
Left twig: ch 6, slst across. Starting in the 2nd chain from the hook then slst back in the center (5).
Right twig: ch 6 on the opposite side. Slst starting in the 2nd ch from the hook (5).
To finish off, slst until the very last ch. Leave a long tail for sewing.
Assembly and Embroidery
1) Sew the hat onto the head. Just sew from the lining of the hat, not the brim. Make it slightly slanted either to the right or left. Cover the back of the head. Use ball pins to secure the hat before sewing.
2) Sew the twigs on the side of the body, somewhat off from each other, 3 rounds below the eyes. Do this multiple times to stiffen the twigs.
3) In orange/mustard yarn, make small horizontal lines in between the eyes, size of 1 st only. Repeat multiple times until the nose is pointed. Pinch the nose to make it even more pointed.
4) Sew or use a strong glue to attach the 3 buttons on the center of the body to the bottom. Start the 1st button 4 sts below the nose.
5) Lastly, wrap the scarf around the neck. Tighten it so it will distinguish a shape between the head and the body. To make this an ornament, make a big loop with a string/yarn and slip stitch it at the back of the hat.
Finishing Tips & Safety
- When adding safety eyes and small buttons, remember these are small parts; if gifting to small children, consider embroidering the eyes and buttons instead for safety.
- Use extra passes of thread or a dab of strong glue behind safety eyes for a secure hold.
- If the hat or twigs feel floppy, reinforce by stitching through multiple layers or adding a bit of fabric glue where needed.
- Customize colors and accessories (pom poms, fringe, or a tiny bell) to match your holiday decor.
Enjoy making your little snowmen—these mini ornaments are great for tree decorations, gift toppers, or handmade holiday swaps!
- Funny Pictures
-
 Weekly Treat of Funniest Parenting Memes for Good Laugh out Loud Right Now
-
 Really Funny Pics to End These Weekend Perfectly
-
 Incredibly Relatable Pics for Your Amusement
- Recipes
-
 Chewy Oatmeal Cookies
-
 Tomato Tuna Melt
-
 Instant Pot Broccoli Cheddar and Zucchini Soup
- Lifehacks
-
 Wide Half Double Crochet Stitch Photo Tutorial
-
 How to Crochet a Sunflower Stitch Photo Tutorial
-
 Lemon Peel Crochet Stitch Photo Tutorial
- Crochet Ideas
-
 DIY Crochet Mushroom Keychain — Easy Step-by-Step Pattern with Photos
-
 Make a Leafy Texture: Easy Crochet Sprig Stitch (Free UK Pattern)
-
 Free Crochet Sleep Mask Pattern — Cute DK Cotton Eye Mask (UK Terms, Advanced Beginner)
- DIY
-
 Cozy Crochet: Free Up-and-Down Stripe Cotton Washcloth Pattern (Quick & Easy)
-
 How to Make Realistic Crepe Paper Daffodils — Easy Step-by-Step DIY
-
 Make Adorable Easter Egg Bird Feeders — Easy DIY Seed Ornaments for Your Backyard
- Knitting Ideas
-
 Knit the Fish Scale Stitch: Easy 4-Row Pattern for a Textured, Scaly Look
-
 Knitted Camisole Party Frock — Vintage Pattern with Step-by-Step Instructions
-
 DIY Knitted Cuddly Cat Toy — Free Pattern & Step-by-Step Instructions