


Adorable Crochet Bird Amigurumi Pattern — Easy Step-by-Step Guide

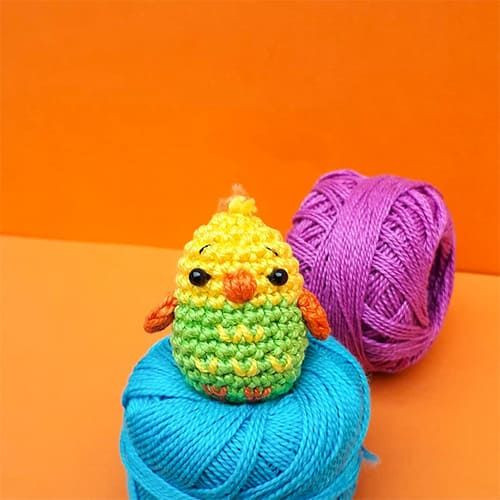
Make a sweet little crochet bird amigurumi with this concise, beginner-friendly pattern. Using basic stitches and simple shaping, you can create a colorful toy or decoration in just a few rounds. This guide covers materials, abbreviations, the body and wings, and assembly tips so you can finish a neat, cuddly bird.
Crochet Bird Amigurumi Overview
Crochet bird amigurumi are the cutest little feathered friends you can create through the art of crocheting! These delightful creations bring a touch of whimsy and charm to any space. Whether you are a seasoned crocheter or just starting out, making a bird amigurumi is a fun and rewarding project. With endless color possibilities and different bird species to crochet, you can let your creativity soar and bring these adorable critters to life with just a hook and some yarn. So grab your crochet supplies and get ready to craft your own flock of handmade treasures that are sure to bring a smile to anyone's face!
Materials Needed
- Crochet hook 2.00 mm
- Cotton yarn (main and contrast colors)
- 3 mm black beads (or safety eyes)
- Various sized sewing needle, tailor pins, scissors
- Soft stuffing
Abbreviations
MR: Magic ring
Sc: Single crochet
Dec: Decrease
Inc: Increase
Dc: Double crochet
Hdc: Half double crochet
Slst: Slip stitch
Body Instructions
- Chain 4 to start (GREEN). Sc in 2nd ch from hook and in each of the next 2 chains. Work 2 more sc in the same space as the last ch. Sc in the next space and 2 sc in the same space as the very first sc. (Photo n.1)
- 2 sc in the first sc of the previous round. Sc in next sc. 2 sc in each of the next 3 sc. Sc in next sc. 2 sc in each of the next 2 sc. (Photo n.2)
- 2 sc in first sc from previous round, 1 sc in next sc. Sc in next sc (2 sc in next sc, 1 sc in next sc)×3. 3 sc. (18 sc) (Photo n.3)
- Rounds 4-8: 18 sc (GREEN)
- Rounds 9-11: 18 sc (YELLOW)
- Round 12: (1 sc, 1 dec)×6 (12 sc). Stuff the body lightly.
- Round 13: 6 dec. (6 sc)
Using a needle, weave the yarn through the front loops and pull the yarn tightly, then hide the thread. (Photo n.4)
Wings Instructions
(Photo n.5)
Make a magic ring: 1 sc, 1 hdc, 1 dc, 1 hdc, 1 sc. Fasten off, leave a long tail for sewing.
Assembly and Design
- Eyes: Place on the 10th–11th round, 3 stitches apart. Use 3 mm black beads or safety eyes.
- Wings: Attach on the 9th–8th round, centered on each side.
- Beak: Embroider it between the eyes using a small length of contrast yarn.
- Optional: Add legs, a tail, or embroidered details to personalize your bird.
Finishing Tips
- Use tailor pins to position eyes and wings before sewing to get symmetrical placement.
- Adjust stuffing to achieve the desired firmness; overstuffing will distort shape.
- Securely weave in ends and stitch parts firmly if the toy will be handled frequently.
- Color swaps: follow the round color notes (GREEN, YELLOW) or choose your own palette for different species or styles.
Enjoy making your little bird and experiment with size and colors — smaller hooks and thinner yarn will produce a tinier bird, while larger yarn and hooks will yield a bigger, squishier toy.
- Funny Pictures
-
 Weekly Treat of Funniest Parenting Memes for Good Laugh out Loud Right Now
-
 Really Funny Pics to End These Weekend Perfectly
-
 Incredibly Relatable Pics for Your Amusement
- Recipes
-
 Chewy Oatmeal Cookies
-
 Tomato Tuna Melt
-
 Instant Pot Broccoli Cheddar and Zucchini Soup
- Lifehacks
-
 Wide Half Double Crochet Stitch Photo Tutorial
-
 How to Crochet a Sunflower Stitch Photo Tutorial
-
 Lemon Peel Crochet Stitch Photo Tutorial
- Crochet Ideas
-
 DIY Crochet Mushroom Keychain — Easy Step-by-Step Pattern with Photos
-
 Make a Leafy Texture: Easy Crochet Sprig Stitch (Free UK Pattern)
-
 Free Crochet Sleep Mask Pattern — Cute DK Cotton Eye Mask (UK Terms, Advanced Beginner)
- DIY
-
 Cozy Crochet: Free Up-and-Down Stripe Cotton Washcloth Pattern (Quick & Easy)
-
 How to Make Realistic Crepe Paper Daffodils — Easy Step-by-Step DIY
-
 Make Adorable Easter Egg Bird Feeders — Easy DIY Seed Ornaments for Your Backyard
- Knitting Ideas
-
 Knit the Fish Scale Stitch: Easy 4-Row Pattern for a Textured, Scaly Look
-
 Knitted Camisole Party Frock — Vintage Pattern with Step-by-Step Instructions
-
 DIY Knitted Cuddly Cat Toy — Free Pattern & Step-by-Step Instructions