


Make This Adorable Crochet Ladybug — Easy Amigurumi Pattern & Step‑by‑Step Guide

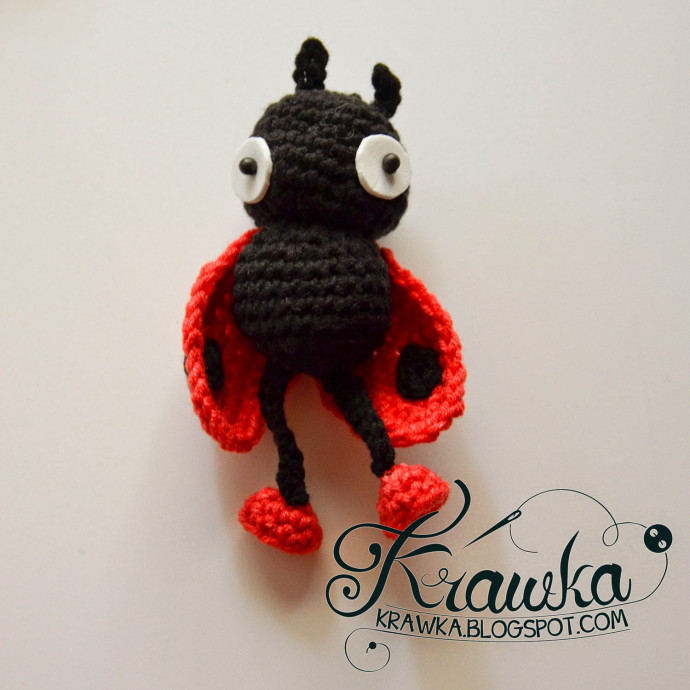
Create a sweet, pocket‑sized ladybug to brighten your crochet collection. This easy amigurumi pattern uses basic stitches and simple assembly, making it suitable for confident beginners and experienced crocheters alike. Use the materials listed below and follow the step‑by‑step rounds to make the head, body, legs, feet, wings and dots, then sew everything together for a charming finished toy. A small clothespin is added at the end for a playful finishing touch.
If You're Looking for a Cute Crochet Project
If you are looking to add a touch of cuteness to your crochet collection, why not try your hand at crocheting a beautiful ladybug? This delightful little critter is not only fun to make but also makes for a charming addition to your crafts. With its bright colors and adorable design, the crochet ladybug is sure to bring a smile to your face. Whether you're a seasoned crocheter or new to the craft, creating a lovely ladybug is a rewarding project that will bring joy to both the maker and the beholder. So grab your yarn and hook, and let's get started on crafting a sweet little ladybug that will brighten up your day!
Materials Needed
- Black and red yarn (I use yarn with a gauge of 24.0 to 30.0 sts = 4 inches)
- 3 mm hook
- White sheet of foam (mine is 1 mm thick) for eyes
- 2 black beads (4 mm would be best)
- Clothespin (the smaller version - 3 cm is best)
- Hot glue gun
- Cotton or another material to use as filament
Beginning the Crochet Ladybug Pattern
Head
For the head, use black yarn.
R1: 6 sc in MR (6)
R2: inc around (12)
R3: * sc, inc * X6 (18)
R4: * sc 2, inc * X6 (24)
R5: sc around (24)
R6: sc around (24)
R7: * sc 3, inc * X6 (30)
R8: sc around (30)
R9: * sc 4, inc * X6 (36)
R10: * sc 3, dec * around (31)
R11: * sc, dec * around (21)
R12: * sc, dec * around (14)
Stuff the head.
R13: dec around (7)
R14: dec around (4) FO
From the white foam, cut two circles for the eyes. If you don't like the edges of your foam, you can use a nail file to smooth them.
Sew them to the head with the bead in the center.
Antennas (Make 2)
For the antennas, use black yarn.
R1: 4 ch (4)
R2: Starting from 2-nd ch, ss 3 (3) FO
Sew the antennas to the head.
Body of the Ladybug
For the body, use black yarn.
R1: 6 sc in MR (6)
R2: inc around (12)
R3: * sc, inc * X6 (18)
R4: * sc 2, inc * X6 (24)
R5 - R8: sc around (24)
R9: * sc 2, dec * X6 (18)
Stuff the body!
R10: * sc, dec * X6 (12) FO
The end of this section is where you will sew the body to the head.
Legs (Make 2)
For the legs, use black yarn.
R1: 10 ch
R2: Starting from 2-nd ch, ss 9 (9) FO
Feet (Make 2)
For the feet, use red yarn.
R1: 6 sc in MR (6)
R2: * sc, inc * X3 (9)
R3: sc around, ss last one (9) FO
Wings (Make 2)
For the wings, use red yarn.
R1: 10 ch (10)
R2: 9 sc on one side of the chain, 9 sc on the other (18)
R3: 3 sc in 1, sc 7, 3 sc in 1, 3 sc in 1, sc 7, 3 sc in 1 (26)
R4: inc 2, sc 2, hdc, dc 3, hdc, sc 2, inc 4, sc 2, hdc, dc 3, hdc, sc 2, ss FO
Dots (Make 8: 4 for Each Wing, 2 for Each Side)
For the dots, use black yarn.
R1: 6 sc in MR (6)
R2: ss in the 1-st sc from R1 FO
Sew two dots on each side of the wing.
Finally, sew the head, body, both legs, and wings together in any order.
The last step is attaching the mini clothespin. I glued it with a hot glue gun in the desired position.
Assembly & Finishing Tips
When sewing pieces together, position and pin parts before stitching to get the proportions you like. Weave in yarn ends securely. If you prefer to avoid foam eyes and beads, you can substitute safety eyes or embroider eyes instead. Use Polyester stuffing or cotton to achieve an even, firm shape. Attach the small clothespin carefully using hot glue and allow it to cool fully before handling.
Care: spot clean the finished toy with a damp cloth; avoid submerging if you used glued elements like the clothespin.
- Funny Pictures
-
 Weekly Treat of Funniest Parenting Memes for Good Laugh out Loud Right Now
-
 Really Funny Pics to End These Weekend Perfectly
-
 Incredibly Relatable Pics for Your Amusement
- Recipes
-
 Chewy Oatmeal Cookies
-
 Tomato Tuna Melt
-
 Instant Pot Broccoli Cheddar and Zucchini Soup
- Lifehacks
-
 Wide Half Double Crochet Stitch Photo Tutorial
-
 How to Crochet a Sunflower Stitch Photo Tutorial
-
 Lemon Peel Crochet Stitch Photo Tutorial
- Crochet Ideas
-
 DIY Crochet Mushroom Keychain — Easy Step-by-Step Pattern with Photos
-
 Make a Leafy Texture: Easy Crochet Sprig Stitch (Free UK Pattern)
-
 Free Crochet Sleep Mask Pattern — Cute DK Cotton Eye Mask (UK Terms, Advanced Beginner)
- DIY
-
 Cozy Crochet: Free Up-and-Down Stripe Cotton Washcloth Pattern (Quick & Easy)
-
 How to Make Realistic Crepe Paper Daffodils — Easy Step-by-Step DIY
-
 Make Adorable Easter Egg Bird Feeders — Easy DIY Seed Ornaments for Your Backyard
- Knitting Ideas
-
 Knit the Fish Scale Stitch: Easy 4-Row Pattern for a Textured, Scaly Look
-
 Knitted Camisole Party Frock — Vintage Pattern with Step-by-Step Instructions
-
 DIY Knitted Cuddly Cat Toy — Free Pattern & Step-by-Step Instructions