


Cute Crochet Owl Amigurumi Pattern — Easy Step-by-Step Guide

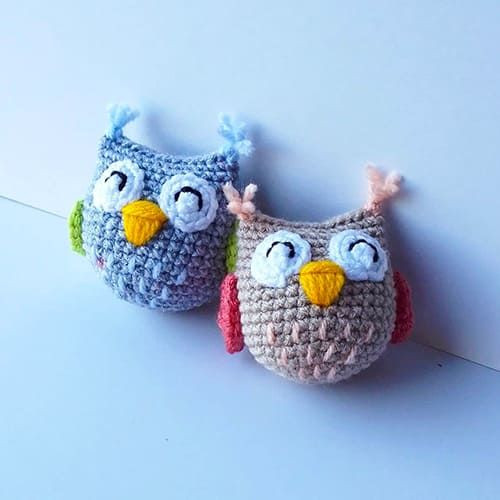
Make a charming crochet owl amigurumi with this easy-to-follow pattern. Perfect as a beginner-friendly project or a quick handmade gift, this pattern walks you through the head, body, eyes, wings, and finishing touches. Gather basic supplies and follow the rounds below to create your own little owl.
Materials
Suggested materials (basic items implied by the pattern): yarn in main and eye colors, crochet hook suited to your yarn, stuffing, a yarn needle, and stitch markers.
Notes & Tips
Work in continuous rounds unless otherwise noted. Use a stitch marker to mark the beginning of each round. For a firmer fabric, use a slightly smaller hook than recommended for your yarn. Embroider details before final stuffing where possible for easier positioning.
Abbreviations
MR: Magic ring
Sc: Single crochet
Inc: Increase
Dec: Decrease
Slst: Slip stitch
Head and Body Instructions
Rnd 1. 6 sc in MR (6)
Rnd 2. 6 inc (12)
Rnd 3. (1sc,inc)* (18)
Rnd 4. (2sc,inc)* (24)
Rnd 5. (3sc,inc)* (30)
Rnd 6. (4sc,inc)* (36)
Rnd 7-14. 36 sc
Rnd 15. (4sc,dec)* (30)
Rnd 16-19. 30 sc
Eyes (Make 2)
In white.
Rnd 1. 6 sc in MR (6)
Rnd 2. 6 inc (12)
Embroider the details in the eyes.
Wings (Make 2)
Rnd 1. 6 sc in MR (6)
Rnd 2. 6 inc (12)
Rnd 3. (1sc,inc)* (18)
Fold in half and join with slst.
Finishing Instructions
Before closing the head/body with slst:
1. Attach the eyes to the body.
2. Embroider the beak.
3. Embroider the body feathers.
4. Attach the wings to the body.
5. Fill the owl with filling and close the top of the head with slst.
6. Decorate the ears with pieces of thread.
Enjoy customizing your owl with different yarn colors, eye details, or small accessories like a tiny scarf or bow for added personality.
- Funny Pictures
-
 Weekly Treat of Funniest Parenting Memes for Good Laugh out Loud Right Now
-
 Really Funny Pics to End These Weekend Perfectly
-
 Incredibly Relatable Pics for Your Amusement
- Recipes
-
 Chewy Oatmeal Cookies
-
 Tomato Tuna Melt
-
 Instant Pot Broccoli Cheddar and Zucchini Soup
- Lifehacks
-
 Wide Half Double Crochet Stitch Photo Tutorial
-
 How to Crochet a Sunflower Stitch Photo Tutorial
-
 Lemon Peel Crochet Stitch Photo Tutorial
- Crochet Ideas
-
 DIY Crochet Mushroom Keychain — Easy Step-by-Step Pattern with Photos
-
 Make a Leafy Texture: Easy Crochet Sprig Stitch (Free UK Pattern)
-
 Free Crochet Sleep Mask Pattern — Cute DK Cotton Eye Mask (UK Terms, Advanced Beginner)
- DIY
-
 Cozy Crochet: Free Up-and-Down Stripe Cotton Washcloth Pattern (Quick & Easy)
-
 How to Make Realistic Crepe Paper Daffodils — Easy Step-by-Step DIY
-
 Make Adorable Easter Egg Bird Feeders — Easy DIY Seed Ornaments for Your Backyard
- Knitting Ideas
-
 Knit the Fish Scale Stitch: Easy 4-Row Pattern for a Textured, Scaly Look
-
 Knitted Camisole Party Frock — Vintage Pattern with Step-by-Step Instructions
-
 DIY Knitted Cuddly Cat Toy — Free Pattern & Step-by-Step Instructions