


Crochet Bruna the Bunny — Cute 28 cm Amigurumi Pattern & Step‑by‑Step Guide

Penelope
Sep 02, 2026 11:30 PM
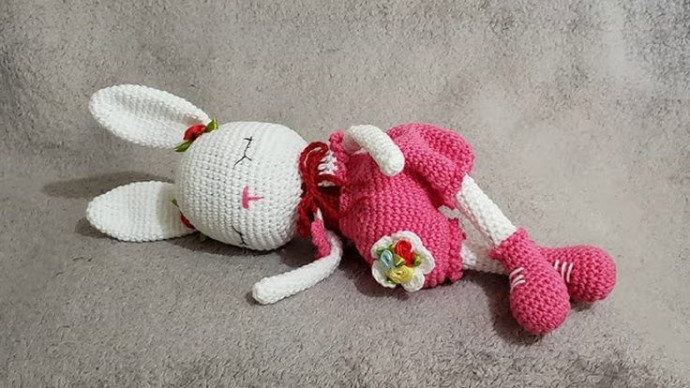
Bring a little sweetness to your crochet basket with Bruna the Bunny. This friendly amigurumi pattern includes clear rounds and assembly steps to make a soft, cuddly bunny approximately 28 cm from head to toe. Suitable for intermediate crocheters and adventurous beginners who know basic amigurumi techniques (magic ring, single crochet, increases and decreases).
Materials Needed & Measurements
- Hook: 4 mm (US G)
- Yarn:
- Body: Soft chenille or fluffy yarn (e.g., Katia Bambi)
- Clothing & Accessories: 100% cotton yarn
- Cheeks & Details: Pink yarn for embroidery
- Eyes: 12 mm safety eyes or embroider with yarn
- Stuffing: Polyfiber or similar
- Needle: Tapestry/sewing needle for finishing
- Finished size: Approximately 28 cm from head to toe
Abbreviations (Stitch Key)
- mr = magic ring
- sc = single crochet
- hdc = half double crochet
- inc = increase (2 sc into one stitch)
- dec = decrease (combine 2 stitches into one)
Notes Before You Start
- Use a stitch marker to mark the beginning of rounds.
- Adjust stuffing firmness to get the desired softness—firmer for standing shapes, softer for cuddly toys.
- For baby-safe toys, embroider eyes rather than using safety eyes.
Stitching Instructions for Bruna the Bunny
Head
- Start with a mr and crochet 6 sc into the ring.
- Round 1: inc in each stitch (12 sts).
- Round 2: (1 sc, inc) around (18 sts).
- Round 3: (2 sc, inc) around (24 sts).
- Rounds 4–7: 1 sc in each stitch (24 sts per round).
- Round 8: (2 sc, dec) around (18 sts).
- Round 9: (1 sc, dec) around (12 sts).
- Round 10: dec in each stitch (6 sts). Stuff the head and fasten off securely.
Body
- Start with a mr and crochet 6 sc into the ring.
- Round 1: inc in each stitch (12 sts).
- Round 2: (1 sc, inc) around (18 sts).
- Round 3: (2 sc, inc) around (24 sts).
- Rounds 4–10: 1 sc in each stitch (24 sts per round).
- Round 11: (2 sc, dec) around (18 sts).
- Round 12: (1 sc, dec) around (12 sts). Fill the body with stuffing and close the opening.
Arms (Make 2)
- Start with a mr and crochet 6 sc into the ring.
- Round 1: (1 sc, inc) around (9 sts).
- Rounds 2–7: 1 sc in each stitch (9 sts per round).
- Round 8: (1 sc, dec) around (6 sts). Lightly stuff and secure the end.
Legs (Make 2)
- Start with a mr and crochet 6 sc into the ring.
- Round 1: inc in each stitch (12 sts).
- Rounds 2–5: 1 sc in each stitch (12 sts per round).
- Round 6: (1 sc, dec) around (8 sts). Stuff lightly and fasten off.
Ears (Make 2)
- Start with a mr and crochet 6 sc into the ring.
- Round 1: (1 sc, inc) around (9 sts).
- Rounds 2–8: 1 sc in each stitch (9 sts per round). Flatten the ears and fasten off securely.
Tail
- Start with a mr and crochet 6 sc into the ring.
- Round 1: (1 sc, inc) around (9 sts).
- Rounds 2–3: 1 sc in each stitch (9 sts per round). Stuff lightly and fasten off.
Assembly
- Sew the head to the body securely.
- Sew the arms to the sides of the body.
- Attach the legs to the bottom of the body.
- Position and attach the ears to the top of the head.
- Sew the tail to the back of the body.
Face Details & Finishing
- Insert 12 mm safety eyes or embroider eyes with black yarn. For a baby-safe toy, embroider eyes instead of using safety eyes.
- Stitch a small nose and cheeks using pink yarn; embroider a simple nose shape and two small blush spots for a sweet expression.
- Optional: crochet a small bow or simple clothing as described below and sew into place.
Optional Accessories
- Bow: Crochet a small rectangle (3–4 rows of hdc) and wrap yarn tightly around the center to form a bow. Sew it to an ear or the neck.
- Clothing: Make a simple tube of hdc rounds to fit the body as a shirt or skirt.
Happy crafting! If you'd like a printable version or a charted stitch map for any section, mention which part and I can help format it for you.
No comments
- Funny Pictures
-
 Weekly Treat of Funniest Parenting Memes for Good Laugh out Loud Right Now
-
 Really Funny Pics to End These Weekend Perfectly
-
 Incredibly Relatable Pics for Your Amusement
- Recipes
-
 Chewy Oatmeal Cookies
-
 Tomato Tuna Melt
-
 Instant Pot Broccoli Cheddar and Zucchini Soup
- Lifehacks
-
 Wide Half Double Crochet Stitch Photo Tutorial
-
 How to Crochet a Sunflower Stitch Photo Tutorial
-
 Lemon Peel Crochet Stitch Photo Tutorial
- Crochet Ideas
-
 DIY Crochet Mushroom Keychain — Easy Step-by-Step Pattern with Photos
-
 Make a Leafy Texture: Easy Crochet Sprig Stitch (Free UK Pattern)
-
 Free Crochet Sleep Mask Pattern — Cute DK Cotton Eye Mask (UK Terms, Advanced Beginner)
- DIY
-
 Cozy Crochet: Free Up-and-Down Stripe Cotton Washcloth Pattern (Quick & Easy)
-
 How to Make Realistic Crepe Paper Daffodils — Easy Step-by-Step DIY
-
 Make Adorable Easter Egg Bird Feeders — Easy DIY Seed Ornaments for Your Backyard
- Knitting Ideas
-
 Knit the Fish Scale Stitch: Easy 4-Row Pattern for a Textured, Scaly Look
-
 Knitted Camisole Party Frock — Vintage Pattern with Step-by-Step Instructions
-
 DIY Knitted Cuddly Cat Toy — Free Pattern & Step-by-Step Instructions