


Easy Crochet Baby Bear Amigurumi Pattern — Step-by-Step Tutorial

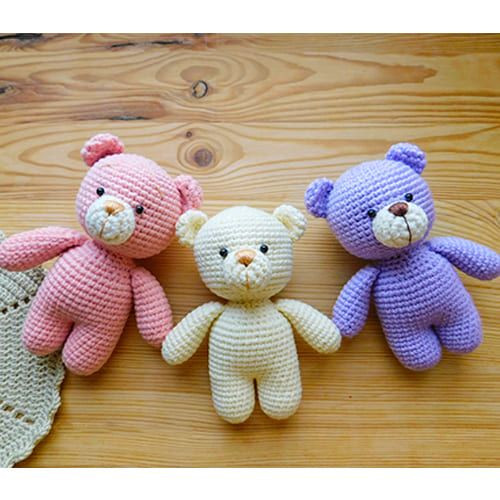
Create an adorable Crochet Baby Bear Amigurumi with this clear, step-by-step pattern. This small, huggable toy is perfect for gifting or decorating a nursery. The pattern uses basic amigurumi techniques—magic ring, single crochet, increases and decreases—so it's suitable for crocheters with beginner-to-intermediate skills. Below you'll find the materials, abbreviations, full stitch-by-stitch instructions for each part, and finishing tips to assemble your bear.
Crochet Baby Bear Amigurumi Introduction
Crochet Baby Bear Amigurumi is an adorable way to add some handmade charm to a nursery or a thoughtful gift for a little one. The cuddly bear is expertly crafted with soft yarn, giving it a huggable and lovable appearance. Its small size makes it perfect for tiny hands to grasp and hug tightly. Whether you're a seasoned crocheter or new to the craft, creating this sweet amigurumi bear will surely bring a smile to your face and warmth to your heart. Give it a try and enjoy the cozy companionship of your very own Crochet Baby Bear Amigurumi!
Necessary Materials
Filler for toys.
Semi-cotton yarn (or any of your choice).
Cotton yarn (thin) for embroidering the spout of a toy.
Beads for the eyes (or eyes on a secure mount, 4 mm).
Hook number 1.5.
Abbreviations
MR: Magic ring
Ch: Chain
Sc: Single crochet
Inc: Increase
Dec: Decrease
Instructions
Arms (Make 2)
1. 6 sc in MR
2. inc х 6 times = 12 sc
3-12. (10 rounds) 12 sc
13. Fold the part in half at the top, crochet 5 sc, inserting the hook into both halves of the part.
Legs (Make 2)
Left Leg
1. 6 sc in MR
2. inc х 6 times = 12 sc
3. (sc, inc) х 6 times = 18 sc
4-9. (6 rounds) 18 sc
At the end of the 9th row, knit ch, pull the thread through ch, cut.
Right Leg
1. 6 sc in MR
2. inc х 6 times = 12 sc
3. (sc, inc) х 6 times = 18 sc
4-9. (6 rounds) 18 sc
At the end of the 9th row, we do not break the thread.
Next, we connect the legs and crochet the body.
10. 18 sc on the left leg, 18 sc on the right leg = 36 sc
11–20. (10 rounds) 36 sc
21. (4 sc, dec) х 6 times = 30 sc
22. 30 sc
23. (3 sc, dec) х 6 times = 24 sc
24. (2 sc, dec) х 6 times = 18 sc
Head
We crochet with a separate detail.
1. 6 sc in MR
2. inc х 6 times = 12 sc
3. (1 sc, inc) х 6 times = 18 sc
4. (2 sc, inc) х 6 times = 24 sc
5. (3 sc, inc) х 6 times = 30 sc
6. (4 sc, inc) х 6 times = 36 sc
7. (5 sc, inc) х 6 times = 42 sc
8–18. (11 rounds) 42 sc
19. (5 sc, dec) х 6 times = 36 sc
20. (4 sc, dec) х 6 times = 30 sc
21. (3 sc, dec) х 6 times = 24 sc
22. (2 sc, dec) х 6 times = 18 sc
Insert the eyes (if you chose the eyes on a secure mount) between the 11th and 12th rows.
The distance between the eyes is 5 loops (at your discretion).
Eye size 4 mm.
Ears
1. 6 sc in MR
2. inc х 6 times = 12 sc
3. (3 sc, inc) х 3 times = 15 sc
4. (3 sc, dec) х 3 times = 12 sc
Muzzle
1. 6 sc in MR
2. inc х 6 times = 12 sc
3. (1 sc, inc) х 6 times = 18 sc
4. 18 sc
5. 18 sc
Sew the nose between the 12th and 18th rows.
Finishing and Assembly
1. Position the eyes between rows 11–12 of the head as indicated and secure them according to the type of eyes you chose (safety eyes, beads with mounts, or embroidered eyes).
2. Sew the muzzle onto the head between rows 12 and 18 as noted in the pattern. Embroider the nose and mouth using thin cotton yarn as desired.
3. Attach the ears to the sides/top of the head, aligning them symmetrically.
4. Sew the arms and legs to the body in positions that look natural for your toy. Use the rounds as reference to center placement.
5. Stuff each part firmly but not overfilled to keep shape and allow seams to sit flat. Close all openings and weave in ends securely.
Safety & Tips
- If the toy is intended for babies or very young children, use embroidered eyes or securely mounted safety eyes to avoid choking hazards. The pattern suggests 4 mm eyes if using mounted beads.
- Use consistent tension to keep stitch counts accurate and make pieces fit together easily.
- Adjust yarn weight and hook size if you prefer a larger or smaller finished bear; note that gauge changes will affect stitch counts and final size.
- Label the finished toy with care instructions if gifting.
Enjoy making your Crochet Baby Bear Amigurumi! Feel free to customize colors, add a little scarf, or embroider facial details to give your bear personality.
- Funny Pictures
-
 Weekly Treat of Funniest Parenting Memes for Good Laugh out Loud Right Now
-
 Really Funny Pics to End These Weekend Perfectly
-
 Incredibly Relatable Pics for Your Amusement
- Recipes
-
 Chewy Oatmeal Cookies
-
 Tomato Tuna Melt
-
 Instant Pot Broccoli Cheddar and Zucchini Soup
- Lifehacks
-
 Wide Half Double Crochet Stitch Photo Tutorial
-
 How to Crochet a Sunflower Stitch Photo Tutorial
-
 Lemon Peel Crochet Stitch Photo Tutorial
- Crochet Ideas
-
 DIY Crochet Mushroom Keychain — Easy Step-by-Step Pattern with Photos
-
 Make a Leafy Texture: Easy Crochet Sprig Stitch (Free UK Pattern)
-
 Free Crochet Sleep Mask Pattern — Cute DK Cotton Eye Mask (UK Terms, Advanced Beginner)
- DIY
-
 Cozy Crochet: Free Up-and-Down Stripe Cotton Washcloth Pattern (Quick & Easy)
-
 How to Make Realistic Crepe Paper Daffodils — Easy Step-by-Step DIY
-
 Make Adorable Easter Egg Bird Feeders — Easy DIY Seed Ornaments for Your Backyard
- Knitting Ideas
-
 Knit the Fish Scale Stitch: Easy 4-Row Pattern for a Textured, Scaly Look
-
 Knitted Camisole Party Frock — Vintage Pattern with Step-by-Step Instructions
-
 DIY Knitted Cuddly Cat Toy — Free Pattern & Step-by-Step Instructions