Crocheted Square: Depicting a Sunny Sky

Introduction
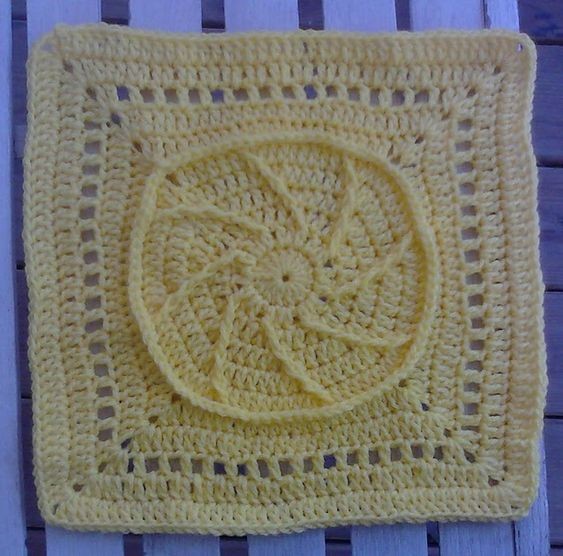
Create a beautiful square using the art of crocheting to depict a sunny sky. This project involves using various shades of blue and yellow yarn to bring to life the image of a clear, sunny day. By following a specific crochet pattern, you can stitch together rows of different colors to form a square that resembles a bright and cheerful sky. The intricate details and careful stitching will result in a stunning finished product that captures the essence of a sunny day.
By following the pattern closely and taking your time with each stitch, you can create a square that is not only visually appealing but also a fun and rewarding project to work on. Let your creativity shine through as you crochet your way to a sunny sky masterpiece.
Project Specifications
Size: 12” Square
Hook: H/5.0mm
Yarn: Red Heart WW
Amount: Color A: .8oz, Color B: 1.4oz
Abbreviations & Stitches Used
Beg = Beginning
Ch = Chain
Slst = Slip stitch
Sc = Single crochet
Sp(s) = Space(s)
Sk = Skip
W/ = With
Dc = Double crochet
St(s) = Stitches
Lps = Loops
Fp = Front post
Flo = Front loop only
Notes
Notes: Bold print: Repeated in pattern. Join: W/slst in beg st. Fpsts are worked going to the right of your work, instead of in the normal direction.
Round Instructions
Rnd 1
RND 1: W/A, Ch4, Work 15dc in 4th ch from hook. join in top of ch4. (16dc)
Rnd 2
RND 2: Ch3, dc in same st. [Dc in next st, 2dc in next st] Repeat around, join. (24dc)
Rnd 3
RND 3: Ch3, dc in next st. [Fpdc in the “single” dc of rnd 2, dc in same st as dc worked before fpst you just did. Dc in next 3sts] Repeat around ending w/dc in last st, join. (40dc)
Rnd 4
RND 4: Ch3, dc in 4sts [Fpdc in fpst of rnd 3, dc in same st as dc worked before fpst, dc in next 5sts] Repeat around minus last 5dc, join. (56dc)
Rnd 5
RND 5: Ch3, fpdc in fpst of rnd 4, dc in same st as ch3. [Dc in 7sts, fpdc in fpst of rnd 4, dc in same st as dc worked before fpst you just did] Repeat around, ending w/dc in last 6sts, join. (72dc)
Rnd 6
RND 6: Ch3, dc in 3sts. [Fpdc in fpst of rnd 5, dc in same st as dc worked before fpst, dc in 9sts] Repeat around, ending w/dc in last 5sts, join in front loop of ch3. (88dc)
Rnd 7
RND 7: Ch1, sc in same lp, sc in flo of each st around, join, fastening off color A. (88sc)
Rnd 8
RND 8: Join B in any unused (back) loop of rnd 6, (behind work), (ch3, dc, ch1, 2dc in same lp. [Dc in next 6lps, hdc in 9lps, dc in 6lps, (2dc, ch1, 2dc) in next lp, corner made.] Repeat around, minus last corner, join. (64dc, 36hdc)
Rnd 9
RND 9: Ch3, dc in next st. [Corner in next sp, dc in 8sts, hdc in 9sts, dc in 8sts] Repeat around, ending w/dc in last 6sts, join. (80dc, 36hdc)
Rnd 10
RND 10: Ch4, sk1, dc in next st, ch1, sk1, [Corner in next sp, (ch1, sk1, dc in next st)14x] Repeat around, ending w/ch1, sk1, join in 3rd st of beg ch4. (72dc)
Rnd 11
RND 11: Ch3, dc in each st/sp to corner ch1sp, [Work corner in corner ch1sp, dc in each st/sp across, (33sts)] Repeat around, join. (148dc)
*Measure your sq and add a round of sc, hdc, or dc. As with any square, your size may vary depending on your tension, choice of yarn and hook size. One of my sqs measured a bit over 11” so I worked a sc, but with the solid color I had to use a dc to get to 12”.
Rnd 12
RND 12: Ch1, sc in same st, sc in next 7sts. [3sc in next sp, sc in next 37sts] Repeat around, ending w/sc in last 29sts, join.
If using a hdc or dc, work same as above, ch2 or ch3, but you can use the corners we used throughout the pattern.
- Funny Pictures
-
 Cute Cat Memes That Will Make Your Day Brighter
-
 Spot-on and Funny Memes About Introverts Struggles
-
 Top Wonderful Cat Memes on Their Way to Better Your Day
- Recipes
-
 Creamy Old Fashioned Rice Pudding
-
 Russian Tea Cakes (Snowball Cookies)
-
 Rigatoni with Sausage, Tomatoes, and Zucchini
- Lifehacks
-
 How to Crochet a Harlequin Stitch
-
 Removing The Toughest Stains
-
 Crochet Basics: Crumpled Griddle Stitch
- Crochet Ideas
-
 Crochet Christmas Tree
-
 Crochet Goblet of Fire
-
 Crochet Adorable Ammonite
- DIY
-
 DIY Snowman Wreath
-
 Mini Santa Sleigh Ornament
-
 Crochet Gingerbread House Blanket
- Knitting Ideas
-
 Knitted Easter Bunny
-
 Knitted Mobile Phone/Glasses Case
-
 Knitted Cabled Wallet