Crochet Afghan Square: A Beautiful Handmade Blanket

Introduction to Crochet Afghan Squares
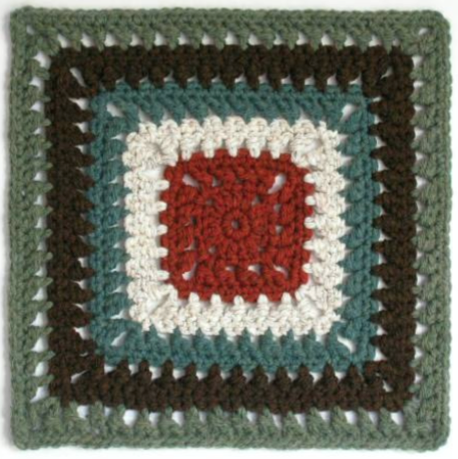
A beautiful handmade square blanket made using the crochet technique is known as a Crochet Afghan Square. This type of blanket is typically made up of multiple squares that are then stitched together to create a larger blanket. Crochet Afghan Squares can vary in size, color, and design, making them a versatile and customizable option for those looking to add a cozy touch to their home decor.
Whether you're a beginner looking to practice your crochet skills or an experienced crafter wanting to create a unique and personalized blanket, Crochet Afghan Squares offer endless possibilities for creativity. With a wide range of yarns and patterns available, you can create a Crochet Afghan Square that perfectly suits your style and preferences.
Materials Needed
- Yarn
- Crochet Hook
Crochet Pattern
Special Stitch
Piggyback Double Crochet: abbrev: PBdc – (dc in next st, dc around post of dc just made)
Instructions
With CB, ch 5, slip st to first ch to form loop.
Round 1
Ch 1, 8 sc in second ch from hook; join with slip st to first sc.
Round 2
Ch 5, dc in same st; *2 dc in next st; (dc ch2 dc) in next st;* 3 times; 2 dc in next st; slip st to third ch of beginning ch-5. (16 dc, 4 ch2 spaces made)
Round 3
Slip st into corner space. Ch 3, dc around the ch 3 just made, ch 2, PBdc in same corner space. *(PBdc, skip one st, PBdc) across. (PBdc, ch2, PBdc) in corner space.* Repeat around. Slip st to top of beginning ch 3.
Round 4
Slip st in next st and into corner space. Ch 1, 3 sc in same space. Sc in each st around working 3 sc in corner spaces. Fasten off.
Round 5
Turn so wrong side is facing. With CA, join with a slip st in 2nd st of any corner. Ch 3, dc around the ch 3 just made, ch 2, PBdc in same corner space. *(PBdc, skip one st, PBdc) across. (PBdc, ch2, PBdc) in corner space.* Repeat around. Slip st to top of beginning ch 3.
Round 6
Slip st in next st and into corner space. Ch 1, 3 sc in same space. Sc in each st around working 3 sc in corner spaces. Join with a slip st to beginning sc. Fasten off.
Round 7
Turn so right side is facing. With CE, join with a slip st in 2nd st of any corner. Ch 3, dc around the ch 3 just made, ch 2, PBdc in same corner space. *(PBdc, skip one st, PBdc) across. (PBdc, ch2, PBdc) in corner space.* Repeat around. Slip st to top of beginning ch 3.
Round 8
Slip st in next st and into corner space. Ch 1, 3 sc in same space. Sc in each st around working 3 sc in corner spaces. Join with a slip st to beginning sc. Fasten off.
Round 9
Turn so wrong side is facing. With CC, join with a slip st in 2nd st of any corner. Ch 3, dc around the ch 3 just made, ch 2, PBdc in same corner space. *(PBdc, skip one st, PBdc) across. (PBdc, ch2, PBdc) in corner space.* Repeat around. Slip st to top of beginning ch 3.
Round 10
Slip st in next st and into corner space. Ch 1, 3 sc in same space. Sc in each st around working 3 sc in corner spaces. Join with a slip st to beginning sc. Fasten off.
Round 11
Turn so right side is facing. With CD, join with a slip st in 2nd st of any corner. Ch 3, dc around the ch 3 just made, ch 2, PBdc in same corner space. *(PBdc, skip one st, PBdc) across. (PBdc, ch2, PBdc) in corner space.* Repeat around. Slip st to top of beginning ch 3.
Round 12
Slip st in next st and into corner space. Ch 1, 3 sc in same space. Sc in each st around working 3 sc in corner spaces. Join with a slip st to beginning sc. Fasten off.
- Funny Pictures
-
 Hilarious Memes for Those Bored to Tears
-
 Weekly Treat of Funniest Parenting Memes for Good Laugh out Loud Right Now
-
 Really Funny Pics to End These Weekend Perfectly
- Recipes
-
 Crispy Baked Avocado Fries
-
 Scrambled Chickpea and Spinach Pitas
-
 Cinnamon Pancakes
- Lifehacks
-
 Crochet Basics: Aligned Cobble Stitch
-
 Brick Stitch Crochet Tutorial
-
 Crochet Basics: Wattle Stitch
- Crochet Ideas
-
 Crochet Snorlax Plushie Doll
-
 Crochet Beautiful Penguin Toy
-
 Crochet Tiny Snowman
- DIY
-
 DIY Santa Craft For Kids
-
 Paper Plate Angel Craft
-
 Upcycled Mason Jar Chicken Vase
- Knitting Ideas
-
 Knitted Bridger Cowl
-
 Knitted Keepsake Bag
-
 Knitted Cutie Cupcake Dolls