

Kawaii Cow Amigurumi Crochet Pattern — Step-by-Step Cute Plush Tutorial

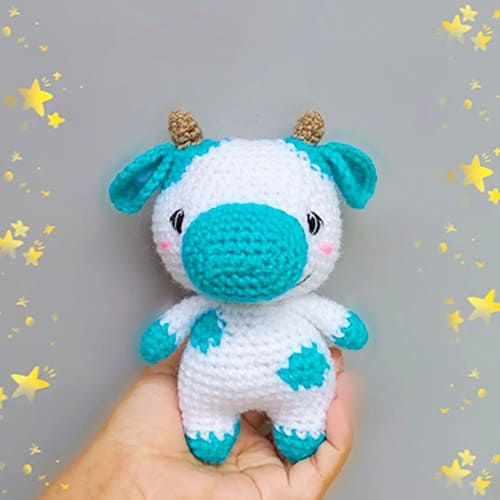
Make an adorable Kawaii Cow amigurumi with this clear, step-by-step crochet pattern. This charming little cow uses simple shapes and color changes to create a soft, cuddly toy — great for crocheters who enjoy amigurumi. The pattern below includes materials, abbreviations, round-by-round instructions for the head, body, legs, arms, ears, nose and horns, plus finishing tips to help you assemble your toy neatly.
Crochet Kawaii Cow Amigurumi Overview
Crochet Kawaii Cow Amigurumi is one of the cutest and most charming craft projects you can create! With its adorable design and soft texture, this little cow will surely bring a smile to anyone's face. Whether you're a beginner or an experienced crocheter, crafting this lovable amigurumi will surely be a fun and rewarding experience. So grab your crochet hooks and yarn, and let's get crafting - you're in for a delightful and heartwarming adventure!
Materials and Tools
- White, blue and beige yarn
- 4 mm crochet hook
- Black thread
- Needle
- Polyfill
Abbreviations
MR: Magic ring
B: Blue
W: White
Inc: Increase
Dec: Decrease
Ch: Chain
St: Stitch
Head Instructions
Start by making 14 chains.
Rnd 1: B-4ch, W-5ch, B-4ch (14)
(Start from the 2nd st from the hook)
Rnd 2: B-4sc, W-5sc, B-3sc, 3sc in the last st, B-3sc, W-5sc, B-3sc, 1 inc (28)
Rnd 3: B-1 sc,1 inc,1 sc, W-7sc, B-1 sc (1sc,1inc)x3, W-7sc, B-(1sc,1inc)x2 (34)
Rnd 4: B-3sc, W-9sc, B-8sc, W-9sc, B-5sc (34)
Rnd 5: B-2sc, W-11 sc, B-6sc, W-11 sc, B-4sc (34)
Rnd 6: B-1 sc, W-12sc, B-6sc, W-12sc, B-3sc (34)
Rnd 7: W-13sc, B-6sc, W-15sc (34)
Rnd 8: W-14sc, B-4sc, W-16sc (34)
Rnd 9: W-4sc, inc...(40) (use only white from this Rnd)
Rnd 10: 5sc, inc x6, 4sc (46)
Rnd 11: 6sc, incx6, 4sc (52)
Rnd 12-16: sc around (52)
Rnd 17: 6sc, decx6, 4sc (46)
Rnd 18: 5sc, decx6, 4sc (40)
Rnd 19: 4sc, dec (34)
Rnd 20: 3sc, dec*6 (28)
Rnd 21: 2sc, dec (21)
Legs and Body Instructions
Start with blue colour.
Rnd 1: 6sc in mr (6)
Rnd 2: 1 sc, 1 inc x3 (9)
Rnd 3: 2sc, inc x3 (12)
Rnd 4: sc around (12). change to white
Rnd 5-6: sc around (12)
(MAKE 2)
Join both the legs by making 3 chains.
Rnd 7: 12sc on the first leg, 3sc on the chain, 12 sc in another leg, 3sc on the chain (30)
Rnd 8: 4sc, incx6 (36)
Rnd 9-10: sc around (36)
Rnd 11: 10 sc, B-3sc, 23 sc (36)
Rnd 12: 9 sc, B-5sc, 22sc (36)
Rnd 13: 10sc, B-3sc, 23 (36)
Rnd 14: White- 4sc, decx6 (30)
Rnd 15: W-18sc, B-3sc, W-9 sc (30)
Rnd 16: W-17sc, B-5sc, W-8sc (30)
Rnd 17: W-(3sc,dec)x6, 3sc, B-dec, 1sc, W-2sc, dec, 3sc, dec (24)
Rnd 18: W-sc around (24)
Rnd 19: 2sc, decx6 (18)
Rnd 20: 1sc, decx6 (12)
Arms Instructions (Make 2)
Start with blue.
Rnd 1: 6 sc in MR (6)
Rnd 2: 1sc, incx3 (9)
Rnd 3: sc around (9)
Change to white.
Rnd 4-10: sc around (7 rounds) (9)
Ears Instructions (Make 2)
Rnd 1: White- 6 sc in MR (6)
Change to blue.
Rnd 2: Ch 1, turn, inc in each st. (12)
Rnd 3: Ch 1, turn, 1 sc inc x 6 (18)
Rnd 4: sc around (18)
Nose Instructions
With blue yarn, make 6 chains, start from the 2nd st from the hook.
Rnd 1: 4 sc, 3 sc on the last st, 3 sc, 1 inc in the last st (12)
Rnd 2: inc, 3 sc, 3 inc, 3 sc, 2 inc (18)
Rnd 3: 1 sc, inc, 3 sc, (1sc,inc)*3, 3 sc, (1sc,inc)*2 (24)
Rnd 4-6: sc around (24)
Horns Instructions (Make 2)
Start with beige.
Rnd 1: 4 sc in MR (4)
Rnd 2: (1sc,inc)*3 (6)
Rnd 3-4: sc around (6)
Finishing and Assembly
- Stuff each part with polyfill as you go; add small amounts at a time for an even, firm fill without lumps.
- Sew the nose and horns to the head using a yarn needle. Use the pattern placement as a guide when attaching parts.
- Embroider eyes and mouth with black thread (as listed in materials) and secure all yarn ends neatly inside the toy.
- Sew the head to the body, then attach arms and ears. Make sure seams are secure and even so the finished amigurumi sits nicely.
Tips
- Follow the color changes in each round carefully to get the striped/patch effect described in the pattern.
- Use a 4 mm hook as specified to match the pattern gauge; if your stitches are looser or tighter adjust hook size slightly.
- Keep stitch markers and a yarn needle handy to mark round starts and for easier assembly.
Enjoy making your Kawaii Cow amigurumi — take your time with assembly for the neatest finish, and personalize colors or facial details to make it your own!