

DIY Crochet Plush Angel Fish — Free Amigurumi Pattern & Step‑by‑Step Instructions

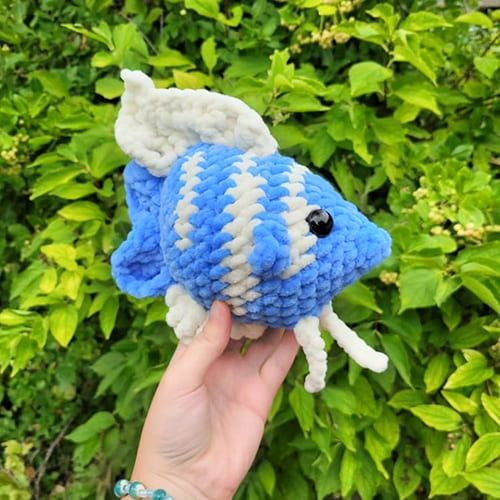
Make a cuddly, colorful crochet plush angel fish with this easy-to-follow amigurumi pattern. Perfect for intermediate beginners, this small plush works up quickly using basic stitches and simple shaping. The pattern below includes materials, stitch abbreviations, a round-by-round body pattern, and finishing details so you can customize colors, fins, and facial features.
The finished piece is a charming addition to ocean-themed décor or a handmade gift. Use safety eyes for display items, or embroider the eyes if the toy will go to a young child.
Materials
I used a 5.5 mm hook (you can use any size depending on your yarn).
- Stitch marker
- 14 mm safety eyes
- Darning needle
- Scissors
- Polyfil/stuffing
- Yarn
Terminology
- MR - Magic ring
- Sc - Single crochet
- Dc - Double crochet
- Trc - Treble crochet
- Inc - Increase
- Dec - Decrease
- Slst - Slip stitch
- FLO - Front loop only
- BLO - Back loop only
- FO - Fasten off
- Picot - chain 3, slst in 3rd chain from hook
Angel Crochet Fish Pattern
RND 1: 5 sc into MR (5)
RND 2: 5 sc around (5)
RND 3: 3 sc inc x5 (15)
RND 4: 15 sc (15)
For color change, pull up a loop of your main color. Before pulling through both loops grab your accent color and pull through. The stitches you will make in the accent color are written in bold.
RND 5: 5 sc (inc)x3, 4sc, (inc)x3 (21)
RND 6: 3 sc, 4 sc, (inc)x4, 4sc, 2sc (inc)x4 (29)
RND 7: 2sc, 18sc, 9sc (29)
The fins are worked in one stitch. Stitch mark each back loop if easier to find for the next round.
RND 8: 4sc, FLO: fin – (dc, ch1, sc, ch1, dc) 13 sc, FLO: fin, 10 sc (29)
Next round work in the 2 back loops from RND 7.
RND 9: 2sc, 7sc, 6sc, 7sc, 7sc (29)
RND 10: 25sc, 4 sc (29)
Place safety eyes between RND 5 and RND 6, 5 stitches apart.
RND 11: 11 sc, (inc)x3, 15 sc (32)
RND 12: 11 sc, (sc, inc)x3, 15 sc (35)
RND 13: 5sc, 8sc, 7sc, 8sc, 7sc (35)
RND 14: (3sc, dec)x7 (28)
RND 15: (2sc, dec)x7 (21)
You may have to adjust the accent color in RND 13 depending on your tension.
Start stuffing, do not overstuff. Try to keep it flatter while stuffing and not making the body too round like a ball.
RND 16: (sc, dec)x7 (14)
RND 17: (dec)x7 (7)
FO, sew closed. Your fins can be any color you choose.
Now we will add the other fins; everything is no sew. Where we ended and sewed closed, count 3 stitches vertically, and centered. 1 will start in RND 16, one in RND 17, and another in RND 16.
With accent color, attach with (sc, ch1, dc, ch1, trc, ch1, dc, ch1, sc) all in one stitch. Do not chain 1, (3sc) into the next stitch. Do not chain 1. Into the next stitch, (sc, ch1, dc, ch1, trc, ch1, dc, ch1, sc, ch1) and turn.
Rest of Tail
Dc into each stitch and each ch 1 space. Only sc in the 3 sc from the first row. Return to dc for the rest of the stitches and ch1 spaces. Work the bottom and top fin back towards your tail.
Bottom Fin
In RND 11, 5 stitches straight from the tail, attach with (sc, ch1, sc) into the same stitch, ch1 (2sc) into next, ch1 (2dc) into next, ch1, (2trc) into next, picot: ch3, slst into the 3rd chain from hook.
Slst into the same stitch, FO.
Top Fin
In RND 11 on top, 5 stitches straight from the tail, attach with (sc, ch1, sc) into the same stitch, ch1, (2sc, ch1, dc) into the same stitch, ch1, dc in the next stitch, ch1, trc, picot, 2 trc into the next.
Ch1 turn. Dc into each stitch and ch1 space, at our picot we will dc into it and make another picot, continue to dc into each stitch and ch1 space, slst into first sc.
Two Long Bottom Fins
Find the best spot on the bottom of the body to make the two long fins; you want them in line with your side fins, and 1 stitch apart from each other. Ch 8, slst in each chain down, slst back into the same stitch of the body (7).
Repeat for a second one.
Weave all of your ends in, and add blush if you’d like.
Tips & Finishing
- Adjust your hook size to change finished size: smaller hooks make a firmer, smaller plush; larger hooks make a looser, larger plush.
- Stuff lightly and evenly to keep a fishlike, slightly flattened shape rather than a round ball.
- For toys intended for small children, replace safety eyes with embroidered eyes or securely attach safety eyes according to manufacturer instructions.
- Change accent and body colors for different looks — try stripes, ombré, or a single bold color.
- Weave in ends neatly and use a yarn needle to close any small gaps around fins to keep stuffing secure.
Most Popular
🧶 Listen while you crochet
3 cozy stories from a little yarn shop
Enjoyed it? A like and a subscribe help our little channel grow 💛