

Adorable Crochet Plush Monkey Amigurumi — Chunky Yarn Pattern & Step-by-Step Instructions

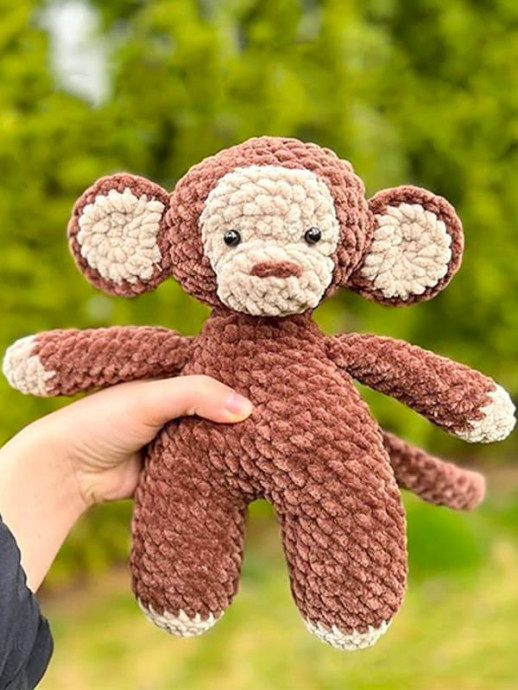
Create a cuddly crochet plush monkey with this easy-to-follow amigurumi pattern. Worked in size 5 chunky yarn with a 6 mm hook, this little two-tone monkey is a quick, satisfying project for crocheters who love making handmade toys. Below you'll find the full materials list, abbreviations, the pattern for each piece, and assembly and finishing tips to help you complete a polished plush.
Note: Finished size will vary depending on yarn tension and stuffing. Use safety eyes securely or substitute embroidered eyes for toys intended for very young children.
Crochet Plush Monkey Amigurumi Overview
Crochet Plush Monkey Amigurumi are the perfect cuddly companions for anyone who adores cute and handmade crafts. With their adorable smiles and soft, huggable bodies, these little monkeys bring a touch of coziness and charm to any space. Whether you're gifting one to a friend or adding it to your own collection, the handmade love and attention to detail that goes into creating each plush monkey truly shines through. Crocheted with care and filled with personality, these amigurumi monkeys are a delightful way to spread joy and warmth wherever they go.
Materials Needed
- Size 5 chunky yarn (light brown and dark brown)
- 6 mm crochet hook
- Stuffing
- 10 mm safety eyes (or alternative)
- Darning needle
- Stitch marker (recommended)
Abbreviations
MR: Magic ring
Sc: Single crochet
Inc: Increase
Dec: Decrease
BLO: Back loop only
FLO: Front loop only
Legs
Legs x 2
Start with light brown.
Rnd 1. 6 sc in a MR
Rnd 2. 6 inc (12)
Rnd 3. (sc, inc)*6 (18)
Change to dark brown.
Rnd 4-11. Work 8 rounds of 18 sc. Work Round 4 in BLO (only the 4th round should be BLO).
Cut yarn for the first leg and fasten off, but don’t cut the yarn for the second leg and continue to the body.
Body
From the second leg, chain 2, connect to the first leg with a sc.
Rnd 12. 7 sc, dec, 18 sc, dec, 10 sc (38)
Rnd 13. 8 sc, dec, 16 sc, dec, 10 sc (36)
Rnd 14. (4 sc, dec)*6 (30)
Rnd 15-16. 30 sc
Rnd 17. (3 sc, dec)*6 (24)
Stuff the legs.
Rnd 18-19. 24 sc
Rnd 20. (2 sc, dec)*6 (18)
Rnd 21. 18 sc
Stuff and fasten off.
Head
With dark brown.
Rnd 1. 6 sc in a MR
Rnd 2. 6 inc (12)
Rnd 3. (sc, inc)*6 (18)
Rnd 4. (2 sc, inc)*6 (24)
Rnd 5. (3 sc, inc)*6 (30)
Rnd 6. (4 sc, inc)*6 (36)
Rnd 7-10. 36 sc (4 rounds)
Rnd 11. (4 sc, dec)*6 (30)
Rnd 12. (3 sc, dec)*6 (24)
Rnd 13. (2 sc, dec)*6 (18)
Stuff and leave a long tail for sewing.
Face
With light brown.
Rnd 1. 6 sc in a MR
Rnd 2. 6 inc (12)
Rnd 3. (sc, inc)*6 (18)
Rnd 4. (2 sc, inc)*6 (24)
Fasten off. Sew in the middle of the head.
Nose
With light brown.
Rnd 1. Chain 7.
Rnd 2. From the second chain of the hook, 5 sc, 3 sc in one chain, 5 sc, 3 sc in one chain (16)
Rnd 3. 16 sc (16)
Fasten off, sew in the lower part of the face (below the middle) and stuff lightly.
Place safety eyes above the nose.
Embroider a small line with dark brown yarn.
Inner Ears
Make two with light brown.
Rnd 1. 6 sc in a MR
Rnd 2. 6 inc (12)
Rnd 3. (sc, inc)*6 (18)
Fasten off.
Hands
Hands x 2
Start with light brown.
Rnd 1. 6 sc in a MR
Rnd 2. (sc, inc)*3 (9)
Rnd 3. (2 sc, inc)*3 (12)
Change to dark brown.
Rnd 4. In BLO, 12 sc, then return to normal loops.
Rnd 5-12. 12 sc (8 rounds)
Stuff lightly. Fold the last row in half and sc through both sides. Fasten off and leave a tail for sewing.
Outer Ears
Make two with dark brown.
Rnd 1. 6 sc in a MR
Rnd 2. 6 inc (12)
Rnd 3. (sc, inc)*6 (18)
Align with one inner ear and sc through both the inner and outer ear with brown yarn. Fasten off.
Tail
Using dark brown.
Rnd 1. 6 sc in a MR
Rnd 2-20. 6 sc (19 rounds)
Fold last row in half and sc through both sides. Fasten off and leave a tail for sewing.
Assembly
Sew arms below the head (on round 20).
Sew the tail onto the back of the body around row 14 and the ears on the two sides of the head vertically.
Sew the face and nose pieces in place, add safety eyes above the nose, and embroider the mouth and small facial details with dark brown yarn.
Finishing & Safety
Weave in all yarn ends and ensure stuffing is evenly distributed. If making this toy for a child under 3 years, consider using embroidered eyes instead of safety eyes and secure all sewn parts tightly. A final light shaping with your hands and a few hidden stitches will help the monkey hold its shape and look polished.