

Adorable Crochet Fox Amigurumi — Step-by-Step Pattern & Tips

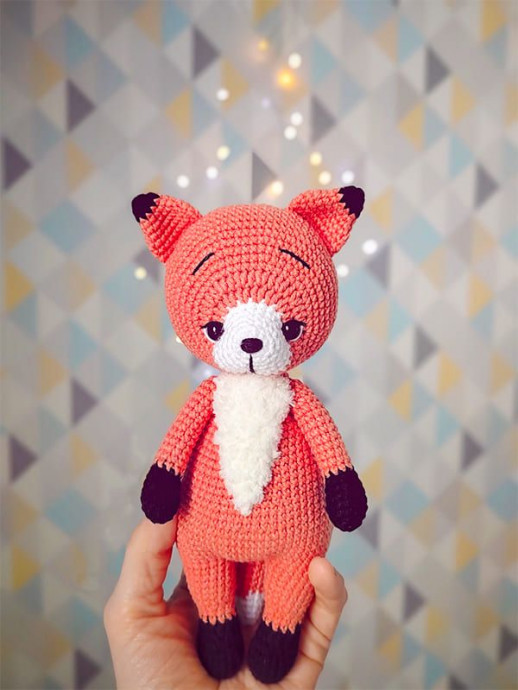
This Crochet Fox Amigurumi pattern walks you through making a charming fox toy in orange, white and black. The pattern is suitable for beginners and experienced crocheters alike and includes step-by-step instructions for the legs, body, muzzle, ears, arms, tummy and tail. Below you will find the complete stitch-by-stitch pattern plus helpful finishing and assembly tips to get a neat, professional-looking result.
Crochet Fox Amigurumi Overview
Crochet Fox Amigurumi is a delightful and charming craft project that combines the cozy art of crochet with the playful spirit of foxes. Creating your very own amigurumi fox can be a fun and rewarding experience, perfect for both beginners and experienced crocheters alike. With its fluffy tail and cute ears, this little fox is sure to bring a smile to your face every time you see it. Whether you're making it as a gift for a friend or simply to add a touch of whimsy to your own space, the Crochet Fox Amigurumi is a wonderful way to express your creativity and spread a little joy.
Necessary Materials
- Yarn Art Jeans yarn in white, orange, black colors
- White Alize Softy yarn
- Hook 2mm
- Filler (holofiber)
- Eyes 8mm
- Long sewing needle
- T-pins and fiber discs 20mm
Abbreviations
MR: Magic ring
Ch: Chain
Sc: Single crochet
Hdc: Half double crochet
Inc: Increase
Dec: Decrease
Slst: Slip stitch
Legs and Body
We start crocheting in black.
1) 6 sc in MR
2) 6 inc (12)
3) (1 sc 1 inc)*6 (18)
4–6) 18 sc (3 rows)
7) 2 sc 4 dec 8 sc (14)
8) 2 sc 2 dec 8 sc (12)
9) 12 sc
Color change to orange.
10–11) 12 sc (2 rows)
12) (3 sc 1 inc)*3 (15)
13) 2 sc 1 inc (4 sc 1 inc)*2 2 sc (18)
14) – 18) 18 sc (5 rows)
Color change to orange and crochet 3 bias loops, stuff, fasten, and cut the thread. Now, we crochet the second leg but do not cut the thread, we continue crocheting:
19) 9 sc 4 ch connect with the 1st leg (in place of the last sc) 18 sc on the first leg 4 sc on 4 ch 18 sc on the 2nd leg 4 sc on 4 ch
20) 8 sc 1 inc 6 sc 1 inc 8 sc 1 inc 6 sc 1 inc 8 sc 1 inc 2 sc 1 inc (50)
21) 2 sc 1 inc 6 sc 1 inc (4 sc 1 inc)*4 5 sc 1 inc 5 sc 1 inc 2 sc 1 inc 3 sc 1 inc 1 sc (60)
22–26) 60 sc (5 rows)
27) 1 dec 18 sc (1 dec 2 sc)*3 20 sc (1 dec 2 sc)*2 (54)
28–29) 54 sc (2 rows)
30) 1 dec 16 sc (1 dec 2 sc)*3 16 sc (1 dec 2 sc)*2 (48)
31–33) 48 sc (3 rows)
34) 3 sc 1 dec (6 sc 1 dec)*5 3 sc (42)
35–36) 42 sc (2 rows)
37) (5 sc 1 dec)*6 (36)
38–39) 36 sc (2 rows)
40) 2 sc 1 dec (4 sc 1 dec)*5 2 sc (30)
41–45) 30 sc (5 rows)
46) (3 sc 1 dec)*6 (24)
47) 1 sc 1 dec (2 sc 1 dec)*5 1 sc (18)
If you are going to sew on the head, then the last row will be 47. Stuff the body, fasten the thread and leave a long end for sewing.
If you use a cotter pin, then insert a cotter pin with a 20mm disk and continue knitting:
48) (1 sc 1 dec)*6 (12)
49) 6 dec
Stuff, pull the hole, cut the thread and hide.
Muzzle
We start crocheting in white.
1) 6 sc in MR
2) 1 inc 3 sc in 1 ch 1 sc 1 inc 3 sc in 1 ch 1 sc (12)
3) 12 sc
4) 2 sc, 4 inc, 2 sc, 4 inc (20)
5) 20 sc
6) 2 sc (1 inc, 1 sc)*4 2 sc (1 inc 1 sc)*4 (28)
7) 28 sc
One bias loop and color change to orange.
8) 7 sc 2 hdc 1 ch skip sc (place for the eyes) 8 inc from hdc 1 ch skip sc (place for the eyes) 2 hdc 7 sc (36)
9) 7 sc 3 hdc (1 hdc 1 inc from hdc)*8 3 hdc 7 sc (44)
10) 10 sc (1 inc, 5 sc)*2 (5 sc 1 inc)*2 10 sc (48)
11) 6 sc (5 sc, 1 inc)*6 6 sc (54)
12) 9 sc 1 inc (6 sc 1 inc)*5 9 sc (60)
13) 6 sc (7 sc, 1 inc)*6 6 sc (66)
Insert eyes.
14) 10 sc 1 inc (8 sc 1 inc)*5 10 sc (72)
15–21) 72 sc (7 rows)
22) 5 sc 1 dec (10 sc 1 dec)*5 5 sc (72)
23) (9 sc, 1 dec)*6 (66)
24) 4 sc, 1 dec (8 sc 1 dec)*5 4 sc (60)
25) (7 sc 1 dec)*6 (54)
Insert cotter pin between 15 and 16 side by side and secure head to body.
26) 3 sc, 1 dec, (6 sc 1 dec)*5 3 sc (48)
27) (5 sc, 1 dec)*6 (42)
28) 2 sc, 1 dec, (4 sc, 1 dec)*5 2 sc (36)
29) (3 sc, 1 dec)*6 (30)
30) 1 sc, 1 dec, (2 sc, 1 dec)*5 1 sc (24)
31) (1 sc, 1 dec)*6 (18)
32) 6 dec
Stuff, pull the hole, cut the thread and hide.
Ears
We start crocheting in black.
1) 6 sc in MR
2) (1 sc 1 inc)*3 (9)
Color change to orange.
3) 9 sc
4) 1 sc 1 inc (2 sc 1 inc)*2 1 sc (12)
5) 1 sc 1 inc (2 sc 1 inc)*5 1 sc (18)
6) (3 sc 1 inc)*6 (24)
7–8) 24 sc (2 rows)
Fold the two halves and crochet them together, leaving a long end for sewing.
Handles
We start crocheting in black.
1) 6 sc in MR
2) 6 inc (12)
3) (5 sc 1 inc)*2 (14)
4–5) 14 sc (2 rows)
6) 3 dec 6 sc (11)
7) 11 sc
Color change to orange.
8–18) 11 sc (11 rows)
19) 1 dec 9 sc (10)
20) 5 dec
We stuff tightly up to the 8th row. Pull the hole, cut the thread and hide it. This version of the handles is for thread fastening, if you plan to sew the handles, then the 19th row is the last. Fold in half and crochet on both sides, fasten the thread, and leave a long end for sewing.
Tummy
Using Alize softy yarn.
1) 9 ch turn from the 2nd loop 8 sc ch
2) turn 8 sc ch turn
3) from the 2nd loop 7 sc ch turn
4) 7 sc ch turn
5) from the 2nd loop 6 sc ch turn
6) 6 sc ch turn
7) from the 2nd loop 5 sc ch turn
8) 5 sc ch turn
9) from the 2nd loop 4 sc ch turn
10) 4 sc ch turn
11) from the 2nd loop 3 sc ch turn
12) 3 sc ch turn
13) from the 2nd loop 2 sc ch turn
14) from the 2nd loop 1 sc
Fasten the thread, leaving a long end for sewing.
Tail
We start crocheting in white.
1) 6 sc in MR
2) (1 sc 1 inc)*3 (9)
3) 9 sc
4) 1 sc 1 inc (2 sc 1 inc)*2 1 sc (12)
5) 12 sc
Color change to orange.
6) 1 sc 1 inc (2 sc 1 inc)*5 1 sc (18)
7) 18 sc
8–15) 18 sc (9 rows)
16) 1 sc 1 dec (2 sc 1 dec)*5 1 sc (12)
17) 12 sc
18) (1 sc 1 dec)*6 (6)
Stuff it, fold it in half and knit from both sides, fasten the thread and leave a long end for sewing. The crochet fox is ready!
Finishing and Assembly Tips
- Stuff firmly but evenly to keep the fox s shape consistent. Use small amounts of stuffing and add gradually.
- Use stitch markers to keep track of rounds, especially when joining legs to body.
- When sewing pieces together, use the long yarn tails left from fastening to make hidden, secure seams. A long sewing needle helps to pass through dense stuffing and fabric.
- If using safety eyes, insert them before closing the muzzle and secure with the appropriate washers; alternatively sew on eyes for younger children.
- Weave in and hide all ends neatly on the inside of the toy for a clean finish.