

Make a Cute Crochet Dog Amigurumi — Complete Step-by-Step Pattern

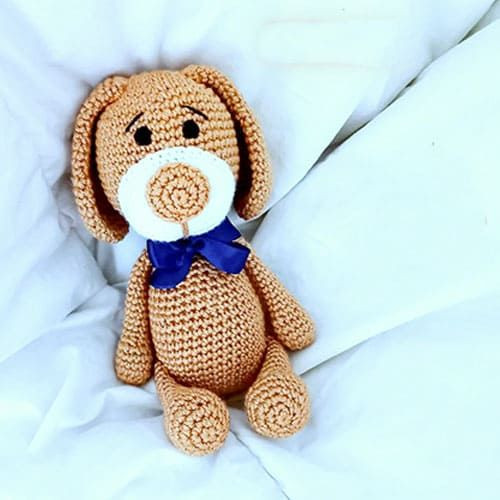
This complete crochet dog amigurumi pattern walks you through each piece — head, snout, nostrils, ears, tail, body, arms and legs — with round-by-round instructions. The pattern below is suitable for crocheters familiar with basic amigurumi techniques (magic ring, single crochet, increases and decreases). Use the pattern as written for a classic small stuffed pup or adapt yarn and hook size to change the finished size.
Suggested materials
- Yarn: worsted/aran or DK weight yarn (main color and contrast for snout/ears as desired)
- Hook: 3.5–4.5 mm (adjust for your tension so stitches are tight)
- Fiberfill for stuffing
- Safety eyes or embroidery thread for eyes
- Yarn needle, stitch marker, scissors
Tips before you start
- Keep stitches tight to avoid stuffing showing through.
- Use a stitch marker to track the beginning of rounds.
- Place and pin parts (snout, ears, arms, legs) before sewing to check positioning.
- Secure safety eyes with washers or embroider eyes if making for very young children.
Assembly overview
Sew the snout to the front center of the head, add nostrils and embroider a nose if desired. Attach ears symmetrically on either side of the head. Fill limbs and body firmly and sew arms and legs to the body before closing. Finally attach the head to the body and secure all loose ends.
Creating a Crochet Dog Amigurumi
Creating a crochet dog amigurumi is a delightful and heartwarming experience that brings joy to both the maker and recipient. From choosing the perfect yarn colors to carefully crafting each tiny stitch, every step is filled with creativity and love. These adorable crochet pups are not just toys; they are handmade companions filled with personality and charm. Whether you are a seasoned crocheter or just starting out, crafting a crochet dog amigurumi is a rewarding and enjoyable project that will surely bring smiles and warmth to all who see it.
Abbreviation
MR – magic ring
sc – single crochet
inc - increase
dec - decrease
Rnd - Round
Head
Rnd 1. MR (6)
Rnd 2. inc (12)
Rnd 3. sc, inc x 6 (18)
Rnd 4. 2sc, inc x 6 (24)
Rnd 5. 3sc, inc x 6 (30)
Rnd 6. 4sc, inc x 6 (36)
Rnd 7. 5sc, inc x 6 (42)
Rnd 8. 6sc, inc x 6 (48)
Rnd 9-18. sc (10 rnds) (48)
Rnd 19. 6sc, dec x 6 (42)
Rnd 20. 5sc, dec x 6 (36)
Rnd 21. 4sc, dec x 6 (30)
Rnd 22. 3sc, dec x 6 (24)
Rnd 23. 2sc, dec x 6 (18)
Rnd 24. sc, dec x 6 (12)
Rnd 25. dec x 6 (6)
Snout
Rnd 1. MR (6)
Rnd 2. inc x 6 (12)
Rnd 3. sc, 3 inc, 3sc, 3 inc, 2sc (18)
Rnd 4. sc, (sc, inc) x 3, 3sc, (inc, sc) x 3, 2sc (24)
Rnd 5. sc, (inc, 2sc) x 3, 3sc, (inc, 2sc) x 3, 2sc (30)
Rnd 6-8. sc (3 rnds) (30)
Nostril
Rnd 1. MR (6)
Rnd 2. inc x 6 (12)
Rnd 3. sc, 3 inc, 3sc, 3 inc, 2sc (18)
Ears
Rnd 1. MR (6)
Rnd 2. inc x 6 (12)
Rnd 3. sc, inc x 6 (18)
Rnd 4. 2sc, inc x 6 (24)
Rnd 5-10. sc (6 rnds) (24)
Rnd 11. 2sc, dec x 6 (18)
Rnd 12-14. sc (3 rnds) (18)
Rnd 15. sc, dec x 6 (12)
Rnd 16-23. sc (8 rnds) (12)
Tail
Rnd 1. MR (6)
Rnd 2. inc x 6 (12)
Rnd 3-4. sc (2 rnds) (12)
Body
Rnd 1. MR (6)
Rnd 2. inc x 6 (12)
Rnd 3. sc, 3 inc, 3sc, 3 inc, 2sc (18)
Rnd 4. sc, (inc, sc) x 3, 3sc, (inc, sc) x 3, 2sc (24)
Rnd 5. sc, (inc, 2sc) x 3, 3sc, (inc, 2sc) x 3, 2sc (30)
Rnd 6. sc, (inc, 3sc) x 3, 3sc, (inc, 3sc) x 3, 2sc (36)
Rnd 7-16. sc (10 rnds) (36)
Rnd 17. 4sc, dec x 6 (30)
Rnd 18-20. sc (3 rnds) (30)
Rnd 21. 3sc, dec x 6 (24)
Rnd 22-23. sc (2 rnds) (18)
Rnd 24. 2sc, dec x 6 (12)
Rnd 25-27. sc (3 rnds) (12)
Arms
Rnd 1. MR (6)
Rnd 2. inc x 6 (12)
Rnd 3. 2sc, inc x 4 (16)
Rnd 4-5. sc (2 rnds) (16)
Rnd 6. 2sc, dec x 4 (12)
Rnd 7. 4sc, dec x 2 (10)
Rnd 8-21. sc (14 rnds) (10)
Legs
Rnd 1. MR (6)
Rnd 2. inc x 6 (12)
Rnd 3. sc, inc x 6 (18)
Rnd 4. 2sc, inc x 6 (24)
Rnd 5-6. sc (2 rnds) (24)
Rnd 7. 2sc, dec x 6 (18)
Rnd 8. (2sc, dec) x 4, 2sc (14)
Rnd 9-20. sc (12 rnds) (14)
Rnd 21. (sc, dec) x 4, 2sc (10)
Rnd 22. (sc, dec) x 3, sc (7)
Assembly: Position the snout and sew it to the head, add nostrils, and embroider or attach a nose. Sew ears to the top sides of the head. Attach arms and legs to the body evenly, then sew the head to the body. Weave in all ends and add any desired embellishments like collars or embroidered markings.
Finishing notes: Check all seams for secure stitching, especially if the toy will be handled by children. Adjust stuffing to achieve the desired firmness and shape. Your amigurumi dog pattern is ready.