

Cute Crochet Strawberry Cake Amigurumi — Step-by-Step Pattern & Tips

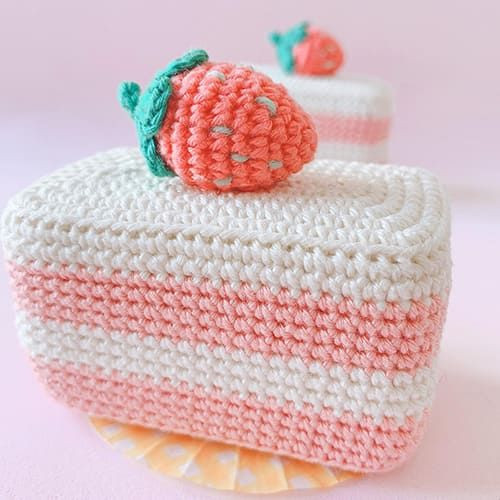
This crochet Strawberry Cake Amigurumi pattern walks you through making an adorable, dessert-inspired stuffed toy: a layered shortcake with a tiny strawberry topper. Perfect for gifting, display, or practicing amigurumi techniques, the pattern uses small-gauge cotton yarn and is worked in the round. Below you'll find the full materials list, stitch abbreviations, the complete round-by-round instructions for the shortcake body and the strawberry, plus finishing and assembly tips to get a neat, stable result.
Crochet Strawberry Cake Amigurumi Overview
Crochet Strawberry Cake Amigurumi is an adorable and delicious-looking creation that brings a touch of sweetness to anyone's day! This charming amigurumi combines the art of crochet with the tempting appearance of a strawberry cake, making it a delightful addition to any crochet enthusiast's collection. Its bright red color, intricate stitches, and cute design make it a standout piece that is sure to bring a smile to your face every time you see it. Whether you use it as a charming decoration, a playful toy, or a unique gift, this Crochet Strawberry Cake Amigurumi is bound to be a sweet and delightful companion that you'll love to have around!
Materials Needed
- 1.75mm crochet hook
- 100% cotton yarn (off-white, light old rose, old rose, green and light green)
- Cardboard
- Fiberfill
- Stitch marker
- Scissors
Abbreviations Used
- ch - chain
- sc - single crochet
- slst - slip stitch
- inc - increase
- t.inc - triple increase (3sc in the same stitch)
- tr - treble crochet
- t.dec - triple decrease (invisible decrease with 3 stitches)
- BLO - back loop only
Making the Shortcake
Starting with off-white yarn, follow these rounds:
- Rnd 1. 13sc, 3sc in the last chain, 12sc, inc (30)
- Rnd 2. t.inc, 12sc, t.inc, sc, t.inc, 12sc, t.inc, sc (38)
- Rnd 3. sc, t.inc, 14sc, t.inc, 3sc, t.inc, 14sc, t.inc, 2sc (46)
- Rnd 4. 2sc, t.inc, 16sc, t.inc, 5sc, t.inc, 16sc, t.inc, 3sc (54)
- Rnd 5. 3sc, t.inc, 18sc, t.inc, 7sc, t.inc, 18sc, t.inc, 4sc (62)
- Rnd 6. 4sc, t.inc, 20sc, t.inc, 9sc, t.inc, 20sc, t.inc, 5sc (70)
- Rnd 7. BLO 70sc
- Rnd 8. 70sc
Change to light old rose yarn and continue:
- Rnd 9-12. 70sc (4 rounds)
- Change to off-white yarn:
- Rnd 13-15. 70sc (3 rounds)
- Change to light old rose yarn:
- Rnd 16-19. 70sc (4 rounds)
- Rnd 20. BLO 70sc
RND 1: Cut some cardboard panels to fit inside the shortcake for better shape after inserting fiberfill.
- Rnd 21. 4sc, t.dec, 20sc, t.dec, 9sc, t.dec, 20sc, t.dec, 5sc (62)
- Rnd 22. 3sc, t.dec, 18sc, t.dec, 7sc, t.dec, 18sc, t.dec, 4sc (54)
Insert fiberfill and the bottom cardboard piece.
- Rnd 23. 2sc, t.dec, 16sc, t.dec, 5sc, t.dec, 16sc, t.dec, 3sc (46)
- Rnd 24. sc, t.dec, 14sc, t.dec, 3sc, t.dec, 14sc, t.dec, 2sc (38)
- Rnd 25. 13sc, t.dec, 12sc, dec (30)
Cut the yarn, leaving a long tail for sewing.
Making the Strawberry
With old rose yarn, follow these rounds:
- Rnd 1. 5sc in the magic ring
- Rnd 2. 5 inc (10)
- Rnd 3. 10sc
- Rnd 4. (sc, inc) x 5 (15)
- Rnd 5. 15sc
- Rnd 6. (2sc, inc) x 5 (20)
- Rnd 7-8. 20sc
- Rnd 9. (2sc, dec) x 5 (15)
- Rnd 10. (sc, dec) x 5 (10)
- Insert fiberfill firmly
- Rnd 11. 5 dec (5)
Creating the Strawberry Calyx
With pastel green yarn:
- In a magic ring: (ch 4, tr, ch 4, slst) x 5 , ch 4, 3 slst starting at the second chain from the hook.
Cut the yarn leaving a long tail for sewing. Close the magic ring and sew it at the top of the strawberry. With a light pastel green yarn, make some details.
Finishing & Assembly
- Sew the strawberry calyx securely to the top of the strawberry using the long tail left when you cut the yarn.
- Place the strawberry on the top center of the shortcake and sew it in place using a whipstitch or ladder stitch for a neat finish.
- Insert remaining cardboard panels inside the shortcake as needed to help the piece keep its shape; ensure fiberfill is evenly distributed before closing.
- Weave in all loose ends and trim excess yarn.
Tips
- Use a stitch marker to mark the beginning of rounds to avoid losing track of counts.
- Adjust stuffing density to get a firmer or softer look depending on preference.
- If using this as a toy for small children, ensure cardboard is well secured and consider omitting it for safety.
Thank you for visiting our website amiguruminews.com.