Crochet Critter Bear Coaster: A Fun DIY Project

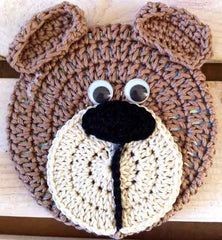
Create your very own adorable bear coaster with the art of crochet! This fun and creative project allows you to showcase your crafting skills while also adding a cute and functional piece to your home decor. Using yarn and a crochet hook, you can easily bring this Crochet Critter Bear Coaster to life. The intricate details of the bear's face and ears will make this coaster a charming addition to your coffee table or kitchen counter. This handmade coaster also makes a thoughtful and unique gift for friends and family. So grab your crochet supplies and get ready to create a one-of-a-kind Crochet Critter Bear Coaster that will bring a touch of whimsy to your living space!
Size
5" Diameter (fits over a CD)
Materials
- Sport Weight Yarn
- Brown (MC) ¾ oz, 54 yd
- Beige (Bg) ¼ oz, 18 yd
- Black (Bk) 5 yd
Additional Materials
- Glue
- Yarn Needle
- ½" Wiggly Eyes - 2
- Crochet Hook: Size F-5 (3.75 mm) or size needed to obtain gauge.
Gauge
2 rnds in dc = 2" across.
Abbreviations
- ch - chain
- dc - double crochet
- hdc - half double crochet
- lp - loop
- rep - repeat
- rnd - round
- sc - single crochet
- sl st - slip stitch
- sp - space
- st - stitch
- yo - yarn over
Special Stitches
Double Crochet Decrease (dc dec): Keeping last loop of each st on hook, dc in next 2 sts, yo and pull through 3 loops on hook.
Single Crochet Decrease (sc dec): Draw up a lp in each of the next 2 sts, yo and draw through 3 lps on hook.
Bear Coaster Instructions
Rnd 1: (Right Side) Starting in center, ch 4, sl st in first ch to form a ring; ch 3 (counts as first dc now and throughout), 11 dc in the ring; join with sl st to first dc. (12 dc) Join all rounds in this manner.
Rnd 2: Ch 3, dc in same st as joining, 2 dc in each dc around; join. (24 dc)
Rnd 3: Ch 3, dc in same dc as joining, dc in next dc, (2 dc in next dc, dc in next dc) 11 times; join. (36 dc)
Rnd 4: Ch 3, dc in same dc as joining, dc in next 2 dc, (2 dc in next dc, dc in next 2 dc) 11 times; join. (48 dc)
Rnd 5: Ch 3, dc in same dc as joining, dc in next 3 dc, (2 dc in next dc, dc in next 3 dc) 11 times; join. (60 dc)
Rnd 6: Ch 3, dc in same dc as joining, dc in next 4 dc, (2 dc in next dc, dc in next 4 dc) 11 times; join. (72 dc)
Rnd 7: Ch 3, dc dec, (dc in next dc, dc dec) around. (48 dc)
Rnd 8: Ch 3, dc dec, (dc in next dc, dc dec) around. (32 dc) Finish off and weave in ends.
Ears (Make 2)
Row 1: (Right Side) Starting at base, with MC, ch 10, sc in 2nd ch from hook, sc in next ch across. (9 sc)
Rows 2-3: Ch 1, turn, sc in each sc across.
Row 4: Ch 1, turn, * draw up a lp in each of next 2 sc, yo and draw through 3 lps on hook *, sc in next sc across to last 2 sc; rep from * to *. (7 sc)
Rnd 1: Ch 1, turn, sc dec, sc in next sc across to last 2 sc; sc dec (5 sc); working in sides of rows, sc in next 4 rows, working in unused lps of starting ch, sc dec, sc in next ch across to last 2 ch, sc dec; working in sides of rows, sc in next 4 rows; join with sl st to first sc. Finish off.
Snout
Rnd 1: (Right Side) Starting in center, with Bg, ch 4, sl st in first ch to form ring; ch 3, 15 dc in ring; join with sl st to first dc. (16 dc)
Rnd 2: Ch 3, dc in same st as joining, 2 dc in each dc around; join. (32 dc)
Rnd 3: Ch 3, dc in same dc as joining, dc in next dc, (2 dc in next dc, dc in next dc) around; join. (48 dc) Finish off.
Face Features
Noise
Row 1: (Right Side) Starting at base, with Bk, ch 2, 3 sc in 2nd ch from hook. (3 sc)
Row 2: Ch 1, turn, 2 sc in each sc across. (6 sc)
Rnd 3: Ch 1, turn, 2 sc in first sc, sc in each sc across to last sc, 2 sc in last sc. (8 sc) Do not turn; working in sides of rows, sc in next 3 rows, sl st in unused lp of starting ch, working in sides of rows, sc in next 3 rows; join with sl st to first sc. Finish off leaving long end.
Mouth
With Bk, ch 10, finish off leaving long end.
Finishing Instructions
- Slip Coaster over CD with Rnds 7 & 8 at the back.
- Using long ends, sew Nose and Mouth to Snout.
- Position and sew (or glue) Ears and Snout to front of Coaster. Glue Wiggly eyes in place.