How to Crochet an Adorable Amigurumi Bear

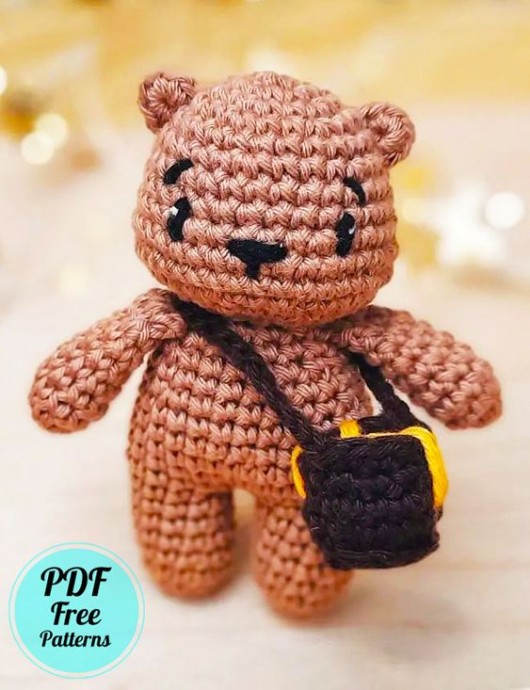
Create your very own adorable amigurumi bear using the art of crochet. This project involves using a small hook and yarn to meticulously craft each part of the bear, from its tiny ears to its fluffy tail. The process of crocheting an amigurumi bear allows you to customize the colors and details to make it uniquely yours. Whether you're a beginner or an experienced crocheter, this project is a fun and rewarding way to showcase your skills and creativity.
Crafting a crochet bear amigurumi involves following a pattern that guides you through each step of the creation process. You'll start by crocheting the bear's body and head, then move on to its limbs and facial features. Once all the pieces are crocheted, you'll carefully assemble them to bring your bear to life. The final touches, such as adding eyes and a nose, will give your amigurumi bear its charming personality. Whether you choose to make a classic brown bear or experiment with different colors and textures, the possibilities are endless when it comes to crocheting your own amigurumi bear.
Materials
• Yarn of choice for the body
• Embroidery thread or scrap yarn for the face features (black and white)
• Optional: Safety eyes
• Crochet hook in the right size for your yarn
• Toy stuffing
• Sewing pins, yarn needle, scissors, stitch marker
I used: Ricorumi DK in color 056 and hook 2.5 mm
Bobble Stitch
In this pattern you will make a bobble for a bear’s tail, it will be made with 3 triple crochet. To make this, make three tr in the same stitch, but do not finish the first two (stop before the last yarn over). When finishing the last tr, pull the loop through all four loops that you will have on your hook.
Pattern Notes
The whole thing is worked in continuous rounds. If you will use the same yarn and hook as me, your toy will measure approx. 10 cm in height.
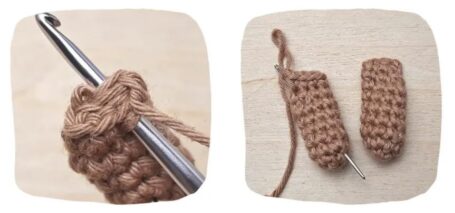
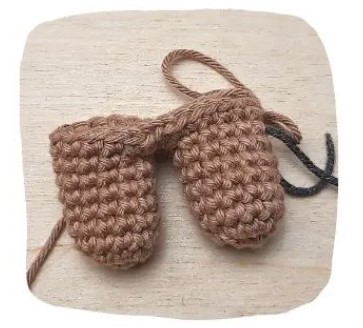
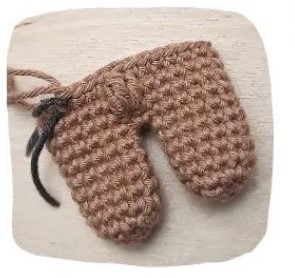
Arms (x2)
• Arms have to be made first, because we will attach these while crocheting the body
R1. 6 sc in MR [6]
R2. (1 sc, inc) x3 [9]
R3-7. sc around (5 rounds) [9]
• Stuff lightly only the very beginning of the arm
R8. (1 sc, dec) x2, 3 sc [7]
• Fold in half, next round is worked through stitches of both layers, skip the last stitch of the last round
R9. 3 sc, ch 1
• Fasten off, pull the last ch very tight, weave in end
Head
R1. 6 sc in MR [6]
R2. 6 inc [12]
R3. (1 sc, inc) x6 [18]
R4. (1 sc, inc, 1 sc) x6 [24]
R5. sc around [24]
R6. (3 sc, inc) x6 [30]
R7-8. sc around (2 rounds) [30]
R9. (2 sc, inc, 2 sc) x6 [36]
R10. 9 sc, 2 inc, 14 sc, 2 inc, 9 sc [40]
R11. sc around [40]
R12. (2 sc, dec) x10 [30]
R13. (1 sc, dec) x10 [20]
• Embroider the face; increases from rnd 10 should be at the sides and face should be centered between these, at the opposite side of the stitch marker. I embroidered the eyes over rnds 8-9, 6 sts apart, with tiny horizontal white sts as light sparks, brows 1 st above the eyes, nose between rnds 9-10, 2 sts wide, snout one rnd down (see the picture for reference)
R14. (2 sc, dec) x5 [15]
• Start stuffing and continue to the end
R15. (1 sc, dec) x5 [10]
R16. 5 dec [5]
• Fasten off, close the hole – with the tapestry needle, thread the yarn through the front loops of the last rnd and pull tight, weave in end

Ears (Make 2)
R1. 6 sc in MR [6]
• Do not close the ring, fasten off and leave a long tail for sewing
Legs (Make 2)
R1. 6 sc in MR [6]
R2. 6 inc [12]
R3-7. sc around (5 rounds) [12]
• Make additional 4 sc (for both legs)
• Fasten off and weave in end for the first leg, crochet the second leg the same way but do not fasten off, mark the last st as a new end of the round and continue crocheting
• Now you will connect two legs and start crocheting the body
Body
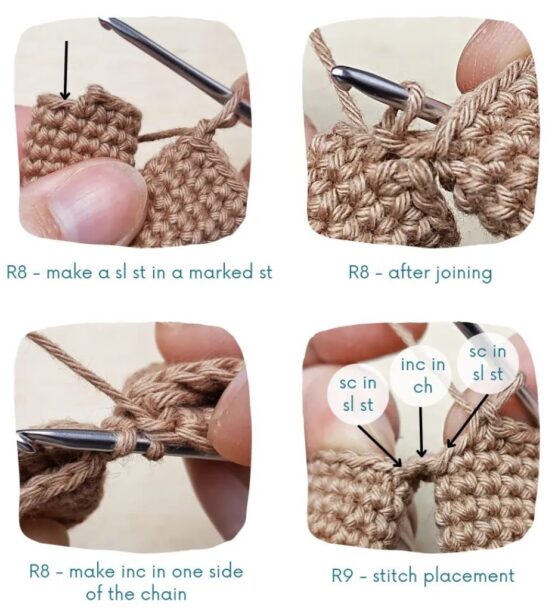
R8. 5 sc, 1 sl st, ch 1, make the next st in the st right after the last made sc of the first leg, 1 sl st, 11 sc, inc in one side of the chain, 6 sc [27]
R9. 5 sc, 1 sc in sl st, inc in the other side of the chain, 1 sc in sl st, 19 sc [28]
R10. 21 sc, bobble stitch with 3 tr, 6 sc [28]
• The bobble st should be in the middle of the back, adjust stitches if needed
R11. 26 sc, finish this round here [28]
• Mark the last sc as a new round end
• Stuff the legs and stuff the body as you go
R12. 8 sc, dec, (7 sc, dec) x2 [25]
R13. sc around [25]
R14. 3 sc, dec, (7 sc, dec) x2, 2 sc [22]
R15. sc around [22]
R16. 4 sc, dec, (5 sc, dec) x2, 2 sc [19]
• In the next round we will attach the arms, sc through the arm and the body at the same time, position the arms with the wrong side of the last row facing upwards.
• Find 3 sts on each side of the body as a place for the arms, there should be a 6 sts distance on the front between these.
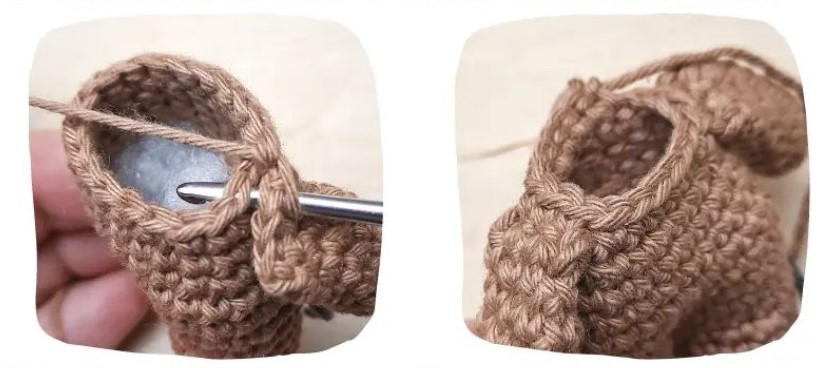
R17. Make 1 sc in every st or the pair of sts where you are attaching arms to the body, in my case it was: 1 sc, 3 sc through the arm and the body, 6 sc, 3 sc through the arm and the body, 6 sc [19]
R18. (1 sc, dec) x6, sl st [13]
• Fasten off, leave a long tail for sewing, finish stuffing

Assembly
• Sew the ears to the head between rounds 4-7, on the opposite sides of the head lined with the arms, right side of the ears has to be facing forward
• Sew the head to the body, stuff the neck firmly