Adorable Crochet Pig Coaster Pattern

Create Your Very Own Adorable Pig Coaster
Create your very own adorable pig coaster with this crochet critter pattern. This fun and whimsical design will add a touch of charm to your home decor while also serving a practical purpose. Using basic crochet stitches, you can easily follow along with the pattern to bring this cute pig to life. Whether you're a seasoned crocheter or just starting out, this project is perfect for all skill levels.
Choose your favorite yarn colors to customize your pig coaster and make it uniquely yours. It's a great way to add a pop of personality to your coffee table or dining room while protecting surfaces from hot or cold drinks. The possibilities are endless with this pattern - you can even create a whole set of critter coasters featuring different animals for a fun and eclectic look. Get your crochet hooks ready and start stitching up your very own crochet critter pig coaster today!
Size and Materials
Size: 5" Diameter (fits over a CD)
Materials
- Sport Weight Yarn
- Pink (MC) ½ oz, 36 yd
- Light Pink (Lp) 6 yd
Additional Materials
- Glue
- Yarn Needle
- 1" Wiggly Eyes - 2
- Crochet Hook: Size F-5 (3.75 mm) or size needed to obtain gauge
Gauge
2 rnds in dc = 2" across.
Abbreviations
- ch - chain
- dc - double crochet
- lp - loop
- rep - repeat
- rnd - round
- sc - single crochet
- sl st - slip stitch
- sp - space
- st - stitch
- yo - yarn over
Special Stitches
Double Crochet Decrease (dc dec): Keeping last loop of each st on hook, dc in next 2 sts, yo and pull through 3 loops on hook.
Pig Coaster Instructions
Rnd 1: (Right Side) Starting in center, ch 4, sl st in first ch to form ring; ch 3 (counts as first dc now and throughout), 11 dc in ring; join with sl st to first dc. (12 dc) JOIN ALL DC RNDS IN THIS MANNER. DO NOT TURN EACH RND.
Rnd 2: Ch 3, dc in same st as joining, 2 dc in each dc around; join. (24 dc)
Rnd 3: Ch 3, dc in same dc as joining, dc in next dc, (2 dc in next dc, dc in next dc) 11 times; join. (36 dc)
Rnd 4: Ch 3, dc in same dc as joining, dc in next 2 dc, (2 dc in next dc, dc in next 2 dc) 11 times; join. (48 dc)
Rnd 5: Ch 3, dc in same dc as joining, dc in next 3 dc, (2 dc in next dc, dc in next 3 dc) 11 times; join. (60 dc)
Rnd 6: Ch 3, dc in same dc as joining, dc in next 4 dc, (2 dc in next dc, dc in next 4 dc) 11 times; join. (72 dc)
Rnd 7: Ch 3, dc dec, (dc in next dc, dc dec) around. (48 dc)
Rnd 8: Ch 3, dc dec, (dc in next dc, dc dec) around. (32 dc) Finish off and weave in ends.
Creating the Ears
Ears (Make 2)
Row 1: (Right Side) Starting at point, with Lp, ch 2, sc in 2nd ch from hook. (1 sc)
Row 2: Ch 1, turn, 3 sc in only sc. (3 sc)
Rows 3-4: Ch 1, turn, 2 sc in first sc, sc in next sc across to last sc, 2 sc in last sc. (5, 7 sc)
Rows 5-6: Ch 1, turn, sc in each sc across.
Rnd 1: Ch 1, turn, sc in next 2 sc, draw up a lp in each of next 3 sc, yo and draw through 4 lps on hook, sc in next 2 sc; ch 1, working in sides of rows, sc in next 5 rows, 3 sc in unused lp of starting ch on other side, working in sides of rows, sc in next 5 rows; join with sl st to first sc.
Creating the Snout
Snout
Row 1: (Right Side) Starting at center, with Lp, ch 1 (center ch), ch 8, sc in center ch (1st ring), ch 8, sl st in 1st ring (2nd ring), 14 sc in 1st ring, sl st in sc, 14 sc in 2nd ring; join with sl st to first sc. Finish off and weave in ends.
Finishing Touches
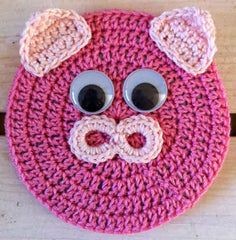
Finishing (use photo as guide):
- Slip Coaster over CD with Rnds 7 & 8 at the back.
- Position and sew (or glue) facial features to front of Coaster and glue Wiggly eyes in place.