Crochet Bear Beanie: An Adorable Winter Accessory

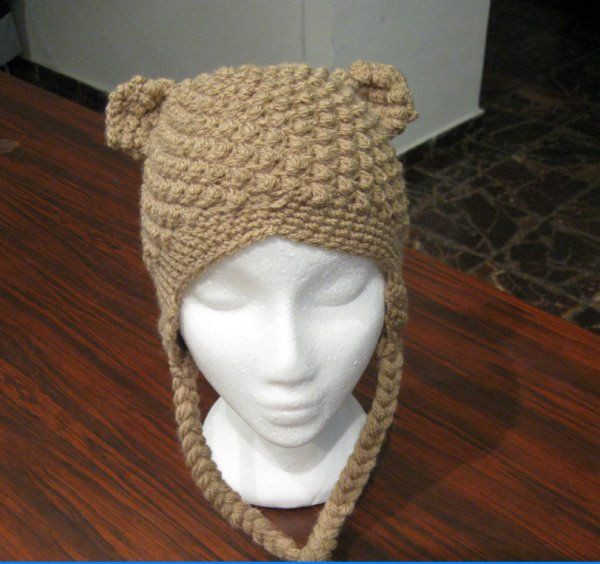
The crochet bear beanie is the perfect accessory for both style and warmth during the colder months. This adorable beanie features cute bear ears that add a fun and playful touch to any outfit. It provides not only a cozy feel but also a charming look that will surely make heads turn. Whether you're heading out for a casual day or a winter adventure, this beanie will keep you looking cute and feeling snug. It's a fantastic way to stay fashionable while embracing the chilly weather with a touch of whimsy. So, why not add this delightful crochet bear beanie to your collection and bring some cozy cuteness into your wardrobe?
Materials Needed for the Bumpy Bear Beanie
For this Bumpy Bear Beanie project you will need:
- HOOK: 4.5mm hook, US size G
- YARN: one skein of worsted weight 4ply US, 10ply AU.
- A tapestry needle
- Two stitch markers of some kind.
Abbreviations
- ch = Chain
- sl st = Slip Stitch
- st = Stitch
- sk = Skip
- SC = Single Crochet
- DC = Double Crochet
- Sc dec = Single Crochet Decrease
- Repeat what’s in between * for the rest of the round.
Note: Because you're adding earflaps, alter your raspberry beanies to be shorter. 13 rounds for newborns and 15 rounds for all other sizes.
Making the Ears
Round 1
Ch 2, and work 6 sc into the second chain from the hook. (6)
Round 2
Do 2 single crochets in each st around (12)
Round 3
Sl st into next st and ch 1, turn your project, back side facing you. Sc, dc, sc all in the same stitch as ch 1, *sk 1 st, and sc, dc, sc into next stitch*, repeat what's in between * for the rest of the round.

Rounds 4-6
(for 3 rounds) Sl st into the beginning sc of the round, then sc, dc, sc in the same st *then sk 2 sts, sc, dc, sc in next stitch, repeat what is in between *’s.
If you’re making the ears for an adult-sized hat and you want bigger ears, just add more rows here.
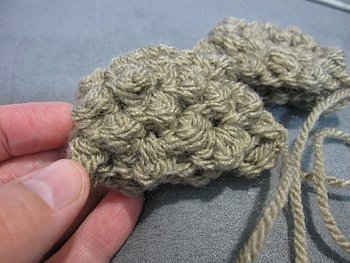
Sl st into next st and ch 1, cut tail, leaving a long tail to sew onto the hat. Sew ears on before making earflaps.
Making the Ear Flaps
Flatten hat so your ears are straight. To ensure your flaps are even, count from the corner, over 6 sts on each side, and mark for a total of 12 stitches. (If you're making a baby hat, mark 10; if adult, mark 14.)
Round 1
Attach your yarn where the right side of the hat is facing you and work 1 sc in each of the 12 sts.
Round 2
Ch 1 and turn, work 1 sc in all 12 sts.
Round 3
Ch 1 and turn, scdec, sc 8, scdec.
Round 4
Ch 1 and turn, scdec, sc 6, scdec.
Round 5
Ch 1 and turn, scdec, sc 4, scdec.
Round 6
Ch 1 and turn, scdec, sc 2, scdec.
Round 7
Ch 1 and turn, scdec, scdec, ch 1 and cut yarn, leaving enough of a tail to be worked in with your tapestry needle.
Lay your hat flat again and recount out 12 sts on the other side, attach your yarn with the right side facing you and repeat the earflap process.
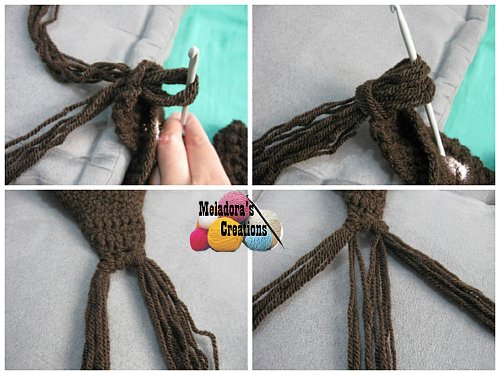
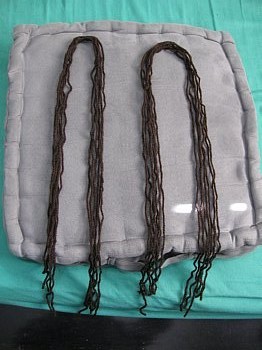
Creating the Braids
Cut several long pieces of yarn, about 28 or so, depending on how thick you want your braids to be, and separate them into two sets of 14.
Fold in half and attach one of the 14 strands to the right side of the flap by pulling up a loop, then pulling the tail through. Tighten, and do the same for the other 14 strands.
Separate into 3 even strands and braid. When the braid is at the desired length, tie at least 3 knots with the braids to secure. Cut excess tails, leaving a small pom pom at the end. Repeat for the other flap.
Make sure to check to see if the second braid is even with the first before tying your knots.