


Cute Crochet Chick Cream Egg Cover — Easy Pattern & Step-by-Step Guide

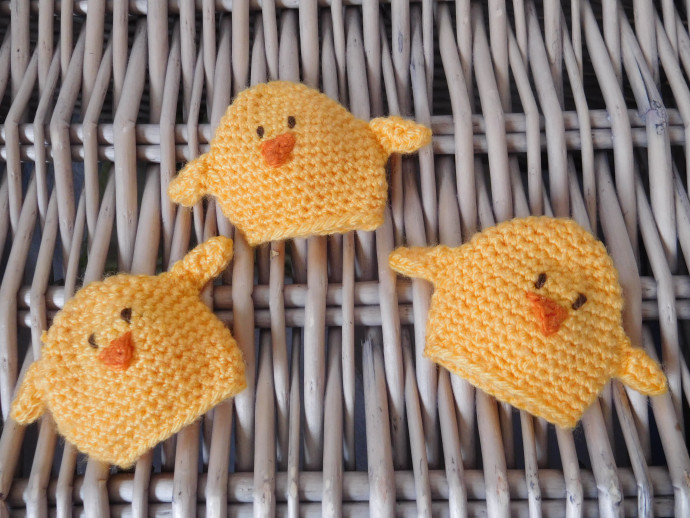
Add a handmade touch to your Easter treats with this Cute Crochet Chick Cream Egg Cover. This small, speedy project dresses a cream egg (or similar-sized chocolate egg) in a cheerful yellow chick with tiny wings and a beak — perfect as a gift topper, table decoration, or quick make for a crochet swap. The pattern is beginner-friendly and uses simple stitches; follow the rounds below and sew the small pieces on to finish.
Materials
- 3.5 mm crochet hook
- 10 g yellow yarn, DK/Sport weight (example used: Stylecraft Special DK – Saffron)
- Small scraps of orange and brown yarn, DK/Sport weight (example used: Stylecraft Special DK – Tomato and Dark Brown)
- Scissors
- Darning needle
- Cream egg or the egg you want to cover (keep it on hand to check fit)
Abbreviations / Terms Used
- Sc = single crochet
- HDC = half double crochet
- MC = magic circle
- Inc = increase
- Dec = decrease
- () Numbers at the end of a round show total stitch count for that round
Notes
Work in continuous rounds unless otherwise stated. Test the fit around your egg after Round 16 of the body and before finishing off; you can add or remove rounds to adjust height for different egg sizes. Weave in ends neatly and sew pieces on with matching yarn tails.
Body
Create a magic circle.
Round 1: 6 Sc into MC (6)
Round 2: Inc x 6 (12)
Round 3: (2 Sc, Inc) x 4 (16)
Round 4: (3 Sc, Inc) x 4 (20)
Round 5: (4 Sc, Inc) x 4 (24)
Round 6: (5 Sc, Inc) x 4 (28)
Round 7: (6 Sc, Inc) x 4 (32)
Rounds 8-13: Sc in each stitch around for 7 rounds.
Round 14: (2 Sc, Dec) x 8 (24)
Round 15: (10 Sc, Dec) x 2 (22)
Round 16: Sc in each stitch around.
Test to see if the egg fits. Then finish off and weave in ends.
Wings (Make 2)
Create a magic circle.
Round 1: 6 Sc in MC (6)
Round 2: Inc x 6 (12)
Fold in half and make 3 Sc through both sides.
Finish off leaving a long tail for sewing. Attach with the closed side to the body.
Beak
Row 1: Chain 4.
Row 2: In the second chain from the hook, slip stitch, Sc, HDC (3)
Fasten off leaving a long tail for attaching to the body.
Sew on the beak and use it as a guide for eye placement. The eyes are embroidered on between two stitches about halfway down.
Assembly & Finishing
- Position the beak on the front center of the body; stitch through the beak tail to secure. Use the beak as a reference point for placing the embroidered eyes — about one stitch to either side and a couple of rows above the beak works well.
- Sew the wings to each side of the body with the closed/folded edge against the body so the wings sit out slightly.
- Weave in and trim all ends. If the cover feels loose, add a sparse row of slip stitches around the base to tighten slightly, or reduce rounds before finishing next time.
Care & Variations
Hand wash gently and reshape while damp if needed. Try different color combinations (e.g., pastel shades for a softer look) or add a tiny ribbon loop on top to hang as an ornament. You can also increase or decrease rounds to fit different egg sizes.
Enjoy gifting or displaying your cheerful crochet chick!
- Funny Pictures
-
 Weekly Treat of Funniest Parenting Memes for Good Laugh out Loud Right Now
-
 Really Funny Pics to End These Weekend Perfectly
-
 Incredibly Relatable Pics for Your Amusement
- Recipes
-
 Chewy Oatmeal Cookies
-
 Tomato Tuna Melt
-
 Instant Pot Broccoli Cheddar and Zucchini Soup
- Lifehacks
-
 Wide Half Double Crochet Stitch Photo Tutorial
-
 How to Crochet a Sunflower Stitch Photo Tutorial
-
 Lemon Peel Crochet Stitch Photo Tutorial
- Crochet Ideas
-
 DIY Crochet Mushroom Keychain — Easy Step-by-Step Pattern with Photos
-
 Make a Leafy Texture: Easy Crochet Sprig Stitch (Free UK Pattern)
-
 Free Crochet Sleep Mask Pattern — Cute DK Cotton Eye Mask (UK Terms, Advanced Beginner)
- DIY
-
 Cozy Crochet: Free Up-and-Down Stripe Cotton Washcloth Pattern (Quick & Easy)
-
 How to Make Realistic Crepe Paper Daffodils — Easy Step-by-Step DIY
-
 Make Adorable Easter Egg Bird Feeders — Easy DIY Seed Ornaments for Your Backyard
- Knitting Ideas
-
 Knit the Fish Scale Stitch: Easy 4-Row Pattern for a Textured, Scaly Look
-
 Knitted Camisole Party Frock — Vintage Pattern with Step-by-Step Instructions
-
 DIY Knitted Cuddly Cat Toy — Free Pattern & Step-by-Step Instructions