


Adorable Crochet Bunny Hat Egg Cozy — Easy Easter Pattern

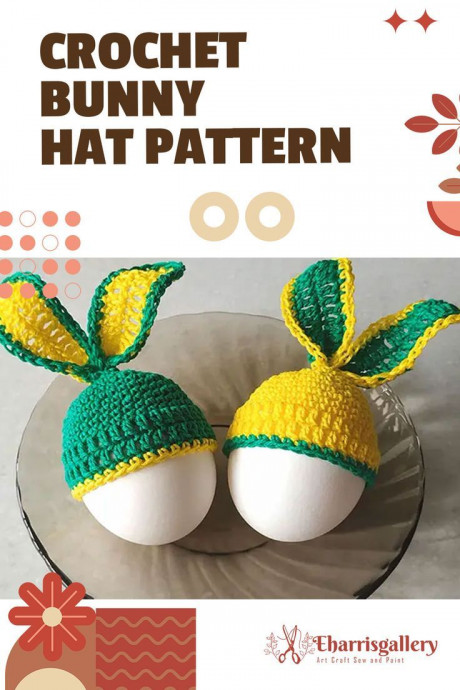
Create a charming Crochet Bunny Hat Egg Cozy to keep boiled eggs warm or to add a whimsical touch to your Easter table. This quick project features bunny ears and simple facial details, and can be adjusted to fit different head sizes for use as a small hat or an egg cozy. Below you'll find materials, sizes, gauge, abbreviations, step-by-step instructions for the hat base, crown shaping, ears and face, plus finishing tips.
Materials Needed & Measurements:
-
Yarn:
- Lion Brand Ve-luxe (Weight: 4/Medium – 246 yds, 5.3 oz). Color example: Silver (#536 – 149) – approx. 65, 75, 90, 110g (depending on size).
- Alternatively, I Love This Yarn (color: Spunky Print) for a different texture and look.
-
Crochet Hook:
Size H (5.0 mm) or any size needed to match the gauge.
-
Tapestry Needle:
For weaving in ends.
-
Optional Supplies:
- (2) 1” wooden buttons for eyes.
- Small amount of accent color yarn for nose and whiskers.
- Sewing needle and thread to attach button eyes.
Head Sizes:
- Newborn (0-3 months): 12-13″ head circumference
- 3-6 months: 13-15″ head circumference
- 6-12 months: 15-16″ head circumference
- Toddler/Preschooler: 16-17″ head circumference
- Child: 17-19″ head circumference
Gauge: 6.5 half double crochets (hdc) x 5.5 rows = 2 inches.
Abbreviations:
- ch: chain
- hdc: half double crochet
- sl st: slip stitch
- st(s): stitch(es)
- sc: single crochet
Stitching Instructions for Making Crochet Bunny Hat Pattern:
Hat Base:
- Start with a magic ring:
- Round 1: Ch 2, make 10 hdc into the magic ring (10 sts).
- Round 2: 2 hdc in each st around (20 sts).
- Round 3: 1 hdc in the next st, 2 hdc in the next st repeat around (30 sts).
- Round 4: 1 hdc in the next 2 sts, 2 hdc in the next st repeat around (40 sts).
- Round 5: 1 hdc in the next 3 sts, 2 hdc in the next st repeat around (50 sts).
- Round 6-11: Work 1 hdc in each st around (50 sts).
- You should now have a base for the hat. Keep checking the fit for the appropriate head circumference.
-
Crown Shaping:
- Round 12: 1 hdc in the next 3 sts, hdc2tog repeat around (40 sts).
- Round 13: 1 hdc in the next 2 sts, hdc2tog repeat around (30 sts).
- Round 14: 1 hdc in the next st, hdc2tog repeat around (20 sts).
- Round 15: hdc2tog around (10 sts).
-
Finish Off:
- Cut your yarn, leaving a long tail.
- Use your tapestry needle to weave in the end and cinch the top of the hat closed.
Bunny Ears (Make 2):
- Foundation: Ch 11.
- Row 1: Starting from the second ch from hook, hdc in each st across (10 sts).
- Row 2-9: Ch 1, turn, hdc in each st across. You should now have a rectangle that measures about 3.5 inches long.
- Shape the ear:
- Fold the rectangle in half and sew the long edges together with a whip stitch.
- Fold down the top of the ear to form a small curve and secure with a few stitches.
- Attach the Ears: Position the ears on top of the hat and sew them in place using your tapestry needle.
Bunny Face:
- Eyes (Optional with wooden buttons):
- Position your 1″ wooden buttons on either side of the hat to create the eyes. Sew them in place with a needle and thread.
- Nose:
- Use a small amount of yarn in a pink or accent color.
- Create a small triangle shape using sc, then sew it onto the center of the hat, between the eyes.
- Whiskers:
- Using the same accent color yarn, cut 6-8 small strands (about 2-3 inches each).
- Attach 3 whiskers on each side of the nose by sewing them in place.
Optional: Add Bow or Additional Embellishments
You can make a small bow or other embellishments from the accent yarn and sew it onto the hat for extra decoration.
Finishing:
- Weave in any remaining yarn ends.
- Try on the hat to ensure it fits comfortably and make any necessary adjustments.
Tips: Match hook size to your tension to meet the gauge; adjust rounds to increase or decrease overall circumference if needed. Use safety when attaching buttons for items intended for babies—consider embroidered eyes instead of buttons for very young children.
- Funny Pictures
-
 Weekly Treat of Funniest Parenting Memes for Good Laugh out Loud Right Now
-
 Really Funny Pics to End These Weekend Perfectly
-
 Incredibly Relatable Pics for Your Amusement
- Recipes
-
 Chewy Oatmeal Cookies
-
 Tomato Tuna Melt
-
 Instant Pot Broccoli Cheddar and Zucchini Soup
- Lifehacks
-
 Wide Half Double Crochet Stitch Photo Tutorial
-
 How to Crochet a Sunflower Stitch Photo Tutorial
-
 Lemon Peel Crochet Stitch Photo Tutorial
- Crochet Ideas
-
 DIY Crochet Mushroom Keychain — Easy Step-by-Step Pattern with Photos
-
 Make a Leafy Texture: Easy Crochet Sprig Stitch (Free UK Pattern)
-
 Free Crochet Sleep Mask Pattern — Cute DK Cotton Eye Mask (UK Terms, Advanced Beginner)
- DIY
-
 Cozy Crochet: Free Up-and-Down Stripe Cotton Washcloth Pattern (Quick & Easy)
-
 How to Make Realistic Crepe Paper Daffodils — Easy Step-by-Step DIY
-
 Make Adorable Easter Egg Bird Feeders — Easy DIY Seed Ornaments for Your Backyard
- Knitting Ideas
-
 Knit the Fish Scale Stitch: Easy 4-Row Pattern for a Textured, Scaly Look
-
 Knitted Camisole Party Frock — Vintage Pattern with Step-by-Step Instructions
-
 DIY Knitted Cuddly Cat Toy — Free Pattern & Step-by-Step Instructions