


Make a Cute Crochet Plush Dog Amigurumi — Step-by-Step Pattern & Tips

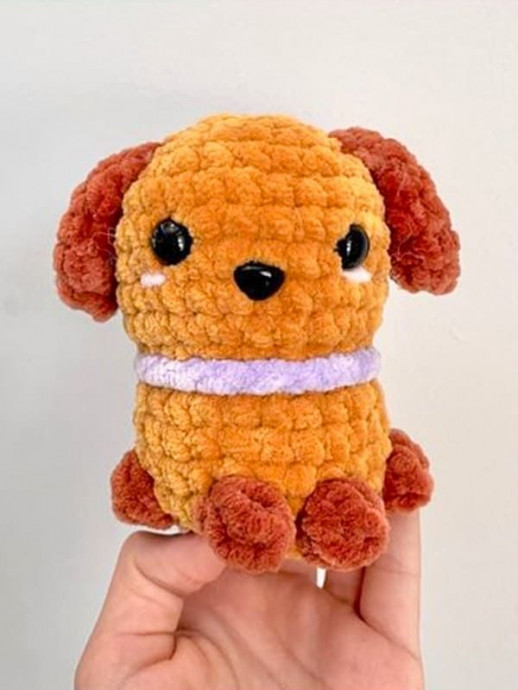
Creating a crochet plush dog amigurumi is like bringing a bundle of joy to life with just a hook and some cozy yarn! These adorable little pups make perfect cuddly companions that are sure to warm your heart and put a smile on your face. Whether you're gifting it to a friend or keeping it for yourself, the process of crafting a crochet plush dog amigurumi is not only fun and rewarding but also a great way to unleash your creativity and spread some handmade happiness. Below is a clear pattern with useful tips and finishing notes to help you through each step.
Materials (suggested)
- Yarn: main color and contrast color for legs/collar (worsted / medium weight recommended)
- Hook: appropriate for your yarn (commonly 3.5–4 mm)
- Fiberfill stuffing
- Safety eyes (6–10 mm) or yarn for embroidered eyes
- Tapestry needle, stitch marker, scissors
Note: Adjust hook and yarn choice to achieve your preferred finished size. If this amigurumi is for a small child, consider embroidering eyes instead of using safety eyes for safety reasons.
Tips before you start
- Work in continuous rounds (spiral) unless otherwise noted; use a stitch marker to mark the beginning of each round.
- Stuff firmly but evenly as you go to avoid lumps. Add more stuffing toward the end to shape the body and head.
- When changing colors (CC) for the legs, carry yarn neatly or fasten off and weave in ends to avoid bulky joins.
Abbreviations
MR: Magic ring
Sc: Single crochet
Dec: Decrease
Inc: Increase
Slst: Slip stitch
Hdc: Half double crochet
BLO: Back loop only
FLO: Front loop only
St: Stitch
BO: Bobble stitch
Head
Rnd 1: 6 sc in MR (6)
Rnd 2: 6 inc (12)
Rnd 3: (sc, inc)*6 (18)
Rnd 4: (2 sc, inc)*6 (24)
Rnd 5: (3 sc, inc)*6 (30)
Rnd 6-9: sc in each st (30)
Rnd 10: (3 sc, dec)*6 (24)
Rnd 11: (2 sc, dec)*6 (18)
Add the safety eyes between rnd 7-8, about 6 stitches apart. You can add or embroider a nose to the puppy, one row under. Move onto the body now.
Body
Stuff as you go.
Rnd 12: In the FLO: (2 sc, inc)*6 (24)
Rnd 13-15: sc in each st around.
Rnd 16: 5 sc, cc BO, cc 3 sc, cc BO, cc 1 sc, cc BO, cc 3 sc, cc BO, cc 8 sc (24)
CC: Color change. You need to change colours for the legs on the dog. Your bobble stitches can be done in the colour you want the legs to be.
Rnd 17: In the BLO: (2 sc, dec)*6 (18)
Rnd 18: (1 sc, dec)*6 (12)
Rnd 19: (dec)*6 (6)
Fasten off and weave in end.
Ears (Make 2)
Rnd 1: 6 sc in MR (6)
Rnd 2: sc, inc x3 (9)
Rnd 3-5: sc in each st around (9)
Fold the ear in half, and sc 4 st across. Fasten off, do not stuff and leave a long tail for sewing.
Collar
With the colour you want the collar to be, chain 23-26 (depending on your tension) and fasten off, leaving a long tail for sewing.
Assembly
Sew the ears onto round 4 of the head. Weave in the end. Sew the collar around the neck of the dog. (weave in both ends).
Finishing touches & variations
- Embroider a small mouth and nose with contrasting yarn, or sew on a tiny felt nose.
- Change yarn colors for spots, a different muzzle color, or a striped collar to personalize your pup.
- Use bobble stitches (BO) as indicated to create textured legs—make them in the contrast color for visual interest.
- If desired, add a small ribbon or removable accessory instead of sewing a permanent collar.
Enjoy your handmade crochet plush dog amigurumi — a sweet, customizable project that makes a lovely gift or keepsake.
- Funny Pictures
-
 Weekly Treat of Funniest Parenting Memes for Good Laugh out Loud Right Now
-
 Really Funny Pics to End These Weekend Perfectly
-
 Incredibly Relatable Pics for Your Amusement
- Recipes
-
 Chewy Oatmeal Cookies
-
 Tomato Tuna Melt
-
 Instant Pot Broccoli Cheddar and Zucchini Soup
- Lifehacks
-
 Wide Half Double Crochet Stitch Photo Tutorial
-
 How to Crochet a Sunflower Stitch Photo Tutorial
-
 Lemon Peel Crochet Stitch Photo Tutorial
- Crochet Ideas
-
 DIY Crochet Mushroom Keychain — Easy Step-by-Step Pattern with Photos
-
 Make a Leafy Texture: Easy Crochet Sprig Stitch (Free UK Pattern)
-
 Free Crochet Sleep Mask Pattern — Cute DK Cotton Eye Mask (UK Terms, Advanced Beginner)
- DIY
-
 Cozy Crochet: Free Up-and-Down Stripe Cotton Washcloth Pattern (Quick & Easy)
-
 How to Make Realistic Crepe Paper Daffodils — Easy Step-by-Step DIY
-
 Make Adorable Easter Egg Bird Feeders — Easy DIY Seed Ornaments for Your Backyard
- Knitting Ideas
-
 Knit the Fish Scale Stitch: Easy 4-Row Pattern for a Textured, Scaly Look
-
 Knitted Camisole Party Frock — Vintage Pattern with Step-by-Step Instructions
-
 DIY Knitted Cuddly Cat Toy — Free Pattern & Step-by-Step Instructions