


Make a Crochet Cheburashka Monkey Amigurumi — Free Step-by-Step Pattern

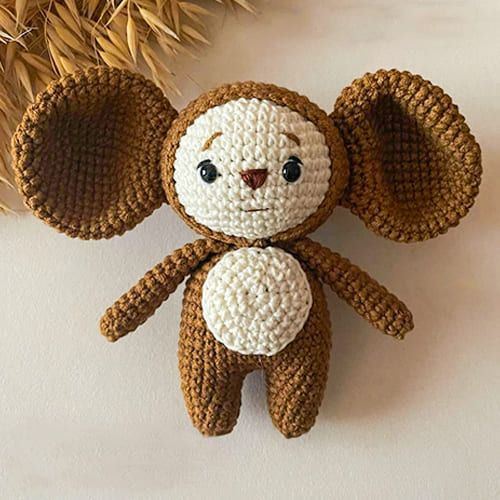
Create a lovable Cheburashka-inspired monkey amigurumi with this clear, step-by-step crochet pattern. The finished toy measures about 14–15 cm. This pattern uses Yarnart Jeans yarn and a 1.5 mm hook and is suitable for crocheters who know basic stitches (sc, inc, dec, slst). Below you’ll find the full pattern, abbreviations, materials list, and helpful finishing tips to assemble your toy neatly.
The Crochet Cheburashka Monkey Amigurumi
The Crochet Cheburashka Monkey Amigurumi is an adorable and fun project for all crochet enthusiasts! With its cute design and playful charm, this amigurumi pattern is perfect for creating a lovable monkey friend that will bring a smile to your face. Whether you are a beginner or an experienced crocheter, this project is sure to delight you with its charming details and whimsical appeal. Get your crochet hooks ready and let's create a little Cheburashka Monkey Amigurumi that will become a beloved addition to your handmade collection!
Abbreviations
MR: Magic ring
Ch: Chain
Sc: Single crochet
Dec: Decrease
Inc: Increase
Slst: Slip stitch
Materials and Tools
- Yarn “Yarnart jeans”
- Crochet hook size: 1.5 mm
- Toy filler
- Safety eyes size: 5 mm
- Thread brown, black, white for muzzle decoration
- Finished toy size: 14-15 cm
Arm (Make 2)
Rnd 1. 6 sc in MR
Rnd 2. (1sc,inc)*3 (9)
Rnd 3-13. 9 sc (11 rows)
We don’t stuff our hands.
Fold in half and crochet 4 sc.
Leave a thread for sewing.
Legs and Body
Rnd 1. 6 sc in MR
Rnd 2. 6 inc (12)
Rnd 3-4. 12 sc
Rnd 5. (3sc,inc)*3 (15)
Rnd 6. 15 sc
Fasten the thread, cut.
We crochet the second leg in the same way.
We do not cut the thread, we continue to crochet.
We make 3 ch and crochet with the first leg.
Rnd 7. We crochet 15 scs on the first leg, 3 sc on ch, 15 sc on the second leg, 3 sc on ch (36)
We put a marker.
Rnd 8-16. 36 sc
Rnd 17. (4sc,dec)*6 (30)
Rnd 18. 30 sc
Rnd 19. (3sc,dec)*6 (24)
Rnd 20. (2sc,dec)*6 (18)
Rnd 21. (1sc,dec)*6 (12)
We stuff the legs and the body.
Leave the thread for sewing on the head.
Head
Beige yarn.
Rnd 1. 6 sc in MR
Rnd 2. 6 inc (12)
Rnd 3. (1sc,inc)*6 (18)
Rnd 4. (2sc,inc)*6 (24)
Rnd 5. (3sc,inc)*6 (30)
Rnd 6. (4sc,inc)*6 (36)
Rnd 7. (5sc,inc)*6 (42)
Rnd 8. (6sc,inc)*6 (48)
Rnd 9-14. 48 sc
Insert the eyes between the 11th and 12th stitches side by side at a distance of 7 sc.
Rnd 15. (6sc,dec)*6 (42)
Rnd 16. (5sc,dec)*6 (36)
Rnd 17. (4sc,dec)*6 (30)
Rnd 18. (3sc,dec)*6 (24)
Rnd 19. (2sc,dec)*6 (18)
Rnd 20. (1sc,dec)*6 (12)
Rnd 21. 6 dec (6)
Fasten off and pull yarn.
Hood
Rnd 1. 6 sc in MR
Rnd 2. 6 inc (12)
Rnd 3. (1sc,inc)*6 (18)
Rnd 4. (2sc,inc)*6 (24)
Rnd 5. (3sc,inc)*6 (30)
Rnd 6. (4sc,inc)*6 (36)
Rnd 7. (5sc,inc)*6 (42)
Rnd 8. (6sc,inc)*6 (48)
Rnd 9-15. 48 sc
We insert the hood.
Then we continue to crochet.
Rnd 16. (6sc,dec)*6 (42)
Rnd 17. (5sc,dec)*6 (36)
Rnd 18. 36 sc
Ears (Make 2)
Rnd 1. 6 sc in MR
Rnd 2. 6 inc (12)
Rnd 3. (1sc,inc)*6 (18)
Rnd 4. (2sc,inc)*6 (24)
Rnd 5. (3sc,inc)*6 (30)
Rnd 6. (4sc,inc)*6 (36)
Rnd 7. (5sc,inc)*6 (42)
Rnd 8-12. 42 sc
Rnd 13. (5sc,dec)*6 (36)
Rnd 14. (4sc,dec)*6 (30)
Rnd 15. (3sc,dec)*6 (24)
Rnd 16. (2sc,dec)*6 (18)
Leave a thread for sewing ears.
Tummy
Rnd 1. 6 sc in MR
Rnd 2. 6 inc (12)
Rnd 3. (1sc,inc)*6 (18)
Rnd 4. (2sc,inc)*6 (24)
Rnd 5. 24 sc, 1 slst.
Leave a thread for sewing.
Assembly and Finishing
- Arrange and pin parts before sewing to check placement. Use the long sewing tails left on pieces to attach them securely.
- Attach safety eyes before final stuffing of the head, as indicated in the head instructions.
- Embroider or sew the muzzle details with brown, black and white thread as desired for expression.
- Weave in and hide all yarn ends neatly on the inside of the toy.
Tips
- Use a stitch marker to keep track of rounds and increases/decreases.
- If you substitute yarn, use a similarly thin yarn and the same hook size to maintain the stated finished size (~14–15 cm).
- Stuff firmly but not overstuffed to keep shape and make sewing parts easier.
Care
Hand wash gently in lukewarm water and reshape while damp. Avoid tumble drying; air dry flat.
- Funny Pictures
-
 Weekly Treat of Funniest Parenting Memes for Good Laugh out Loud Right Now
-
 Really Funny Pics to End These Weekend Perfectly
-
 Incredibly Relatable Pics for Your Amusement
- Recipes
-
 Chewy Oatmeal Cookies
-
 Tomato Tuna Melt
-
 Instant Pot Broccoli Cheddar and Zucchini Soup
- Lifehacks
-
 Wide Half Double Crochet Stitch Photo Tutorial
-
 How to Crochet a Sunflower Stitch Photo Tutorial
-
 Lemon Peel Crochet Stitch Photo Tutorial
- Crochet Ideas
-
 DIY Crochet Mushroom Keychain — Easy Step-by-Step Pattern with Photos
-
 Make a Leafy Texture: Easy Crochet Sprig Stitch (Free UK Pattern)
-
 Free Crochet Sleep Mask Pattern — Cute DK Cotton Eye Mask (UK Terms, Advanced Beginner)
- DIY
-
 Cozy Crochet: Free Up-and-Down Stripe Cotton Washcloth Pattern (Quick & Easy)
-
 How to Make Realistic Crepe Paper Daffodils — Easy Step-by-Step DIY
-
 Make Adorable Easter Egg Bird Feeders — Easy DIY Seed Ornaments for Your Backyard
- Knitting Ideas
-
 Knit the Fish Scale Stitch: Easy 4-Row Pattern for a Textured, Scaly Look
-
 Knitted Camisole Party Frock — Vintage Pattern with Step-by-Step Instructions
-
 DIY Knitted Cuddly Cat Toy — Free Pattern & Step-by-Step Instructions