Crochet Bathing Suit Cover

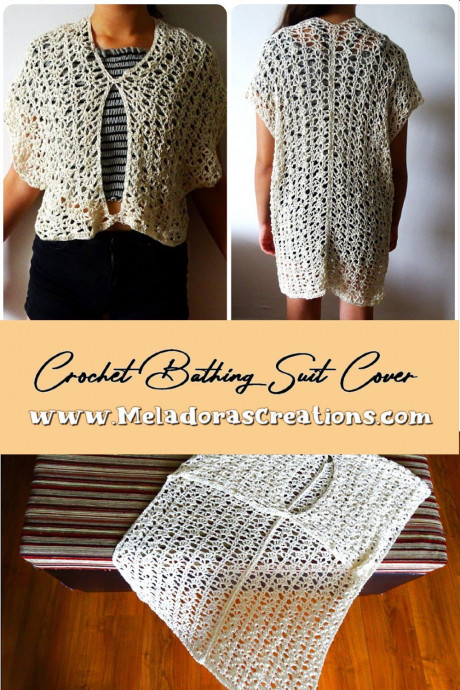
Crochet bathing suit covers are not only practical but also stylish additions to your beach or poolside outfit. The intricate crochet patterns add a touch of bohemian flair and can be customized to suit your individual style. Whether you opt for a classic white cover-up or a vibrant, colorful design, you're sure to turn heads while lounging by the water. These versatile pieces are great for transitioning from the beach to a beachside cafe effortlessly. Plus, they provide just the right amount of coverage if you're looking to protect your skin from the sun's rays without sacrificing your fashion sense. So, why not add a crochet bathing suit cover to your summer wardrobe and make a fashion statement with a friendly twist?
For this project you will need:
Materials Needed
HOOK: 4 mm hook or size G hook for the US
YARN: Size 1 Super Fine yarn or Sock Yarn. I used Microfiber Acrylic. It’s soft and excellent for any Summer garment that might get wet.
I used 2 skeins total. Each skein was 100g / 5.52 Oz and 350 meter or 382.76 Yards.
So you’ll need 700 Meters or 765.52 yards in total for this size small garment. Obviously if you’re going to make a bigger size you’ll need to get another few skeins depending on how much bigger you plan to make it.
Gauge and Sizing
Gauge is 2 sts per cm or 5 sts per Inch.
I created 2 panels and it only took one skein per panel for the small size. Each panel measured 43 inches or 108 cms in length and was 9 inches or 23 cms wide.
Abbreviations
ch = Chain
sl st = Slip Stitch
YO = Yarn Over
st = Stitch
sts = Stitches
sk a st = Skip a stitch
sk 2 sts = Skip two stitches
SC = Single Crochet
DC = Double Crochet
beg = beginning
Repeat what’s in between * for the rest of the round.
Pattern Instructions
Multiples of the Stitch
The multiples of this pattern is 11 + 2.
To Start:
Chain 60 to create the small size. Or chain in multiples of 11 until you reach your desired size. Keep in mind that this is only one panel, so think half the body size you need.
Row 1
DC in 3rd chain from hook. DC in the rest of the 58 sts. With the beg chain 2 you should have a total of 59 sts. Ch 2 and turn.
This stitch design takes 3 rows to complete, and I will be referring to the 3 row repeat as a SET. Rows 2 – 4 are the set repeat.
Row 2
DC in the next st. *ch 1 skip a st and DC into the next st. Sk 2 sts and DC, ch 3, DC in next st. Skip 2 sts and DC in next st. Ch 1 and skip a st and DC into the next two DC’s.* Repeat for the row. You should end perfectly at the end of the repeat, with the last two sts being a DC. Ch 2 and turn.
Row 3
DC in the next st. Then skip over to the ch 3 space. *Ch 1, DC into this space 5 times. Ch 1 and DC in the next 2 DC’s.* Repeat for the row. You should end perfectly at the end of the repeat, with the last two sts being a DC. Ch 2 and turn.
Row 4
DC in the next st. Now we’re going to be using the spaces between our DC’s of our shell. Spread the 5 DC’s and ch 1 spaces apart. Do you see the 4 spaces? You’ll be using the 2 center ch 1 spaces. So Ch 4 and skip our first space of our shell and SC into the second/next ch 1 space. Ch 1 again and then SC into the next ch 1 space.
We’ll be using only the 2 middle ch 1 spaces of our shells this row. Here’s the repeat:
*Ch 4 and skip the first ch 1 space and SC into the second ch sp. Then ch 1 and SC into the next ch 1 space. Ch 4 and skipping the last ch 1 space of your shell and DC one into the next two DC’s.* Repeat for the row. You should end perfectly at the end of the repeat, with the last two sts being a DC. Ch 2 and turn.
Row 5
DC in the next st. *Ch 1 skip and DC on ch 4. DC, ch 3, DC to create your new V stitch in the ch 1 space that’s in between your 2 sc’s that you made in those two spaces on your shell on the last row. DC and ch 1 on your next ch 4. DC into the next two DC’s.* Repeat for the row. You should end perfectly at the end of the repeat, with the last two sts being a DC. Ch 2 and turn.
Finalizing the Panels
Repeat the set using rows 3 – 5. I did a total of 30 sets per panel. After your final set is done and you’re ready to finish it, I always did a row of DC’s.
Final Row of Your Panels
DC in the next st. *DC 3 in ch 4 space, DC in SC, DC in the ch 1 space between the sc’s, DC in SC, DC 3 in ch 4 space, DC in next 2 DC’s.* I had 57 DC’s total at the end of my row.
You will need to make 2 panels the same size. Then I’ll show you how I put them together.
Assembly Instructions
Lay your panels side by side and grab some markers. We’ll be using them to hold your piece together at the sewing points until we can attach them ourselves.
I counted my sets by using the 1st row of our set which creates the biggest hole, making it easy to find for counting.
1st marker: Start from the bottom of the garment and place a marker.
2nd marker: Then, count up 7 sets and place a marker.
3rd marker: Then, from there, count up 8 sets and place a marker.
Now you have your open front area of your blouse and head hole marked out. Flip your piece over to sew it for a nicer look from the front.
You can attach your markers any place along the rest of the piece to hold it in place until you're ready to sew it. Be sure to flip your piece inside out to sew. It will create a nicer look.
Attach your yarn to the 1st marker and sew up two stitches. I used single crochets, but you can use slip stitches or even a tapestry needle if you’d prefer. Just make sure you get a couple sewn up to hold it in place at the bottom here, unless you would prefer it to be open here completely.
Once you have your 2 sts sewn, cut your yarn and hide your tail. Repeat this same method of sewing for the 2nd marker. SC 2 stitches together at the next marker. This creates the connection at the top of the garment front.
For your 3rd marker, you are starting to sew up the back of your garment. I stopped and added markers randomly to hold the garment closed to make sure it stays lined up until I could sew it evenly. Doing it this way will ensure that your garment is even and won’t get sewn on crooked.
Quick Tip
Make sure you’re using the inside of your garment for all the sewing!!! Once your panels are sewn together, creating the main piece, fold your garment at the head hole. Favor the back of the garment than the front, to pull the head hole down away from the neck.
Remember how we counted our sets? We’re going to count our larger holes on row 2. Align your pieces and let the holes in the garment guide you.
Once you got it aligned, count up from the bottom of the garment up 3 sets and place a marker there. Then mark the bottom of the sleeve / bottom of garment, to make sure it doesn’t get crooked.
I folded then aligned my front piece with the back piece at a set to ensure it was even. Then I counted up 3 sets and placed another marker.
Now attach your yarn at the bottom marker / bottom of the garment and sew up the 3 sets to your marker. Ch 1 and cut your yarn. Repeat for the other side too.
Then enjoy your beautiful crochet bathing suit cover!
- Funny Pictures
-
 Pics to Get the Excitement Today
-
 Funny Christmas Meme Dump
-
 Funniest Relatable Felines in the Form of Memes
- Recipes
-
 Cinnamon Sugar Swirl Cupcakes
-
 Cheesy Bacon Ranch Roasted Potatoes
-
 Blooming Onion Bites with Dipping Sauce
- Lifehacks
-
 7 Toilet and Bathroom Cleaning Hacks
-
 Tips & Hacks for Clean Carpets
-
 7 Kitchen Hacks & Simple Solutions
- Crochet Ideas
-
 Crochet Watermelon Amigurumi
-
 Crochet Shark Applique
-
 Crochet Pineapple Amigurumi
- DIY
-
 Yarn Wrapped Christmas Wreath Ornaments
-
 Egg Carton Snowman Ornament
-
 Stick Peppermint Candy Ornament
- Knitting Ideas
-
 Knitted Star Square Dishcloth
-
 Knitted Free 2025 Year Dishcloth
-
 Knitted Belle Finger Puppet