Crochet Your Own Adorable Superman Figure

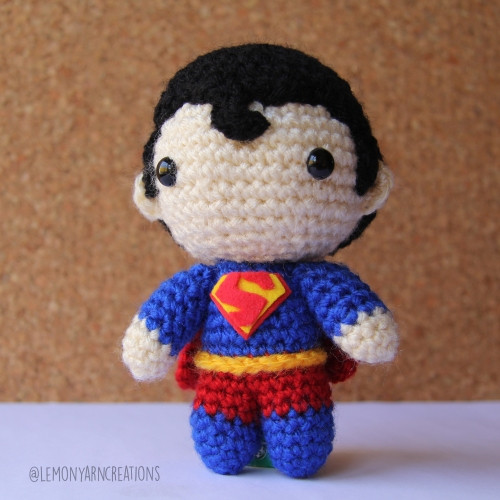
Crocheting an adorable Superman figure is a delightful project that allows you to channel your creativity and spread joy to those around you. Imagine the smiles and warm feelings this cute superhero creation can bring to children and comic book fans alike. As you carefully stitch the red cape and iconic "S" symbol, let your imagination soar like Superman himself. With each loop of yarn, you are crafting a tiny piece of whimsy that is sure to enchant anyone who lays eyes on your handmade masterpiece. So grab your crochet hook and let's bring a bit of superhero magic to life!
Materials
- 3.5mm (size E) crochet hook
- Worsted weight yarn in Blue, Red, Yellow, Black and Natural (for the face)
- Felt fabric in Red and Yellow
- 12mm safety eyes
- Polyester fiberfill stuffing
- Yarn needle
- Scissors
- Craft glue and/or small needle and thread
Abbreviations
- Rnd/s – Round/Rounds
- MR – Magic Ring
- Ch – Chain
- St/s – Stitch/Stitches
- Slst – Slip Stitch
- Sc – Single Crochet
- Inc – Increase
- Dec – Decrease
- FLO – Front Loop Only
- [*] – Sequence of stitches to repeat
- (*) – Number of stitches at the end of each round
Head (in Natural Yarn)
RND 1: 6 sc in MR (6)
RND 2: Inc around (12)
RND 3: [Sc, inc] around (18)
RND 4: [Sc 2, inc] around (24)
RND 5: [Sc 3, inc] around (30)
RND 6: Sc around (30)
RND 7: [Sc 4, inc] around (36)
RND 8: Sc around (36)
RND 9: [Sc 5, inc] around (42)
RND 10-12: Sc around (42)
RND 13: [Sc 5, dec] around (36)
RND 14: Sc around (36)
RND 15: [Sc 4, dec] around (30)
Place safety eyes between rnds 11 and 12, about 9 sts apart. Start stuffing.
RND 16: [Sc 3, dec] around (24)
RND 17: [Sc 2, dec] around (18)
RND 18: [Sc, dec] around (12)
RND 19: Dec around (6) Finish off, sew hole closed, and hide yarn end inside the head.
Ears (Make Two in Natural Yarn)
Ch 2, in second ch from hook make 3 hdc, slst. Finish off and leave long tail for sewing.
Hair (in Black Yarn)
RND 1: 6 sc in MR (6)
RND 2: Inc around (12)
RND 3: [Sc, inc] around (18)
RND 4: [Sc 2, inc] around (24)
RND 5: [Sc 3, inc] around (30)
RND 6: Sc around (30)
RND 7: [Sc 4, inc] around (36)
RND 8: Sc around (36)
RND 9: [Sc 5, inc] around (42)
RND 10: Sc around (42)
You will now be working in rows.
ROW 11: To make the first sideburn, ch 4, skip first ch and sc 3. Slst in the st at the base of the ch. Now back on the hair, slst 2, sc 20, ch 1 and turn.
ROW 12: Sc 20, ch 1 and turn (20)
ROW 13: Dec, sc 16, dec, ch 1 and turn (18)
ROW 14: Dec, sc 14, dec, ch 1 and turn (16)
ROW 15: Dec, sc 12, dec. (14) Finish off and leave long tail for sewing.
Place hook on last st made on row 11 and attach yarn with a slst. To make the second sideburn, slst 2, ch 4, skip first ch and sc 3. Slst in the next st to finish off.
Place hook four sts to the right of the center of the forehead hair (between the sideburns). Make the following sts to create the hairline [Slst, sc, hdc, hdc, ch 5, skip first ch and sc 4, slst at the base of the ch, hdc, hdc, sc, slst, finish off.
Legs (Make Two Starting with Blue Yarn But Don’t Finish Off the Second Leg)
RND 1: 6 sc in MR (6)
RND 2: [Sc, inc] around (9)
RND 3: [Sc 2, inc] around (12)
RND 4-6: Sc around (12) Switch to red yarn
RND 7: Sc around (12)
Body (Continuing Where You Left the Second Leg in Red Yarn)
RND 8: Join yarn to the last st of the first leg with a slst. Sc around the legs (24)
RND 9-10: Sc around (24) Switch to blue yarn
RND 11: Sc in FLO around (24)
RND 12: [Sc 10, dec] around (22)
RND 13: [Sc 9, dec] around (20)
RND 14: Sc around (20)
RND 15: [Sc 8, dec] around (18)
RND 16: Sc around (18) Finish off and leave long tail for sewing.
Sew close the opening left between the legs. Stuff the legs and the body firmly.
Arms (Make Two Starting with Natural Yarn)
RND 1: 6 sc in MR (6)
RND 2: [Sc, inc] around (9)
RND 3: Sc around (9) Switch to blue yarn
RND 4-9: Sc around (9) Stuff the arm slightly.
RND 10: [Sc 2, dec] around (6)
Finish off leaving long tail for sewing.
Belt (in Yellow Yarn)
Attach yarn in the back of the body to the FLO with a slst. Slst around (24)
Cape (in Red Yarn and Working in Rows)
ROW 1: Ch 16, skip first st and sc 15 (15)
ROW 2: Ch 1, turn, sc 15 (15)
ROW 3: Ch 1, turn, dec, sc 11, dec (13)
ROW 4: Ch 1, turn, sc 13 (13)
ROW 5: Ch 1, turn, dec, sc 9, dec (11)
ROW 6: Ch 1, turn, sc 11 (11)
ROW 7: Ch 1, turn, dec, sc 7, dec (9)
ROW 8: Ch 1, turn, sc 9 (9) Sc around the edge of the cape, and finish off leaving long tail for sewing. Weave in loose end at the bottom.
Assembly
Sew body to the bottom of the head.
Sew arms on the sides of the body, between rnds 15 and 16.
Sew hair to the head, so that the curl sits between the eyes and one rnd above them. The back of the hair should be above the rnd where you sew the body. Make sure to sew the side burns vertically and to leave a gap between them and the rest of the hair.
Sew ears to the head, between the gap of the sideburn and the rest of the hair.
Sew the smaller edge of the cape to the body on the back.
For the symbol, cut one piece of red felt in a diamond shape, and a piece of red felt in the same shape but slightly smaller. Cut a piece of red felt in a shape of “S” that fits on top of the diamond shape. Glue the diamonds together (red on the bottom and yellow on top), glue the “S” on top of that, and then glue to the body above the belt and centered. (Cutting the symbol can be tricky, so I suggest looking at reference images online and do your best)
And that’s it.
- Funny Pictures
-
 Relatable and Funny Memes to Distract You From the Routine
-
 Hilarious Cat Snapchats That Will Leave You With the Biggest Smile
-
 Today’s Top Funny Tweets to Scroll Before Bed
- Recipes
-
 Cappuccino Brownies
-
 Chicken Mushroom Tortellini Bake
-
 Spinach Pie
- Lifehacks
-
 8 Necessary Tips for Baking Bread
-
 Tips & Hacks for Clean Carpets
-
 10 Uses For Old TV Armoires
- Crochet Ideas
-
 Crochet Watermelon Amigurumi
-
 Crochet Flower Hat for your Pet
-
 Crochet Sophia and Bennet Love Birds
- DIY
-
 DIY Beaded Christmas Tree
-
 Crochet Titus the Barn Owl
-
 DIY Washer Ornaments
- Knitting Ideas
-
 Knitted Star Square Dishcloth
-
 Knitted Free 2025 Year Dishcloth
-
 Knitted Ribbed Adult Hat