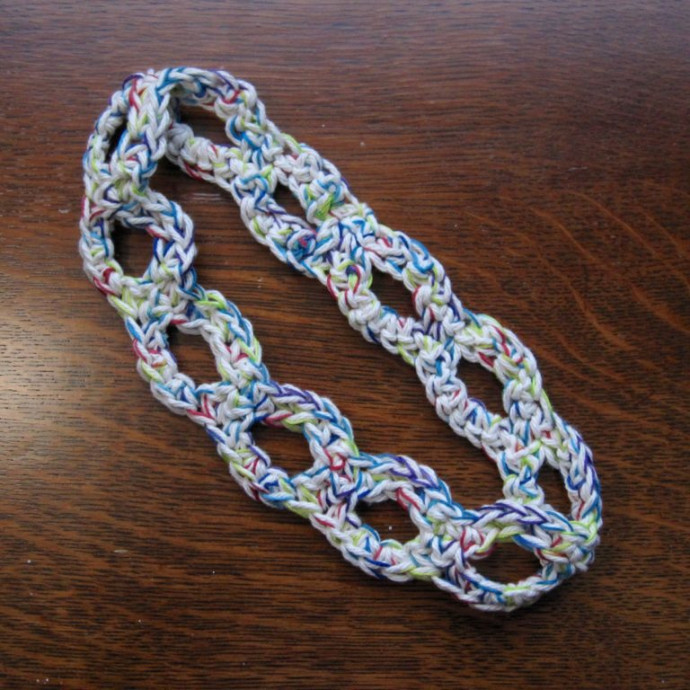
How to Crochet an Adorable Headband: Step-by-Step Instructions

Crocheting an adorable headband can be such a fun and creative project! Whether you're starting out or have been crocheting for a while, the joy of crafting something cute and practical is always there. Choosing your favorite yarn colors and different crochet stitches to make the headband unique to your style is all part of the excitement. Plus, once you finish your creation, you can wear it proudly or gift it to a friend to spread the handmade goodness. So, grab your crochet hook, select some lovely yarn, and get ready to embark on a delightful journey of crafting your very own adorable headband!
Materials
Worsted weight cotton yarn, I/9 (5.5mm) hook.
Step-by-Step Instructions
Chain 67.
Row Instructions
- Starting in the second chain from the hook, alternate 2 single crochet decreases and 2 single crochet increases across.
- Chain 2 (turning chain + 1). Skip the first stitch and then alternate 2 single crochets and 4 chains over 4 skipped stitches – your single crochets are made into the middle 2 single crochets of each pair of increases from row 1. You will end with a chain of 4 that includes the turning chain for the next row and is over only 3 skipped stitches.
- Alternate 2 single crochet increases and 2 single crochet decreases across, starting in the second chain from the hook. Make your stitches into the chains instead of around the chains so they shape the way they are intended to.
Your finished flat piece should have a closed ring on the end with the starting slip knot, and two “fingers” on the opposite end. Sew those fingers to the starting end to close that “chain link” – it will be a bit wider than the ones mid-row but not very noticeable. Finish off all yarn/floss ends.
Abbreviated Version
Or abbreviated:
- Ch 67.
- *Dec 2, inc 2* across (66).
- Ch 2 (includes turning ch). Sk first st; *sc 2, sk 4 sts and ch 4* across. Will end with only 3 sk sts but still 4 chs (includes turning ch for next row) (22 sc, 44 ch + 2 turning ch).
- *Inc 2, dec 2* across, stitching into ch instead of around ch (66).
- Sew ends together and finish off.
Fitting Your Headband
Headbands are very personal, and crochet gauge is also very personal, so this is unlikely to work for you as written. Or perhaps you want to make it with a different weight of yarn. How should you adjust?
Determining Your Gauge
To determine your gauge:
Chain 13. Starting in the second chain from the hook, *sc dec, sc dec, sc inc, sc inc* twice. It should make a gentle S shape. With your ruler against the two bumps of the S (so you are measuring straight along the overall direction of the work), measure from the first increase stitch to the last decrease stitch. If you follow the pattern as written, multiply that by 11 to get your finished size.
Desired Finished Size
To determine your desired finished size:
Measure your head where the headband will lie and subtract 1-2 inches. I subtracted 1″ and the headband fits, but I could have gone a decent bit tighter. In fact, at first I worried it was too loose to be used, but I’ve tried it in some workouts and it’s stable enough to forget it’s there. I do, however, have a large head, so 1″ is proportionally not so much; for a child’s head, a 1″ subtraction might be just right. This is quite a stretchy pattern, so you’re safe to go a bit smaller than you would normally.
Adjusting the Pattern
To adjust the pattern:
Is there a multiple of your gauge measurement that is in your good finished size range? If so, that same multiple of 6, plus 1, is your starting chain length. For instance, if you were working larger than I did and had a gauge of 2 1/4″, your finished size for the pattern as written would be 24 3/4″ – probably way too big. If your head measurement is 22″, and you want a 20″-21″ headband, use a starting chain of 55: since 9 * 2 1/4″ = 20 1/4″, compute 9*6 + 1 = 55.
Adding or subtracting multiples of 6 chains ought to be possible given how much leeway you have for size; if it seems impossible, go up or down a hook size and recalculate your gauge. That keeps you from having to alter the pattern itself. At the end, however, I’ll give adjustments for any multiple of 2 in case you really want them.
Using Embroidery Floss
If you add embroidery floss like I did, you’ll be starting a new length of it every row. There is enough floss in a skein to do both the starting chain and row 2, but there is not enough to do both row 1 or 3 and anything else. So, you will need 3 skeins of embroidery floss. Hold skein 1 together with the yarn for the starting chain. Switch to skein 2 (cutting skein 1) for row 1. Switch back to skein 1 for row 2, and then start skein 3 for row 3. I quite liked the effect.
More Modifications
If you alter by a non-multiple of 6 number of chains, the ends will no longer match up pattern-wise, but it can be done. You do have to have a starting chain that is (even number) + 1. Take that even number and divide by 6. What is the remainder?
- 0: Follow the pattern as written.
- 2: Start row 1 with two increases; you will also end with two increases. Row 2 will begin as written and end with chain 2, skip 1 instead of 4, 3. Row 3 will begin and end with two decreases.
- 4: Start row 2 as written but end with 2 decreases. Row 2 will start with chain 4, skip 3 instead of 2, 1 and end as written. Row 3 will begin and end with two increases.
- Funny Pictures
-
 Hilarious Memes for Those Bored to Tears
-
 Weekly Treat of Funniest Parenting Memes for Good Laugh out Loud Right Now
-
 Really Funny Pics to End These Weekend Perfectly
- Recipes
-
 Crispy Baked Avocado Fries
-
 Scrambled Chickpea and Spinach Pitas
-
 Cinnamon Pancakes
- Lifehacks
-
 Crochet Basics: Aligned Cobble Stitch
-
 Brick Stitch Crochet Tutorial
-
 Crochet Basics: Wattle Stitch
- Crochet Ideas
-
 Crochet Snorlax Plushie Doll
-
 Crochet Beautiful Penguin Toy
-
 Crochet Tiny Snowman
- DIY
-
 DIY Santa Craft For Kids
-
 Paper Plate Angel Craft
-
 Upcycled Mason Jar Chicken Vase
- Knitting Ideas
-
 Knitted Bridger Cowl
-
 Knitted Keepsake Bag
-
 Knitted Cutie Cupcake Dolls