Craft Your Charming Crochet Bracelet

Create your own charming wrist accessory by crafting a delightful bracelet using the art of crochet. With just a few simple materials like yarn and a crochet hook, you can easily bring to life a unique and stylish piece of jewelry that will add a touch of handmade beauty to any outfit. Whether you prefer a dainty design or a bold statement piece, the possibilities are endless when it comes to crocheting bracelets. Crocheting a bracelet is not only a fun and creative way to express your style, but it also makes for a thoughtful handmade gift for friends and loved ones. So grab your crochet hook and get ready to craft a truly adorable bracelet that will be sure to turn heads wherever you go.
Materials Needed
3.75 mm hook
Yarn: I used scraps left over from projects. Naturally Caron Spa looks great with this, or if you are going for a more natural feel, organic cotton yarn also looks awesome, but you will need to up your hook accordingly.
A button
Needle and thread and a yarn needle
Stitches Used
- Chain {ch}
- Single Crochet {sc}
- Half Double Crochet {hdc}
- Double Crochet {dc}
- Skip {sk}
- Space {sp}
Simple Crochet Bracelet Pattern
Written in US Crochet Terms.
Step 1: ch 35 +2 more
Row Instructions
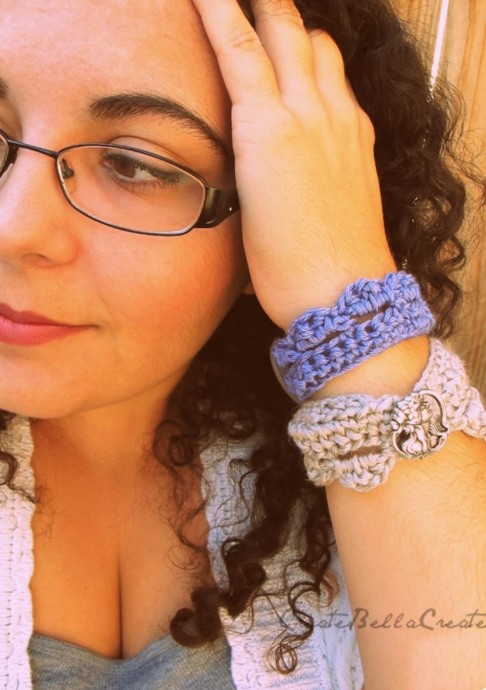
Row 1: hdc in the 2nd ch from your hook, hdc across. If you are making the bracelet that is thinner (it's the blue one in the photo above), then you will skip Row 2 and go onto Row 3.
Row 2: Ch 2 (does not count), turn, hdc in the ch 2 sp, hdc across.
Row 3: ch 1 (does not count), turn, sc in the ch 1 sp. *ch 4, sk 3, sc in the next* repeat this across and stop when there are two stitches left. You will have 8 ch 4 spaces. We are leaving the last two stitches so there is a nice spot for you to sew your button on later on.
Row 4: ch 1 (does not count), turn, sc into the 1st ch 4 sp, hdc, dc, hdc, sc into the same ch 4 sp. *sc, hdc, dc, hdc, sc* repeat this pattern in each ch 4 sp. After you do that final sc in the last ch 4 sp, you will make your loop to go over your button.
ch 4 or however big or small you need it for your button. For the blue one, I used a bigger button, so I did a ch 5, but for the tan, I had a smaller button, so I did a ch 4. You will just have to use your best judgment with your button in hand.
After you do your ch 4 for your loop, you will do a slip stitch into the bottom corner where you did your beginning chains. See the photo below so you can see what the loop looks like attached. Also, before you finish off your yarn and weave in your end, make sure your button can go through the loop. You don’t want it too easy or too hard. Somewhere in the middle is the best.
Sew on a button on the opposite end from your loop and finish off all your ends, weaving them in with a yarn needle.
I like to wear both of them together; I think it looks kind of cool and fun. I am also thinking about making one that has a little bigger of a band too and maybe a different shell type stitch around the bottom.
- Funny Pictures
-
 Hilarious Memes for Those Bored to Tears
-
 Weekly Treat of Funniest Parenting Memes for Good Laugh out Loud Right Now
-
 Really Funny Pics to End These Weekend Perfectly
- Recipes
-
 Crispy Baked Avocado Fries
-
 Scrambled Chickpea and Spinach Pitas
-
 Cinnamon Pancakes
- Lifehacks
-
 Crochet Basics: Aligned Cobble Stitch
-
 Brick Stitch Crochet Tutorial
-
 Crochet Basics: Wattle Stitch
- Crochet Ideas
-
 Crochet Snorlax Plushie Doll
-
 Crochet Beautiful Penguin Toy
-
 Crochet Tiny Snowman
- DIY
-
 DIY Santa Craft For Kids
-
 Paper Plate Angel Craft
-
 Upcycled Mason Jar Chicken Vase
- Knitting Ideas
-
 Knitted Bridger Cowl
-
 Knitted Keepsake Bag
-
 Knitted Cutie Cupcake Dolls