How to Create a Crochet Textured Dishcloth

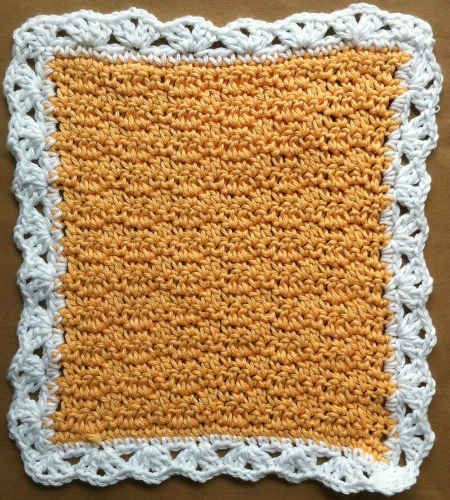
Discover the art of creating a unique and captivating Crochet Textured Dishcloth. Dive into the world of crochet and let your creativity flow as you embark on this exciting project. With just a few simple stitches and some colorful yarn, you can transform a plain dishcloth into a stunning piece of functional art. This project is the perfect opportunity to explore the endless possibilities of crochet and showcase your skills.
With a combination of different stitches and techniques, you can create a dishcloth that not only serves its purpose but also adds a touch of elegance to your kitchen. Let your imagination run wild as you experiment with various colors and textures, and watch as your creation comes to life stitch by stitch. Whether you're a seasoned crocheter or just starting out, this project is sure to bring you joy and satisfaction as you create a unique and beautiful dishcloth that will be admired by all.
Project Details
Skill: Easy
Size: About 11” square.
Materials Required
Yarn
- Worsted Weight Cotton Yarn:
- Banana – 2 oz, 100 yd (60 g, 92 m)
- White – ½ oz, 25 yd (15 g, 23 m)
Crochet Hook
Size H-8 (5.00 mm)
Gauge
6 pattern sts = 2″, 4 pattern rows = 2″.
Joining Technique
When instructed to join with sc, begin with a slip knot on the hook, insert the hook in the stitch or space indicated, yarn over and pull up a loop, yarn over and draw through both loops on the hook.
Dishcloth Instructions
Row 1: (Right Side) With Banana, ch 29, sc in 2nd ch from hook, (sc in next ch) across. (28 sc)
Row 2: Ch 1, turn, sc in first 2 sc, dc in next 2 sc, * sc in next 2 sc, dc in next 2 sc; rep from * 5 times.
Rows 3-22: Ch 1, turn, sc in first 2 dc, dc in next 2 sc, * sc in next 2 dc, dc in next 2 sc; rep from * 5 times.
Row 23: Ch 1, turn, sc in each st across. (28 sc) Finish off and weave in ends.
Edging Instructions
Rnd 1: With right side facing, join White with sc to first sc of Row 23, 2 sc in the same sc, (sc in next sc) across to last sc, 3 sc in last sc (corner), * working in sides of rows, work sc in sc rows and 2 sc in dc rows *; working in unused loops of starting ch, 3 sc in first ch, (sc in next ch) across to last ch, 3 sc in last ch; rep from * to *; join with slip stitch to first sc.
Rnd 2: Slip stitch to corner sc, ch 3, DO NOT TURN, (dc, ch 2, 2 dc) in the same st as joining, skip next 3 sc, * (2 dc, ch 2, 2 dc) in next sc, skip next 3 sc; rep from * around; join with slip stitch to first dc. Finish off and weave in ends.
- Funny Pictures
-
 Hilarious Memes for Those Bored to Tears
-
 Weekly Treat of Funniest Parenting Memes for Good Laugh out Loud Right Now
-
 Really Funny Pics to End These Weekend Perfectly
- Recipes
-
 Crispy Baked Avocado Fries
-
 Scrambled Chickpea and Spinach Pitas
-
 Cinnamon Pancakes
- Lifehacks
-
 Crochet Basics: Aligned Cobble Stitch
-
 Brick Stitch Crochet Tutorial
-
 Crochet Basics: Wattle Stitch
- Crochet Ideas
-
 Crochet Snorlax Plushie Doll
-
 Crochet Beautiful Penguin Toy
-
 Crochet Tiny Snowman
- DIY
-
 DIY Santa Craft For Kids
-
 Paper Plate Angel Craft
-
 Upcycled Mason Jar Chicken Vase
- Knitting Ideas
-
 Knitted Bridger Cowl
-
 Knitted Keepsake Bag
-
 Knitted Cutie Cupcake Dolls